Aspire one Series
Service Guide
Service guide files and updates are available
on the ACER/CSD web; for more information,
please refer to http://csd.acer.com.tw
PRINTED IN TAIWAN
Revision History
Please refer to the table below for the updates made on Aspire one Series service guide.
Date Chapter Updates
II
Copyright
Copyright © 2008 by Acer Incorporated. All rights reserved. No part of this publication may be reproduced,
transmitted, transcribed, stored in a retrieval system, or translated into any language or computer language, in
any form or by any means, electronic, mechanical, magnetic, optical, chemical, manual or otherwise, without
the prior written permission of Acer Incorporated.
Disclaimer
The information in this guide is subject to change without notice.
Acer Incorporated makes no representations or warranties, either expressed or implied, with respect to the
contents hereof and specifically disclaims any warranties of merchantability or fitness for any particular
purpose. Any Acer Incorporated software described in this manual is sold or licensed "as is". Should the
programs prove defective following their purchase, the buyer (and not Acer Incorporated, its distributor, or its
dealer) assumes the entire cost of all necessary servicing, repair, and any incidental or consequential
damages resulting from any defect in the software.
Acer is a registered trademark of Acer Corporation.
Intel is a registered trademark of Intel Corporation.
Pentium and Pentium II/III are trademarks of Intel Corporation.
Other brand and product names are trademarks and/or registered trademarks of their respective holders.
III
Conventions
The following conventions are used in this manual:
SCREEN MESSAGES Denotes actual messages that appear
on screen.
NOTE Gives bits and pieces of additional
information related to the current
topic.
WARNING Alerts you to any damage that might
result from doing or not doing specific
actions.
CAUTION Gives precautionary measures to
avoid possible hardware or software
problems.
IMPORTANT Reminds you to do specific actions
relevant to the accomplishment of
procedures.
IV
Preface
Before using this information and the product it supports, please read the following general information.
1. This Service Guide provides you with all technical information relating to the BASIC CONFIGURATION
decided for Acer's "global" product offering. To better fit local market requirements and enhance product
competitiveness, your regional office MAY have decided to extend the functionality of a machine (e.g.
add-on card, modem, or extra memory capability). These LOCALIZED FEATURES will NOT be covered
in this generic service guide. In such cases, please contact your regional offices or the responsible
personnel/channel to provide you with further technical details.
2. Please note WHEN ORDERING FRU PARTS, that you should check the most up-to-date information
available on your regional web or channel. If, for whatever reason, a part number change is made, it will
not be noted in the printed Service Guide. For ACER-AUTHORIZED SERVICE PROVIDERS, your Acer
office may have a DIFFERENT part number code to those given in the FRU list of this printed Service
Guide. You MUST use the list provided by your regional Acer office to order FRU parts for repair and
service of customer machines.
V
VI
Table of Contents
System Specifications 1
Features . . . . . . . . . . . . . . . . . . . . . . . . . . . . . . . . . . . . . . . . . . . . . . . . . . . . . . . . . . . .1
System Block Diagram . . . . . . . . . . . . . . . . . . . . . . . . . . . . . . . . . . . . . . . . . . . . . . . . .3
Your Acer Notebook tour . . . . . . . . . . . . . . . . . . . . . . . . . . . . . . . . . . . . . . . . . . . . . . .4
Front View . . . . . . . . . . . . . . . . . . . . . . . . . . . . . . . . . . . . . . . . . . . . . . . . . . . . . . .4
Closed Front View . . . . . . . . . . . . . . . . . . . . . . . . . . . . . . . . . . . . . . . . . . . . . . . . .5
Left View . . . . . . . . . . . . . . . . . . . . . . . . . . . . . . . . . . . . . . . . . . . . . . . . . . . . . . . .5
Right View . . . . . . . . . . . . . . . . . . . . . . . . . . . . . . . . . . . . . . . . . . . . . . . . . . . . . . .6
Bottom View . . . . . . . . . . . . . . . . . . . . . . . . . . . . . . . . . . . . . . . . . . . . . . . . . . . . .6
Indicators . . . . . . . . . . . . . . . . . . . . . . . . . . . . . . . . . . . . . . . . . . . . . . . . . . . . . . .7
TouchPad Basics . . . . . . . . . . . . . . . . . . . . . . . . . . . . . . . . . . . . . . . . . . . . . . . . .8
Using the Keyboard . . . . . . . . . . . . . . . . . . . . . . . . . . . . . . . . . . . . . . . . . . . . . . . . . . .9
Lock Keys and embedded numeric keypad . . . . . . . . . . . . . . . . . . . . . . . . . . . . .9
Windows Keys . . . . . . . . . . . . . . . . . . . . . . . . . . . . . . . . . . . . . . . . . . . . . . . . . .10
Hot Keys . . . . . . . . . . . . . . . . . . . . . . . . . . . . . . . . . . . . . . . . . . . . . . . . . . . . . . .11
Special Key . . . . . . . . . . . . . . . . . . . . . . . . . . . . . . . . . . . . . . . . . . . . . . . . . . . . .12
Hardware Specifications and Configurations . . . . . . . . . . . . . . . . . . . . . . . . . . . . . . .13
System Utilities 19
BIOS Setup Utility . . . . . . . . . . . . . . . . . . . . . . . . . . . . . . . . . . . . . . . . . . . . . . . . . . . .19
Navigating the BIOS Utility . . . . . . . . . . . . . . . . . . . . . . . . . . . . . . . . . . . . . . . . .19
Information . . . . . . . . . . . . . . . . . . . . . . . . . . . . . . . . . . . . . . . . . . . . . . . . . . . . .20
Main . . . . . . . . . . . . . . . . . . . . . . . . . . . . . . . . . . . . . . . . . . . . . . . . . . . . . . . . . .21
Advanced . . . . . . . . . . . . . . . . . . . . . . . . . . . . . . . . . . . . . . . . . . . . . . . . . . . . . .22
Security . . . . . . . . . . . . . . . . . . . . . . . . . . . . . . . . . . . . . . . . . . . . . . . . . . . . . . . .23
Power . . . . . . . . . . . . . . . . . . . . . . . . . . . . . . . . . . . . . . . . . . . . . . . . . . . . . . . . .26
Boot . . . . . . . . . . . . . . . . . . . . . . . . . . . . . . . . . . . . . . . . . . . . . . . . . . . . . . . . . . .28
Exit . . . . . . . . . . . . . . . . . . . . . . . . . . . . . . . . . . . . . . . . . . . . . . . . . . . . . . . . . . .29
BIOS Flash Utility . . . . . . . . . . . . . . . . . . . . . . . . . . . . . . . . . . . . . . . . . . . . . . . . . . . .30
DOS Flash Utility . . . . . . . . . . . . . . . . . . . . . . . . . . . . . . . . . . . . . . . . . . . . . . . . .31
WinFlash Utility . . . . . . . . . . . . . . . . . . . . . . . . . . . . . . . . . . . . . . . . . . . . . . . . . .33
Remove HDD/BIOS Password Utilities . . . . . . . . . . . . . . . . . . . . . . . . . . . . . . . . . . . .34
Miscellaneous Utilities . . . . . . . . . . . . . . . . . . . . . . . . . . . . . . . . . . . . . . . . . . . . .37
Machine Disassembly and Replacement 39
Disassembly Requirements . . . . . . . . . . . . . . . . . . . . . . . . . . . . . . . . . . . . . . . . . . . .39
Related Information . . . . . . . . . . . . . . . . . . . . . . . . . . . . . . . . . . . . . . . . . . . . . . .39
General Information . . . . . . . . . . . . . . . . . . . . . . . . . . . . . . . . . . . . . . . . . . . . . . . . . .40
Pre-disassembly Instructions . . . . . . . . . . . . . . . . . . . . . . . . . . . . . . . . . . . . . . .40
Disassembly Process . . . . . . . . . . . . . . . . . . . . . . . . . . . . . . . . . . . . . . . . . . . . .40
External Module Disassembly Process . . . . . . . . . . . . . . . . . . . . . . . . . . . . . . . . . . .41
External Modules Disassembly Flowchart . . . . . . . . . . . . . . . . . . . . . . . . . . . . .41
Removing the Battery Pack . . . . . . . . . . . . . . . . . . . . . . . . . . . . . . . . . . . . . . . .42
Removing the SD Dummy Card . . . . . . . . . . . . . . . . . . . . . . . . . . . . . . . . . . . . .43
Removing the Lower Covers . . . . . . . . . . . . . . . . . . . . . . . . . . . . . . . . . . . . . . . .44
Removing the Hard Disk Drive Module . . . . . . . . . . . . . . . . . . . . . . . . . . . . . . . .46
Removing the DIMM Module . . . . . . . . . . . . . . . . . . . . . . . . . . . . . . . . . . . . . . .48
Removing the WLAN Module . . . . . . . . . . . . . . . . . . . . . . . . . . . . . . . . . . . . . . .49
Main Unit Disassembly Process . . . . . . . . . . . . . . . . . . . . . . . . . . . . . . . . . . . . . . . . .51
Main Unit Disassembly Flowchart . . . . . . . . . . . . . . . . . . . . . . . . . . . . . . . . . . . .51
Removing the Keyboard . . . . . . . . . . . . . . . . . . . . . . . . . . . . . . . . . . . . . . . . . . .52
Removing the Upper Cover . . . . . . . . . . . . . . . . . . . . . . . . . . . . . . . . . . . . . . . .54
Removing the Power Board . . . . . . . . . . . . . . . . . . . . . . . . . . . . . . . . . . . . . . . .58
Removing the TouchPad Bracket . . . . . . . . . . . . . . . . . . . . . . . . . . . . . . . . . . . .60
VII
Table of Contents
Removing the LCD Module . . . . . . . . . . . . . . . . . . . . . . . . . . . . . . . . . . . . . . . . .63
Removing the RTC Battery . . . . . . . . . . . . . . . . . . . . . . . . . . . . . . . . . . . . . . . . .66
Removing the USB Board and Cable . . . . . . . . . . . . . . . . . . . . . . . . . . . . . . . . .67
Removing the Bluetooth Module . . . . . . . . . . . . . . . . . . . . . . . . . . . . . . . . . . . . .69
Removing the Mainboard and Power Cable . . . . . . . . . . . . . . . . . . . . . . . . . . . .71
Removing the Speaker Module . . . . . . . . . . . . . . . . . . . . . . . . . . . . . . . . . . . . . .74
Removing the Thermal Module . . . . . . . . . . . . . . . . . . . . . . . . . . . . . . . . . . . . . .76
LCD Module Disassembly Process . . . . . . . . . . . . . . . . . . . . . . . . . . . . . . . . . . . . . .78
LCD Module Disassembly Flowchart . . . . . . . . . . . . . . . . . . . . . . . . . . . . . . . . .78
Removing the LCD Bracket Extensions . . . . . . . . . . . . . . . . . . . . . . . . . . . . . . .79
Removing the LCD Bezel . . . . . . . . . . . . . . . . . . . . . . . . . . . . . . . . . . . . . . . . . .80
Removing the Camera Board . . . . . . . . . . . . . . . . . . . . . . . . . . . . . . . . . . . . . . .82
Removing the LCD Panel . . . . . . . . . . . . . . . . . . . . . . . . . . . . . . . . . . . . . . . . . .83
Removing the LCD Brackets and FPC Cable . . . . . . . . . . . . . . . . . . . . . . . . . . .84
Removing the Microphone Board . . . . . . . . . . . . . . . . . . . . . . . . . . . . . . . . . . . .86
Removing the Camera Cable . . . . . . . . . . . . . . . . . . . . . . . . . . . . . . . . . . . . . . .87
Removing the Antennas . . . . . . . . . . . . . . . . . . . . . . . . . . . . . . . . . . . . . . . . . . .88
LCD Module Reassembly Procedure . . . . . . . . . . . . . . . . . . . . . . . . . . . . . . . . . . . . .89
Replacing the Antennas, Camera Cable, and MIC . . . . . . . . . . . . . . . . . . . . . . .89
Replacing the LCD Cable and Brackets . . . . . . . . . . . . . . . . . . . . . . . . . . . . . . .91
Replacing the LCD Panel . . . . . . . . . . . . . . . . . . . . . . . . . . . . . . . . . . . . . . . . . .93
Replacing the Camera Module . . . . . . . . . . . . . . . . . . . . . . . . . . . . . . . . . . . . . .94
Replacing the LCD Bezel . . . . . . . . . . . . . . . . . . . . . . . . . . . . . . . . . . . . . . . . . .95
Replacing the LCD Bracket Extensions . . . . . . . . . . . . . . . . . . . . . . . . . . . . . . .97
Main Module Reassembly Procedure . . . . . . . . . . . . . . . . . . . . . . . . . . . . . . . . . . . . .98
Replacing the Thermal Module . . . . . . . . . . . . . . . . . . . . . . . . . . . . . . . . . . . . . .98
Replacing the Speaker Module . . . . . . . . . . . . . . . . . . . . . . . . . . . . . . . . . . . . . .99
Replacing the Mainboard . . . . . . . . . . . . . . . . . . . . . . . . . . . . . . . . . . . . . . . . .101
Replacing the Bluetooth Module . . . . . . . . . . . . . . . . . . . . . . . . . . . . . . . . . . . .102
Replacing the USB Board . . . . . . . . . . . . . . . . . . . . . . . . . . . . . . . . . . . . . . . . .103
Replacing the LCD Module . . . . . . . . . . . . . . . . . . . . . . . . . . . . . . . . . . . . . . . .104
Replacing the TouchPad Bracket . . . . . . . . . . . . . . . . . . . . . . . . . . . . . . . . . . .107
Replacing the Power Board . . . . . . . . . . . . . . . . . . . . . . . . . . . . . . . . . . . . . . .108
Replacing the Upper Cover . . . . . . . . . . . . . . . . . . . . . . . . . . . . . . . . . . . . . . . .109
Replacing the Keyboard . . . . . . . . . . . . . . . . . . . . . . . . . . . . . . . . . . . . . . . . . .112
Replacing the WLAN Board . . . . . . . . . . . . . . . . . . . . . . . . . . . . . . . . . . . . . . .113
Replacing the DIMM Module . . . . . . . . . . . . . . . . . . . . . . . . . . . . . . . . . . . . . . .114
Repl[acing the Hard Disk Drive Module . . . . . . . . . . . . . . . . . . . . . . . . . . . . . .114
Replacing the Lower Covers . . . . . . . . . . . . . . . . . . . . . . . . . . . . . . . . . . . . . . .115
Replacing the SD Dummy Card . . . . . . . . . . . . . . . . . . . . . . . . . . . . . . . . . . . .116
Replacing the Battery . . . . . . . . . . . . . . . . . . . . . . . . . . . . . . . . . . . . . . . . . . . .116
Troubleshooting 117
Common Problems . . . . . . . . . . . . . . . . . . . . . . . . . . . . . . . . . . . . . . . . . . . . . . . . . .117
Power On Issue . . . . . . . . . . . . . . . . . . . . . . . . . . . . . . . . . . . . . . . . . . . . . . . .118
No Display Issue . . . . . . . . . . . . . . . . . . . . . . . . . . . . . . . . . . . . . . . . . . . . . . . .119
Random Loss of BIOS Settings . . . . . . . . . . . . . . . . . . . . . . . . . . . . . . . . . . . .120
LCD Failure . . . . . . . . . . . . . . . . . . . . . . . . . . . . . . . . . . . . . . . . . . . . . . . . . . . .121
Built-In Keyboard Failure . . . . . . . . . . . . . . . . . . . . . . . . . . . . . . . . . . . . . . . . .121
TouchPad Failure . . . . . . . . . . . . . . . . . . . . . . . . . . . . . . . . . . . . . . . . . . . . . . .122
Internal Speaker Failure . . . . . . . . . . . . . . . . . . . . . . . . . . . . . . . . . . . . . . . . . .122
Internal Microphone Failure . . . . . . . . . . . . . . . . . . . . . . . . . . . . . . . . . . . . . . .124
HDD Not Operating Correctly . . . . . . . . . . . . . . . . . . . . . . . . . . . . . . . . . . . . . .125
USB Failure (Rightside) . . . . . . . . . . . . . . . . . . . . . . . . . . . . . . . . . . . . . . . . . .126
Power Button Failure . . . . . . . . . . . . . . . . . . . . . . . . . . . . . . . . . . . . . . . . . . . .126
VIII
Table of Contents
External Mouse Failure . . . . . . . . . . . . . . . . . . . . . . . . . . . . . . . . . . . . . . . . . . .127
Other Failures . . . . . . . . . . . . . . . . . . . . . . . . . . . . . . . . . . . . . . . . . . . . . . . . . .127
Intermittent Problems . . . . . . . . . . . . . . . . . . . . . . . . . . . . . . . . . . . . . . . . . . . . . . . .128
Undetermined Problems . . . . . . . . . . . . . . . . . . . . . . . . . . . . . . . . . . . . . . . . . . . . . .128
POST Code Reference Tables . . . . . . . . . . . . . . . . . . . . . . . . . . . . . . . . . . . . . . . . .129
Sec: . . . . . . . . . . . . . . . . . . . . . . . . . . . . . . . . . . . . . . . . . . . . . . . . . . . . . . . . . .129
Memory: . . . . . . . . . . . . . . . . . . . . . . . . . . . . . . . . . . . . . . . . . . . . . . . . . . . . . .129
BDS & Specific action: . . . . . . . . . . . . . . . . . . . . . . . . . . . . . . . . . . . . . . . . . . .130
Each PEIM entry point used in 80_PORT . . . . . . . . . . . . . . . . . . . . . . . . . . . . .131
Each Driver entry point used in 80_PORT . . . . . . . . . . . . . . . . . . . . . . . . . . . .131
Each SmmDriver entry point used in 80_PORT . . . . . . . . . . . . . . . . . . . . . . . .134
Jumper and Connector Locations 135
Top View . . . . . . . . . . . . . . . . . . . . . . . . . . . . . . . . . . . . . . . . . . . . . . . . . . . . . . . . . .135
Bottom View . . . . . . . . . . . . . . . . . . . . . . . . . . . . . . . . . . . . . . . . . . . . . . . . . . . . . . .136
Clearing Password Check and BIOS Recovery . . . . . . . . . . . . . . . . . . . . . . . . . . . .137
Clearing Password Check . . . . . . . . . . . . . . . . . . . . . . . . . . . . . . . . . . . . . . . . .137
BIOS Recovery by Crisis Disk . . . . . . . . . . . . . . . . . . . . . . . . . . . . . . . . . . . . .138
FRU (Field Replaceable Unit) List 139
Aspire one Exploded Diagrams . . . . . . . . . . . . . . . . . . . . . . . . . . . . . . . . . . . . . . . .140
Main Assembly . . . . . . . . . . . . . . . . . . . . . . . . . . . . . . . . . . . . . . . . . . . . . . . . .140
Upper Cover Assembly . . . . . . . . . . . . . . . . . . . . . . . . . . . . . . . . . . . . . . . . . . .141
Lower Cover Assembly . . . . . . . . . . . . . . . . . . . . . . . . . . . . . . . . . . . . . . . . . . .142
LCD Assembly . . . . . . . . . . . . . . . . . . . . . . . . . . . . . . . . . . . . . . . . . . . . . . . . .143
Aspire one FRU List . . . . . . . . . . . . . . . . . . . . . . . . . . . . . . . . . . . . . . . . . . . . .144
Screw List . . . . . . . . . . . . . . . . . . . . . . . . . . . . . . . . . . . . . . . . . . . . . . . . . . . . .157
Model Definition and Configuration 158
Aspire one Series . . . . . . . . . . . . . . . . . . . . . . . . . . . . . . . . . . . . . . . . . . . . . . . . . . .158
Test Compatible Components 211
Windows XP Environment Test . . . . . . . . . . . . . . . . . . . . . . . . . . . . . . . . . . . . . . . .212
Online Support Information 217
Index 219
IX
Table of Contents
X
Chapter 1
System Specifications
Features
Below is a brief summary of the computer’s many feature:
Operating System
• Microsoft Windows® XP™ / Linux
Platform
• Intel® Atom™ Processor N270 FSB 533/667 MHz
• Intel 945GSE + ICH7M Chipset
System Memory
• One DDRII SO-DIMM slots support up to 2GB system memory
• Adjustable 128MB UMA VGA memory share from North Bridge
Display
• 10.1” 1024 x 600
Storage subsystem
• 2.5" hard disk drive
• Multi-in-1 card reader
Audio
• REALTEK ALC272X-GR for High Definition Audio Codec
Dimensions and Weight
• 248 (W) x 169.4 (D) x 29.5 (H) mm (ME dimension)
• 995g weight with 8.9” LCD and 8GB SSD
Communication
• On-Board PCI-E 10/100 LAN
• Mini-card Wireless LAN
• Wake-on-LAN support
• 3G Module through USB
Chapter 1 1
Privacy control
• BIOS user, supervisor, and power on passwords
• Kensington lock slot
Special keys and controls
• New Acer Aspire one keyboard support
• Power button and Wireless LAN/3G switch
I/O interface
• 1 * Express card slot
• 1 * VGA port, 15 pins
• 1 * Microphone-in/Line-in
• 1 * Line-out / Headphone out
• 3 * External USB 2.0
• 1 * DC in jack
• 1 * RJ-45 jack for LAN
• 1 * Internal Digital MIC
• 1 * 5-in-1 card reader
• 1 * SD card reader
Environment
• Temperature:
• Operating: 5 °C to 35 °C
• Non-operating: -20 °C to 65 °C
• Humidity (non-condensing):
• Operating: 20% to 80%
• Non-operating: 20% to 80%
2 Chapter 1
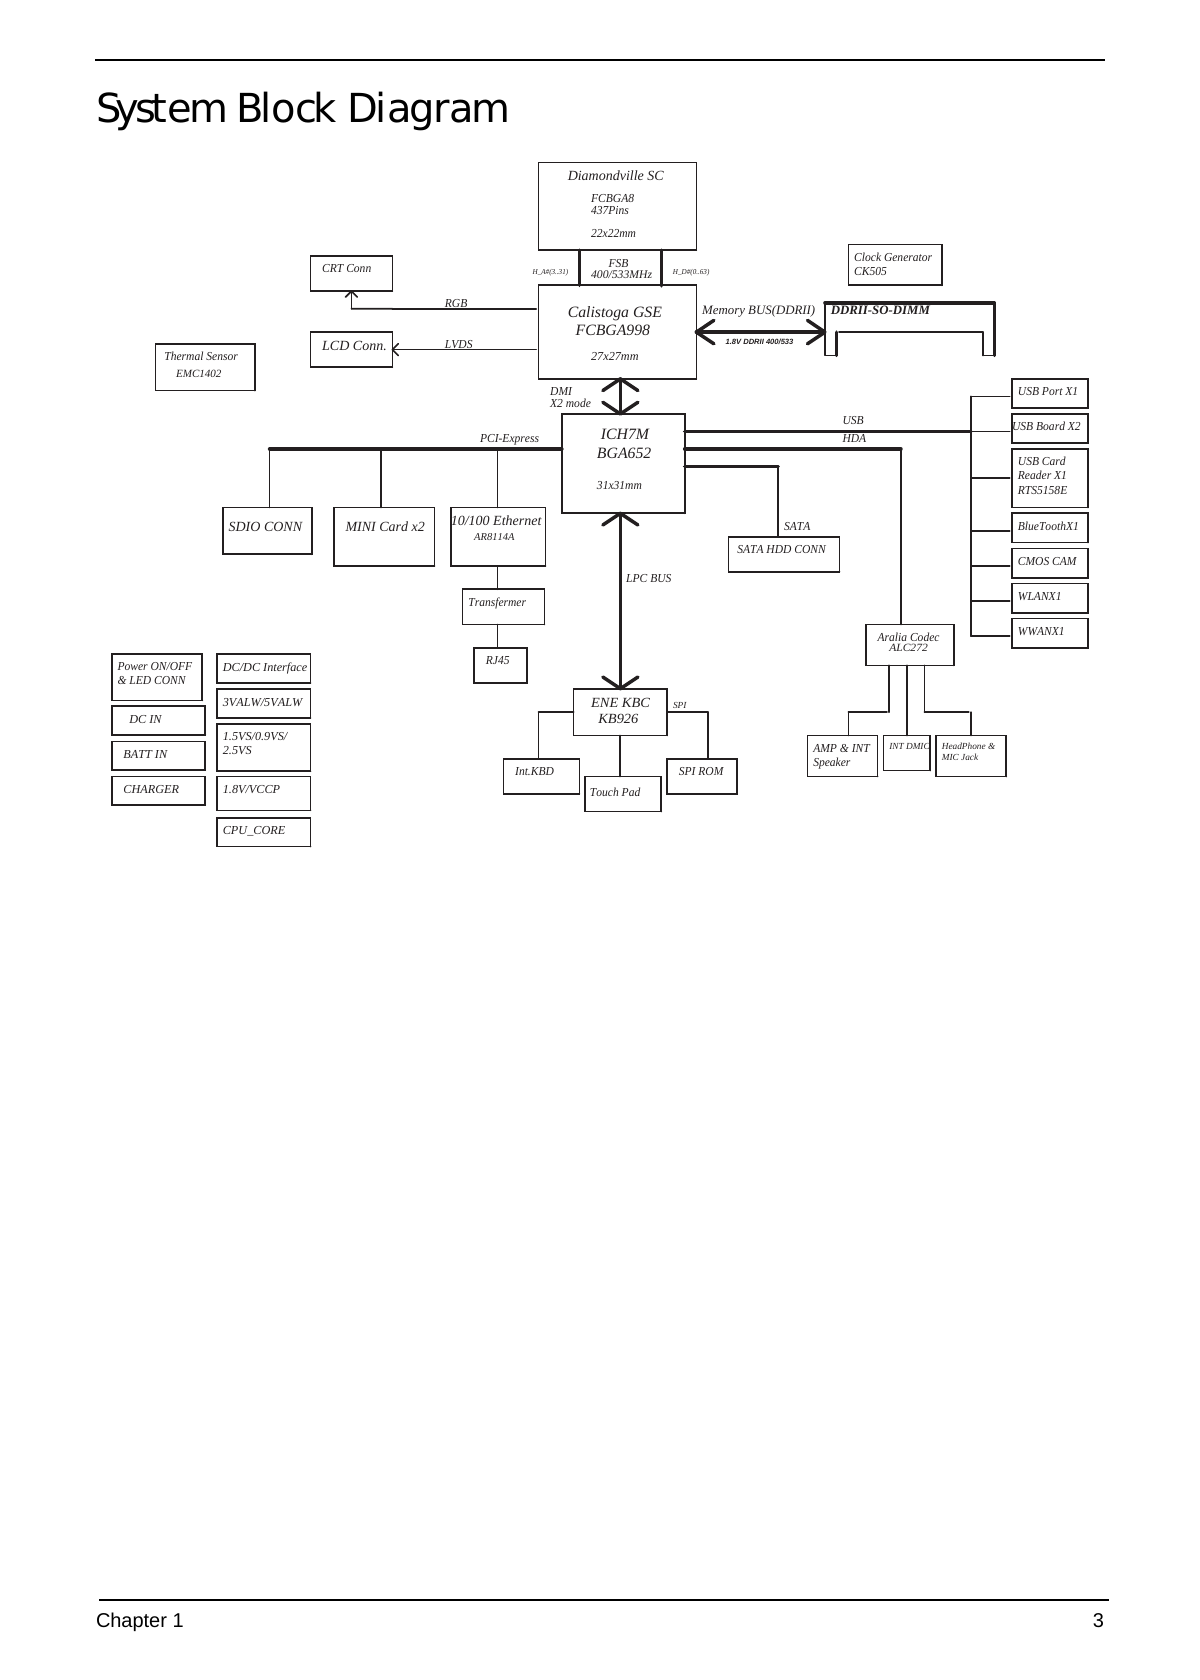
System Block Diagram
Diamondville SC
FCBGA8
437Pins
22x22mm
FSB Clock Generator
CRT Conn H_A#(3..31) 400/533MHz H_D#(0..63) CK505
RGB
Calistoga GSE Memory BUS(DDRII) DDRII-SO-DIMM
FCBGA998
1.8V DDRII 400/533
LCD Conn. LVDS
Thermal Sensor 27x27mm
EMC1402
DMI USB Port X1
X2 mode
USB USB Board X2
PCI-Express ICH7M HDA
BGA652 USB Card
Reader X1
31x31mm RTS5158E
SDIO CONN MINI Card x2 10/100 Ethernet SATA BlueToothX1
AR8114A
SATA HDD CONN
CMOS CAM
LPC BUS
Transfermer WLANX1
Aralia Codec WWANX1
ALC272
Power ON/OFF RJ45
DC/DC Interface
& LED CONN
3VALW/5VALW ENE KBC SPI
DC IN KB926
1.5VS/0.9VS/
AMP & INT INT DMIC HeadPhone &
BATT IN 2.5VS MIC Jack
Speaker
Int.KBD SPI ROM
CHARGER 1.8V/VCCP Touch Pad
CPU_CORE
Chapter 1 3
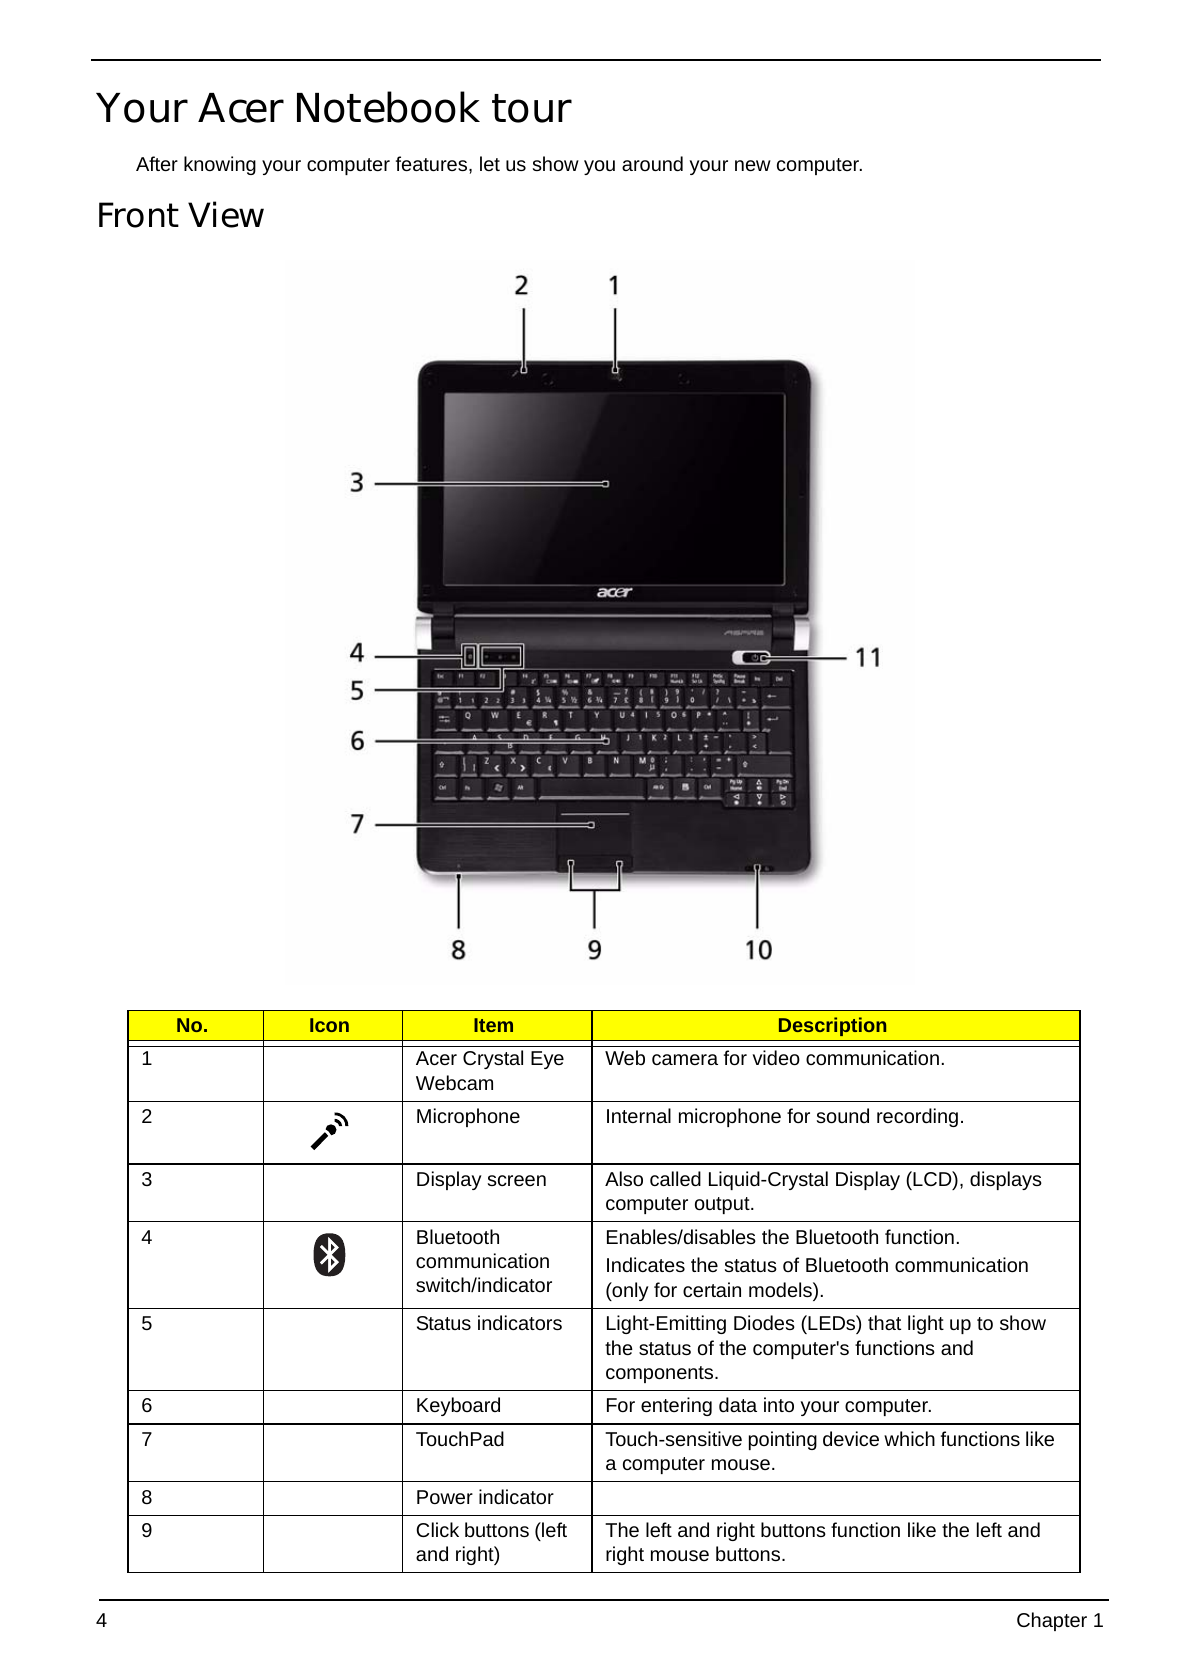
Your Acer Notebook tour
After knowing your computer features, let us show you around your new computer.
Front View
No. Icon Item Description
1 Acer Crystal Eye Web camera for video communication.
Webcam
2 Microphone Internal microphone for sound recording.
3 Display screen Also called Liquid-Crystal Display (LCD), displays
computer output.
4 Bluetooth Enables/disables the Bluetooth function.
communication Indicates the status of Bluetooth communication
switch/indicator (only for certain models).
5 Status indicators Light-Emitting Diodes (LEDs) that light up to show
the status of the computer's functions and
components.
6 Keyboard For entering data into your computer.
7 TouchPad Touch-sensitive pointing device which functions like
a computer mouse.
8 Power indicator
9 Click buttons (left The left and right buttons function like the left and
and right) right mouse buttons.
4 Chapter 1
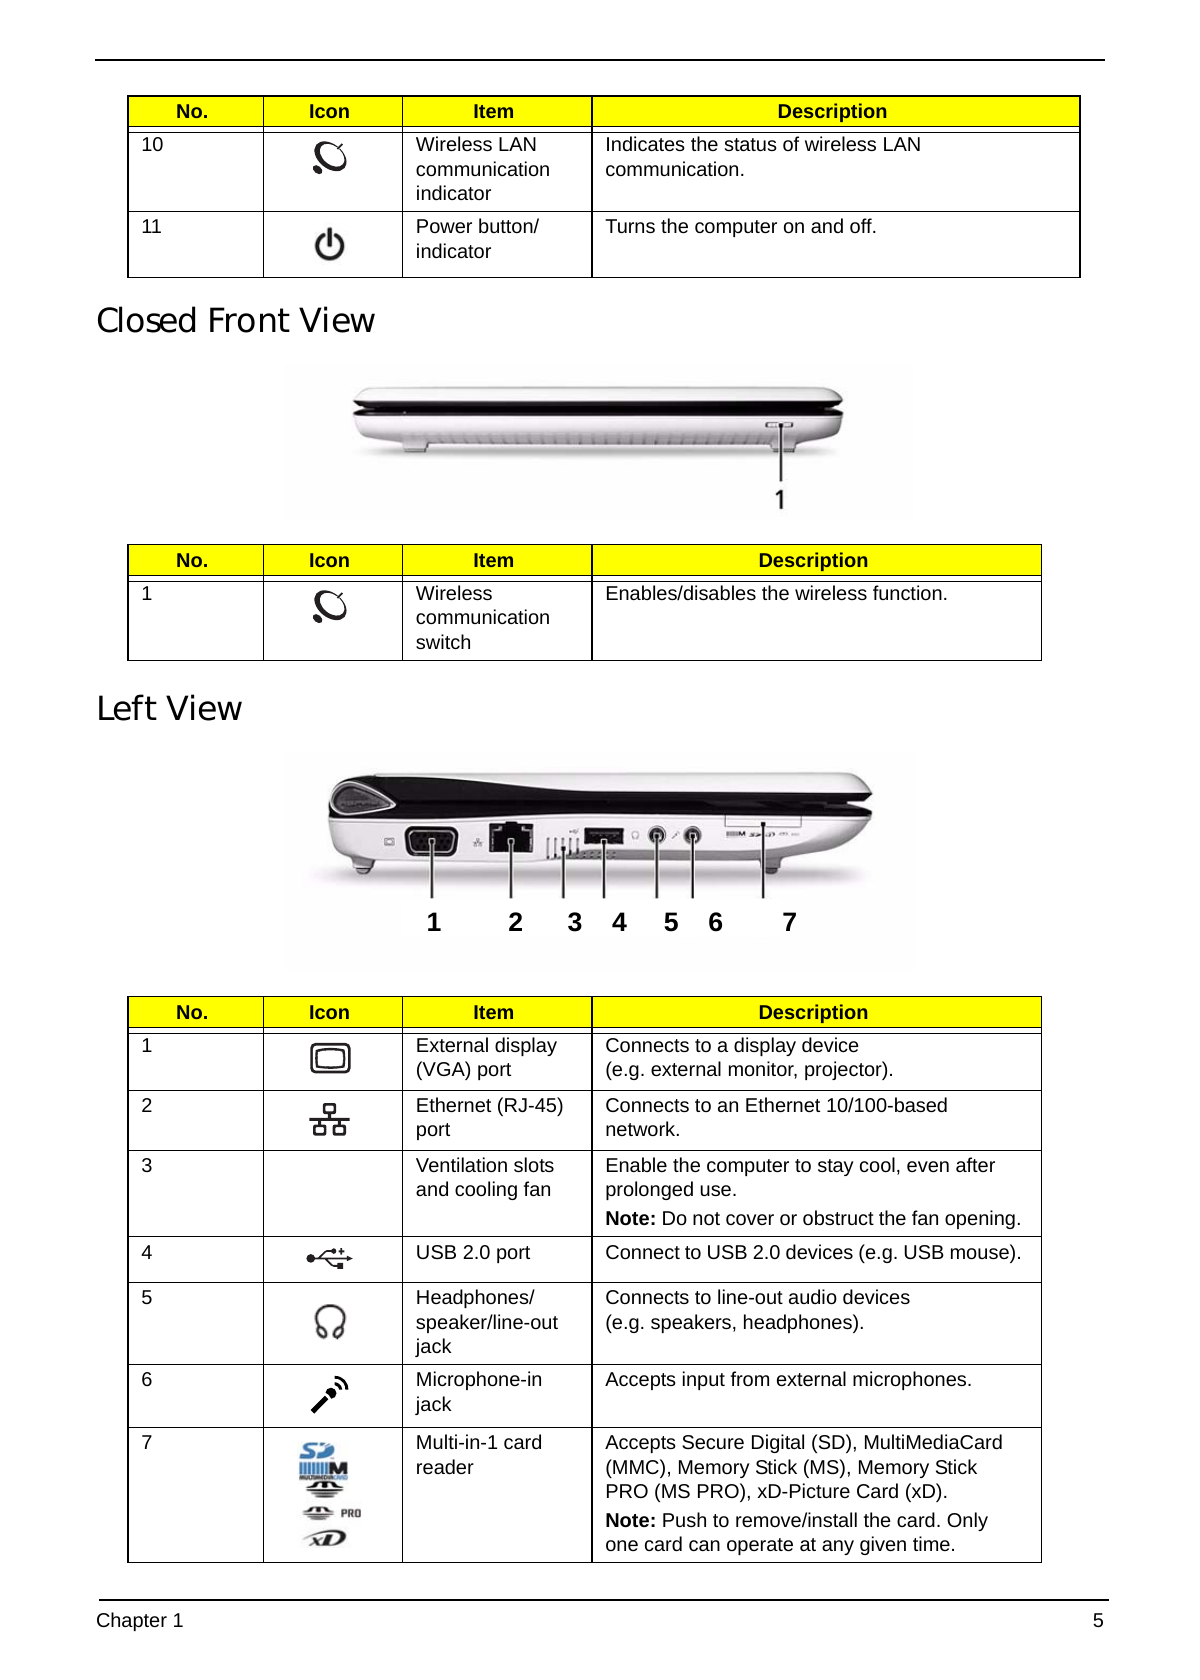
No. Icon Item Description
10 Wireless LAN Indicates the status of wireless LAN
communication communication.
indicator
11 Power button/ Turns the computer on and off.
indicator
Closed Front View
No. Icon Item Description
1 Wireless Enables/disables the wireless function.
communication
switch
Left View
1 2 3 4 5 6 7
No. Icon Item Description
1 External display Connects to a display device
(VGA) port (e.g. external monitor, projector).
2 Ethernet (RJ-45) Connects to an Ethernet 10/100-based
port network.
3 Ventilation slots Enable the computer to stay cool, even after
and cooling fan prolonged use.
Note: Do not cover or obstruct the fan opening.
4 USB 2.0 port Connect to USB 2.0 devices (e.g. USB mouse).
5 Headphones/ Connects to line-out audio devices
speaker/line-out (e.g. speakers, headphones).
jack
6 Microphone-in Accepts input from external microphones.
jack
7 Multi-in-1 card Accepts Secure Digital (SD), MultiMediaCard
reader (MMC), Memory Stick (MS), Memory Stick
PRO (MS PRO), xD-Picture Card (xD).
Note: Push to remove/install the card. Only
one card can operate at any given time.
Chapter 1 5
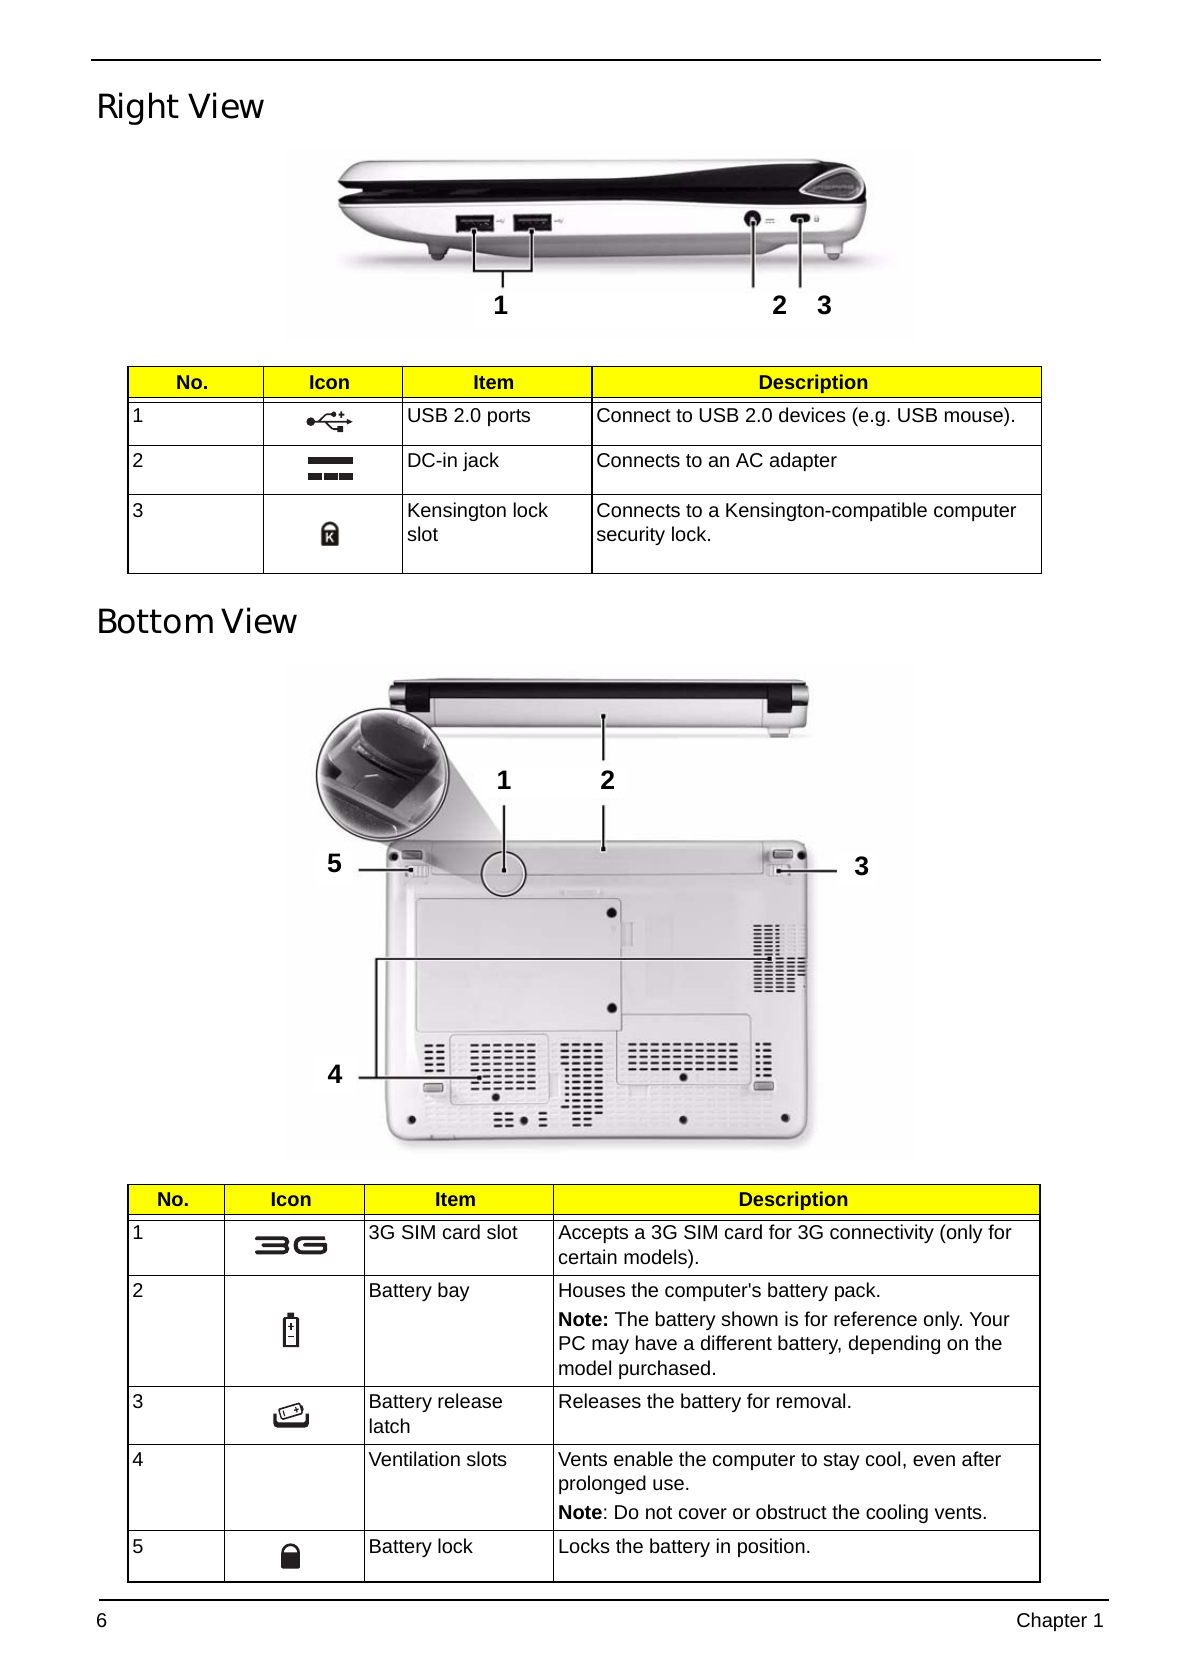
Right View
1 2 3
No. Icon Item Description
1 USB 2.0 ports Connect to USB 2.0 devices (e.g. USB mouse).
2 DC-in jack Connects to an AC adapter
3 Kensington lock Connects to a Kensington-compatible computer
slot security lock.
Bottom View
1 2
5 3
4
No. Icon Item Description
1 3G SIM card slot Accepts a 3G SIM card for 3G connectivity (only for
certain models).
2 Battery bay Houses the computer's battery pack.
Note: The battery shown is for reference only. Your
PC may have a different battery, depending on the
model purchased.
3 Battery release Releases the battery for removal.
latch
4 Ventilation slots Vents enable the computer to stay cool, even after
prolonged use.
Note: Do not cover or obstruct the cooling vents.
5 Battery lock Locks the battery in position.
6 Chapter 1
Indicators
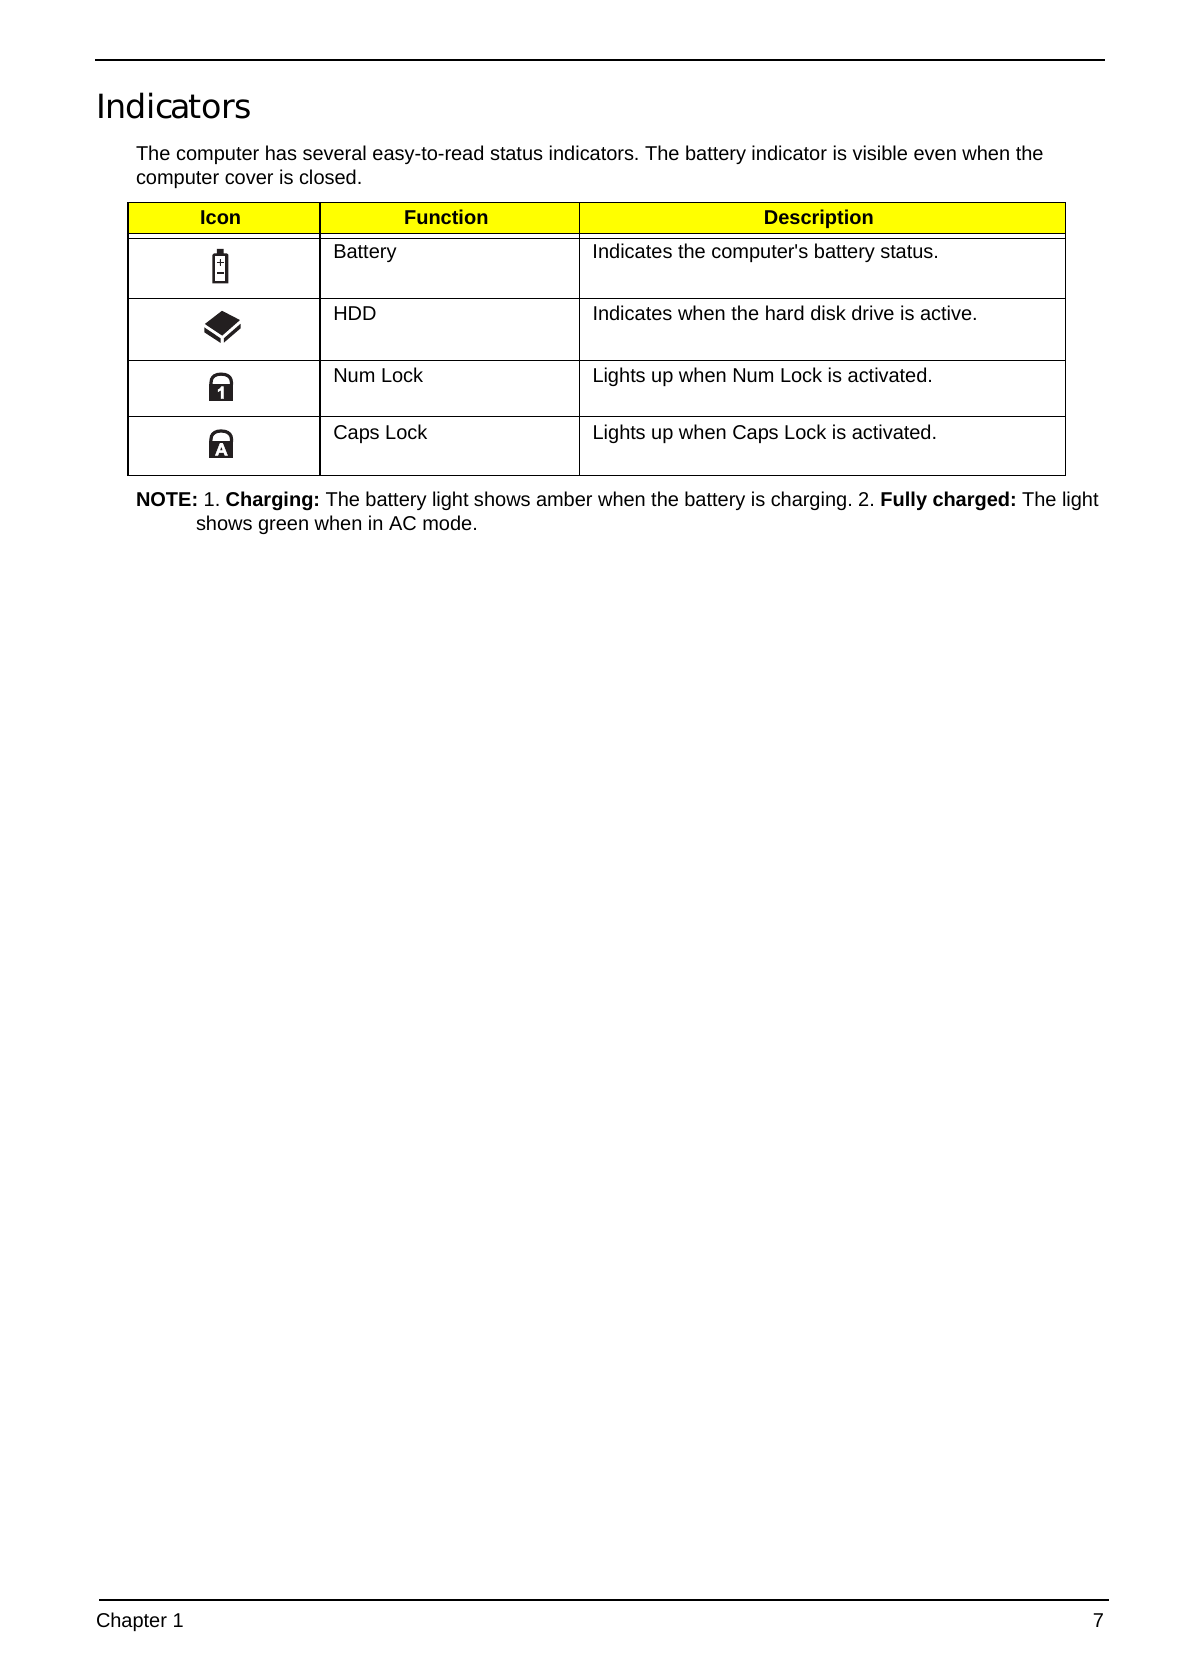
The computer has several easy-to-read status indicators. The battery indicator is visible even when the
computer cover is closed.
Icon Function Description
Battery Indicates the computer's battery status.
HDD Indicates when the hard disk drive is active.
Num Lock Lights up when Num Lock is activated.
Caps Lock Lights up when Caps Lock is activated.
NOTE: 1. Charging: The battery light shows amber when the battery is charging. 2. Fully charged: The light
shows green when in AC mode.
Chapter 1 7
TouchPad Basics
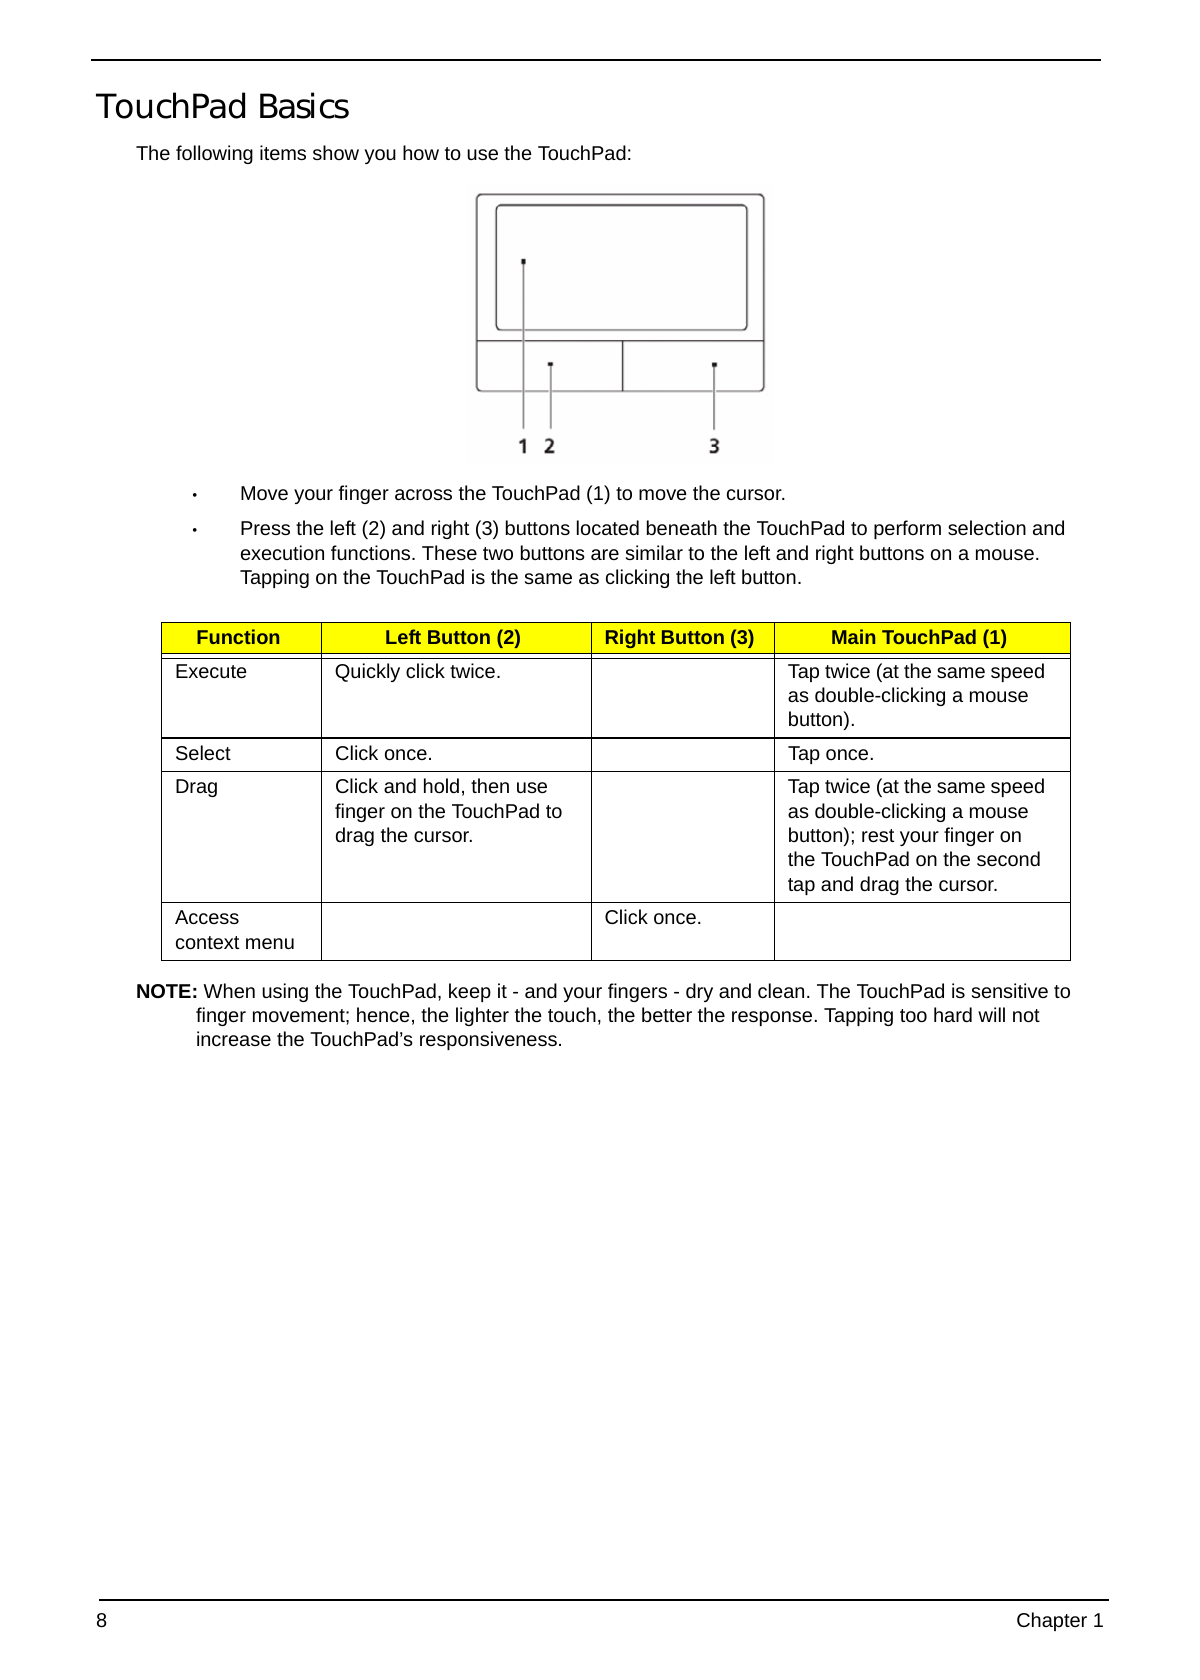
The following items show you how to use the TouchPad:
• Move your finger across the TouchPad (1) to move the cursor.
• Press the left (2) and right (3) buttons located beneath the TouchPad to perform selection and
execution functions. These two buttons are similar to the left and right buttons on a mouse.
Tapping on the TouchPad is the same as clicking the left button.
Function Left Button (2) Right Button (3) Main TouchPad (1)
Execute Quickly click twice. Tap twice (at the same speed
as double-clicking a mouse
button).
Select Click once. Tap once.
Drag Click and hold, then use Tap twice (at the same speed
finger on the TouchPad to as double-clicking a mouse
drag the cursor. button); rest your finger on
the TouchPad on the second
tap and drag the cursor.
Access Click once.
context menu
NOTE: When using the TouchPad, keep it - and your fingers - dry and clean. The TouchPad is sensitive to
finger movement; hence, the lighter the touch, the better the response. Tapping too hard will not
increase the TouchPad’s responsiveness.
8 Chapter 1
Using the Keyboard
Your Aspire one has a close-to-full-sized keyboard and an embedded numeric keypad, separate cursor, lock,
function and special keys.
Lock Keys and embedded numeric keypad
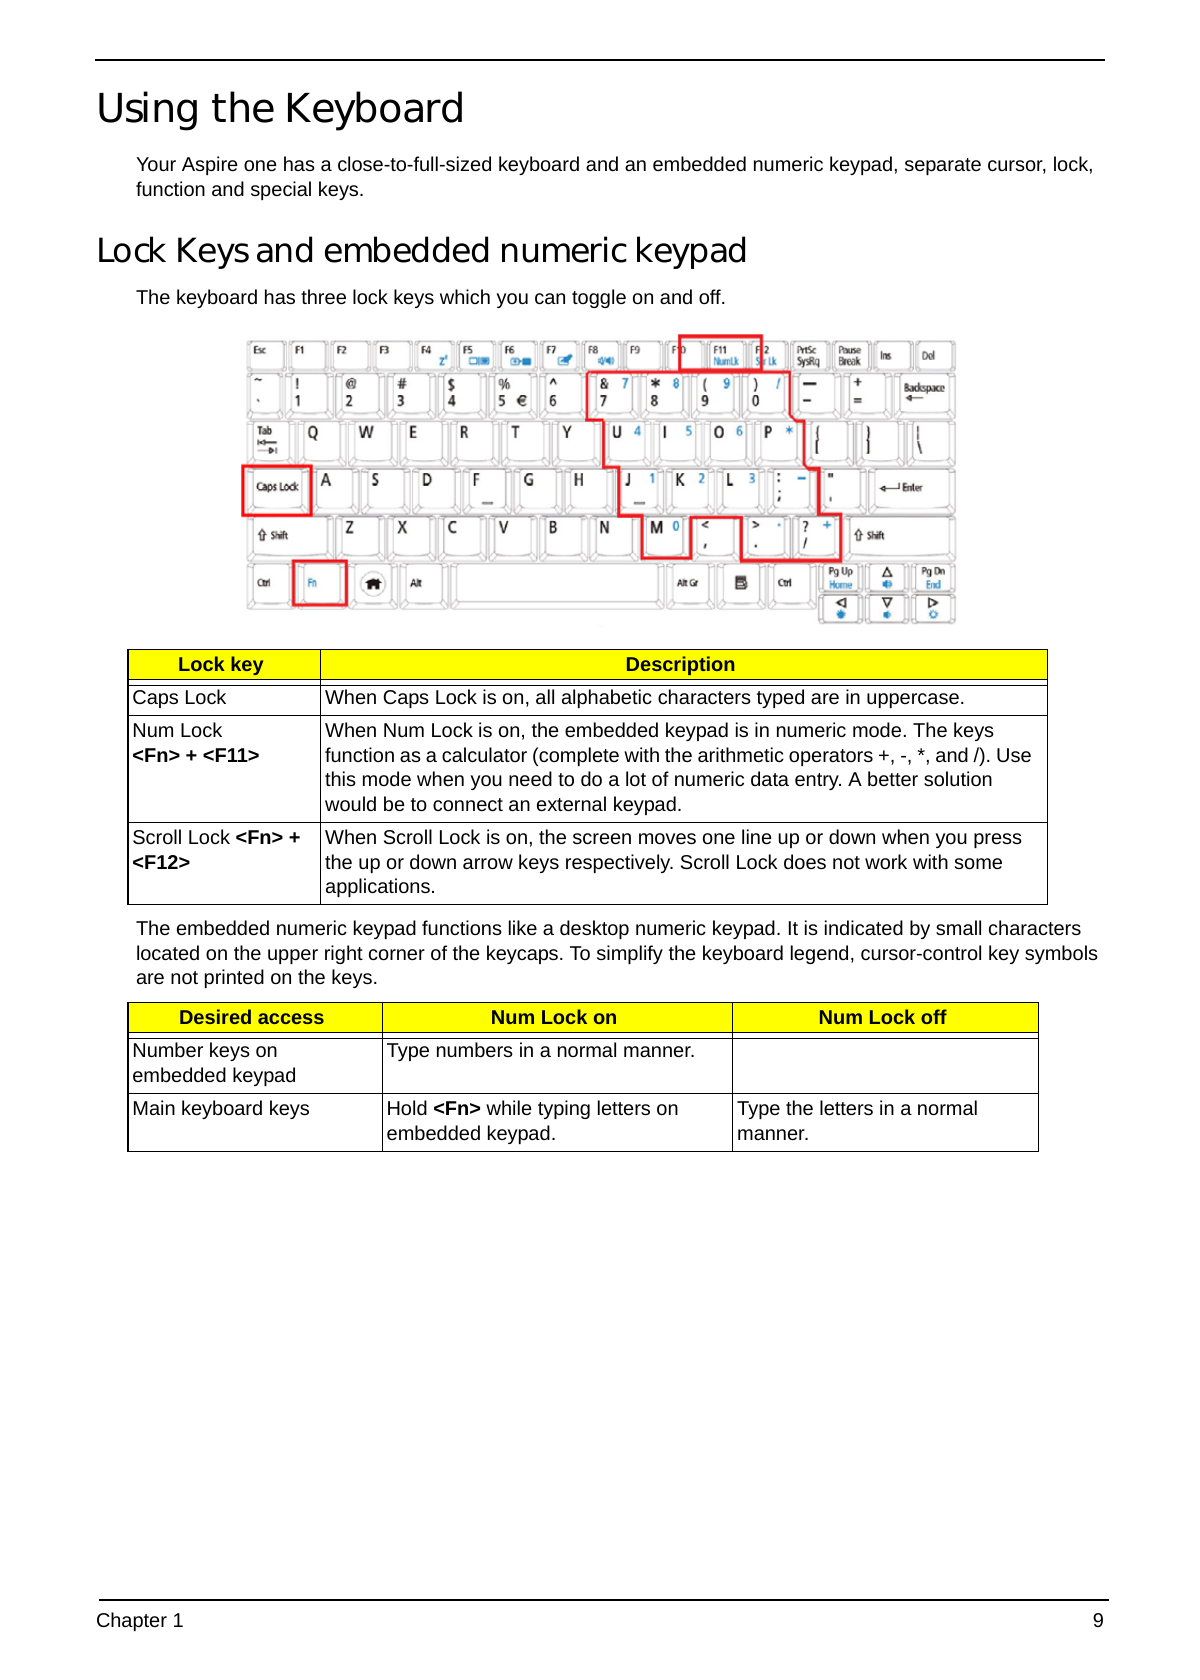
The keyboard has three lock keys which you can toggle on and off.
Lock key Description
Caps Lock When Caps Lock is on, all alphabetic characters typed are in uppercase.
Num Lock When Num Lock is on, the embedded keypad is in numeric mode. The keys
+ function as a calculator (complete with the arithmetic operators +, -, *, and /). Use
this mode when you need to do a lot of numeric data entry. A better solution
would be to connect an external keypad.
Scroll Lock + When Scroll Lock is on, the screen moves one line up or down when you press
the up or down arrow keys respectively. Scroll Lock does not work with some
applications.
The embedded numeric keypad functions like a desktop numeric keypad. It is indicated by small characters
located on the upper right corner of the keycaps. To simplify the keyboard legend, cursor-control key symbols
are not printed on the keys.
Desired access Num Lock on Num Lock off
Number keys on Type numbers in a normal manner.
embedded keypad
Main keyboard keys Hold while typing letters on Type the letters in a normal
embedded keypad. manner.
Chapter 1 9
Windows Keys
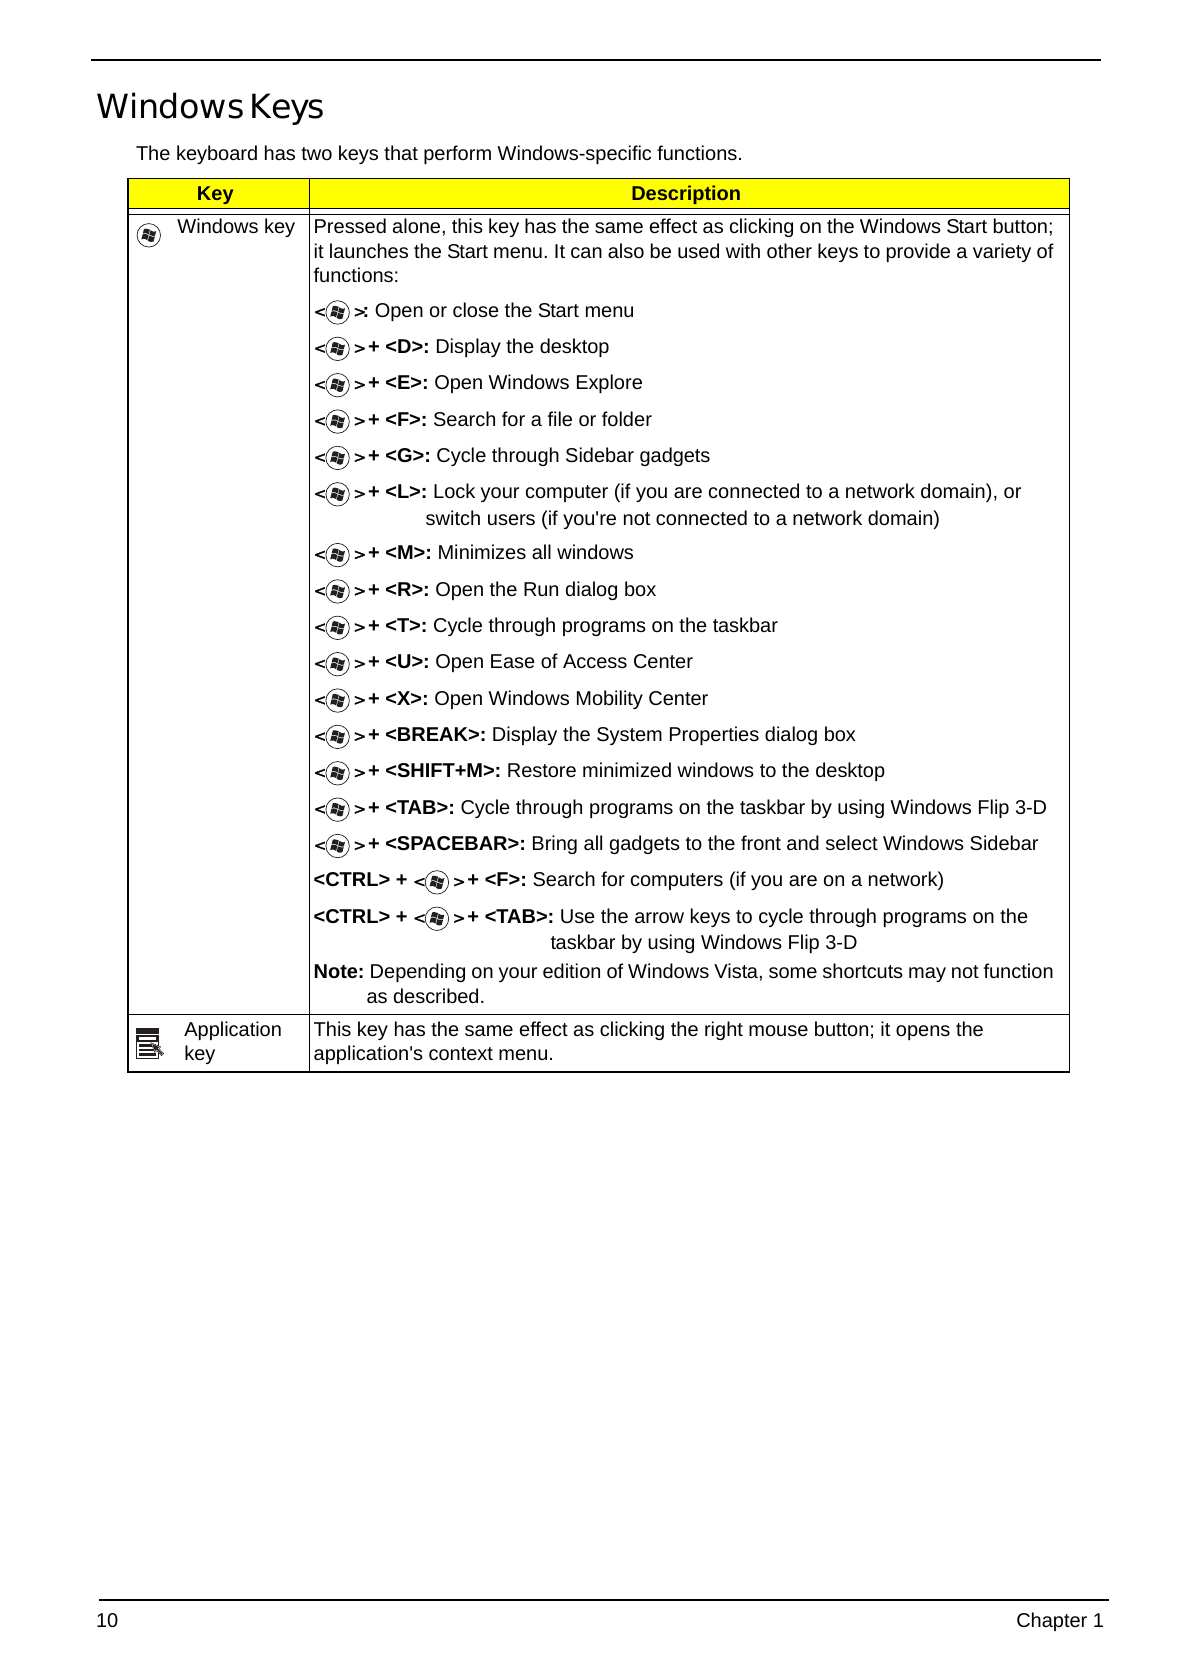
The keyboard has two keys that perform Windows-specific functions.
Key Description
Windows key Pressed alone, this key has the same effect as clicking on the Windows Start button;
it launches the Start menu. It can also be used with other keys to provide a variety of
functions:
< >: Open or close the Start menu
< > + : Display the desktop
< > + : Open Windows Explore
< > + : Search for a file or folder
< > + : Cycle through Sidebar gadgets
< > + : Lock your computer (if you are connected to a network domain), or
switch users (if you're not connected to a network domain)
< > + : Minimizes all windows
< > + : Open the Run dialog box
< > + : Cycle through programs on the taskbar
< > + : Open Ease of Access Center
< > + : Open Windows Mobility Center
< > + : Display the System Properties dialog box
< > + : Restore minimized windows to the desktop
< > + : Cycle through programs on the taskbar by using Windows Flip 3-D
< > + : Bring all gadgets to the front and select Windows Sidebar
+ < > + : Search for computers (if you are on a network)
+ < > + : Use the arrow keys to cycle through programs on the
taskbar by using Windows Flip 3-D
Note: Depending on your edition of Windows Vista, some shortcuts may not function
as described.
Application This key has the same effect as clicking the right mouse button; it opens the
key application's context menu.
10 Chapter 1
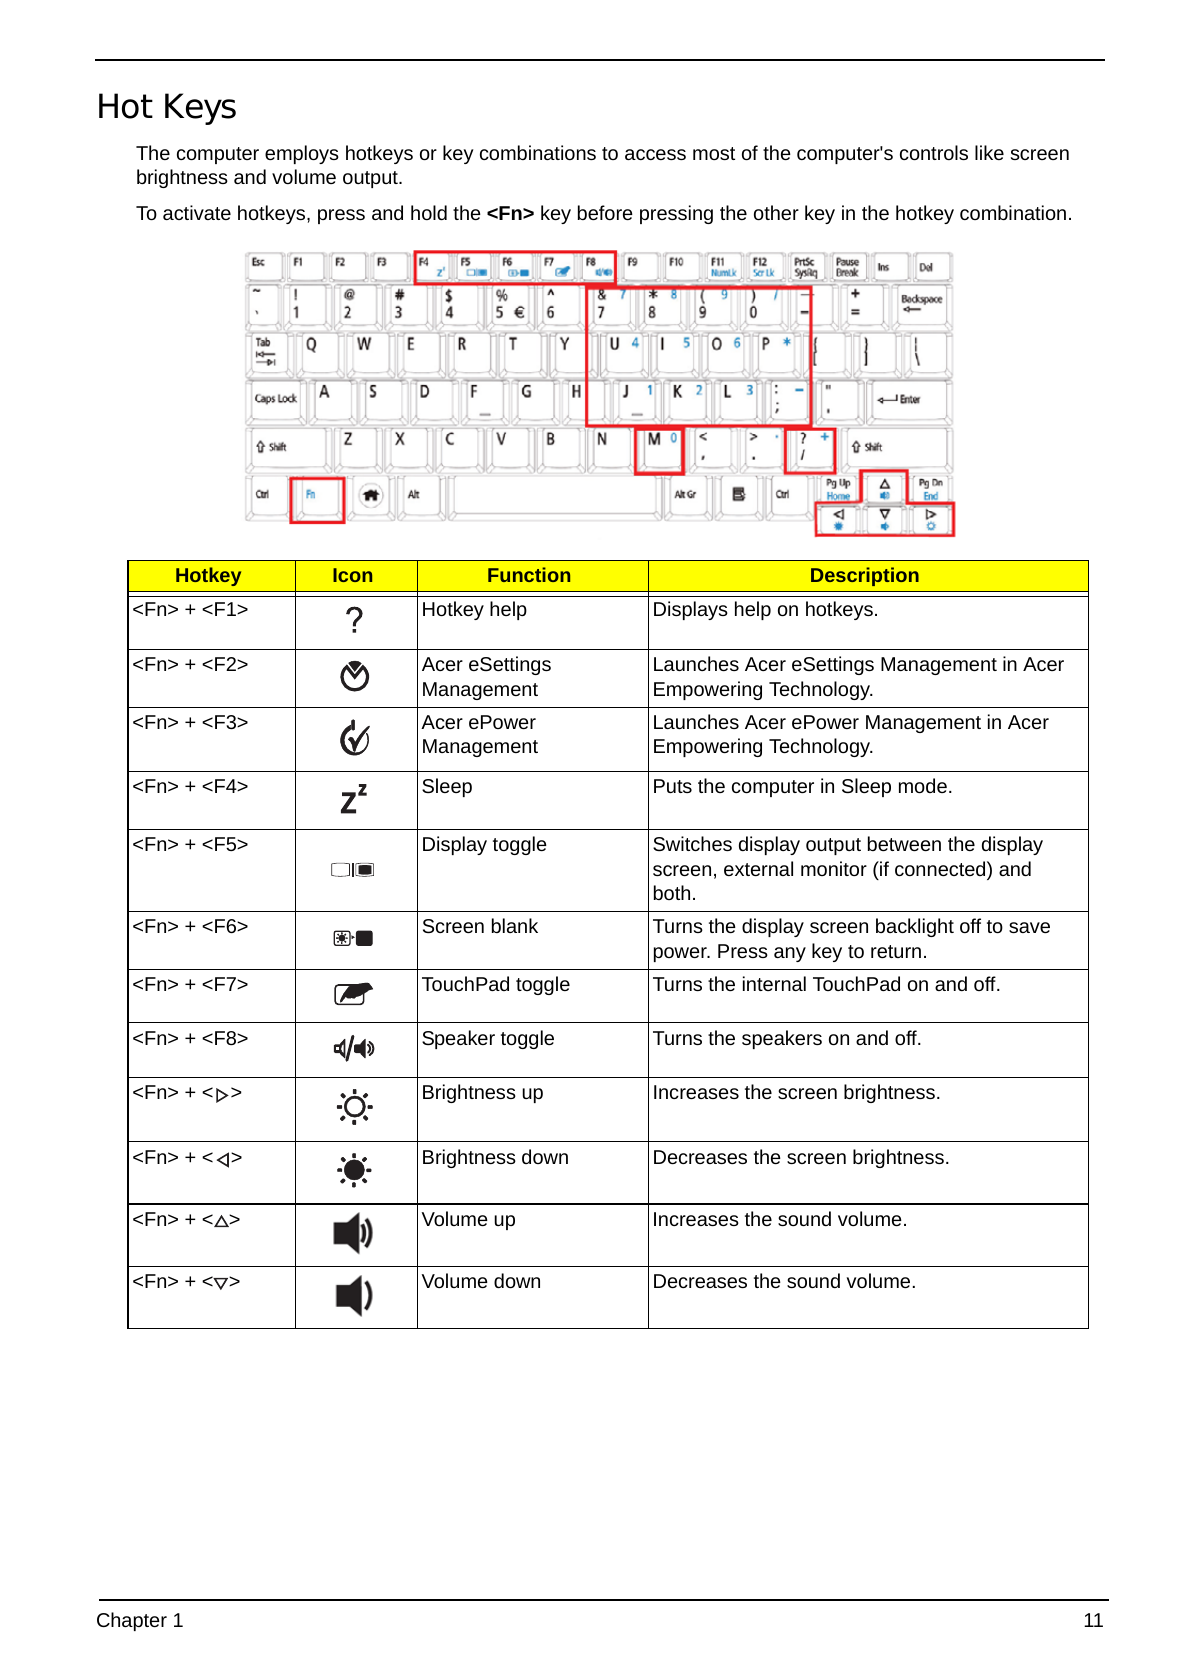
Hot Keys
The computer employs hotkeys or key combinations to access most of the computer's controls like screen
brightness and volume output.
To activate hotkeys, press and hold the key before pressing the other key in the hotkey combination.
Hotkey Icon Function Description
+ Hotkey help Displays help on hotkeys.
+ Acer eSettings Launches Acer eSettings Management in Acer
Management Empowering Technology.
+ Acer ePower Launches Acer ePower Management in Acer
Management Empowering Technology.
+ Sleep Puts the computer in Sleep mode.
+ Display toggle Switches display output between the display
screen, external monitor (if connected) and
both.
+ Screen blank Turns the display screen backlight off to save
power. Press any key to return.
+ TouchPad toggle Turns the internal TouchPad on and off.
+ Speaker toggle Turns the speakers on and off.
+ < > Brightness up Increases the screen brightness.
+ < > Brightness down Decreases the screen brightness.
+ < > Volume up Increases the sound volume.
+ < > Volume down Decreases the sound volume.
Chapter 1 11
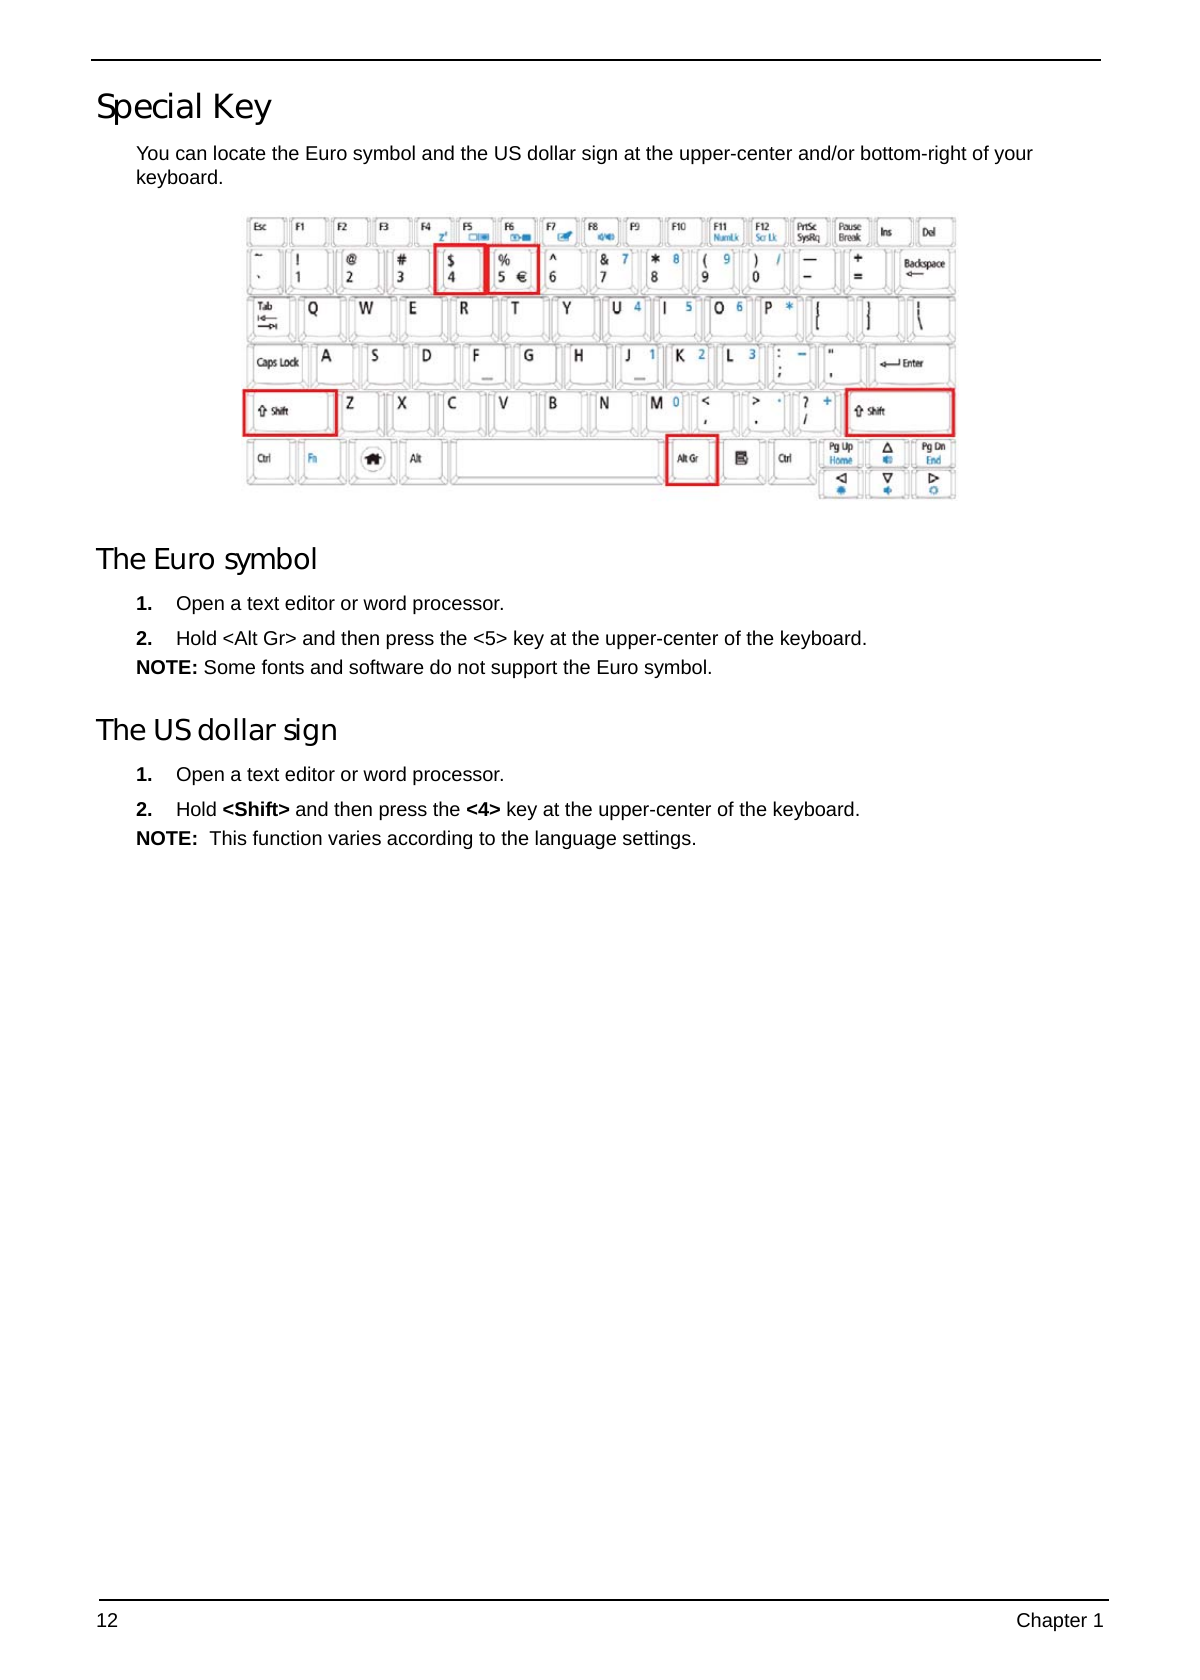
Special Key
You can locate the Euro symbol and the US dollar sign at the upper-center and/or bottom-right of your
keyboard.
The Euro symbol
1. Open a text editor or word processor.
2. Hold and then press the <5> key at the upper-center of the keyboard.
NOTE: Some fonts and software do not support the Euro symbol.
The US dollar sign
1. Open a text editor or word processor.
2. Hold and then press the <4> key at the upper-center of the keyboard.
NOTE: This function varies according to the language settings.
12 Chapter 1
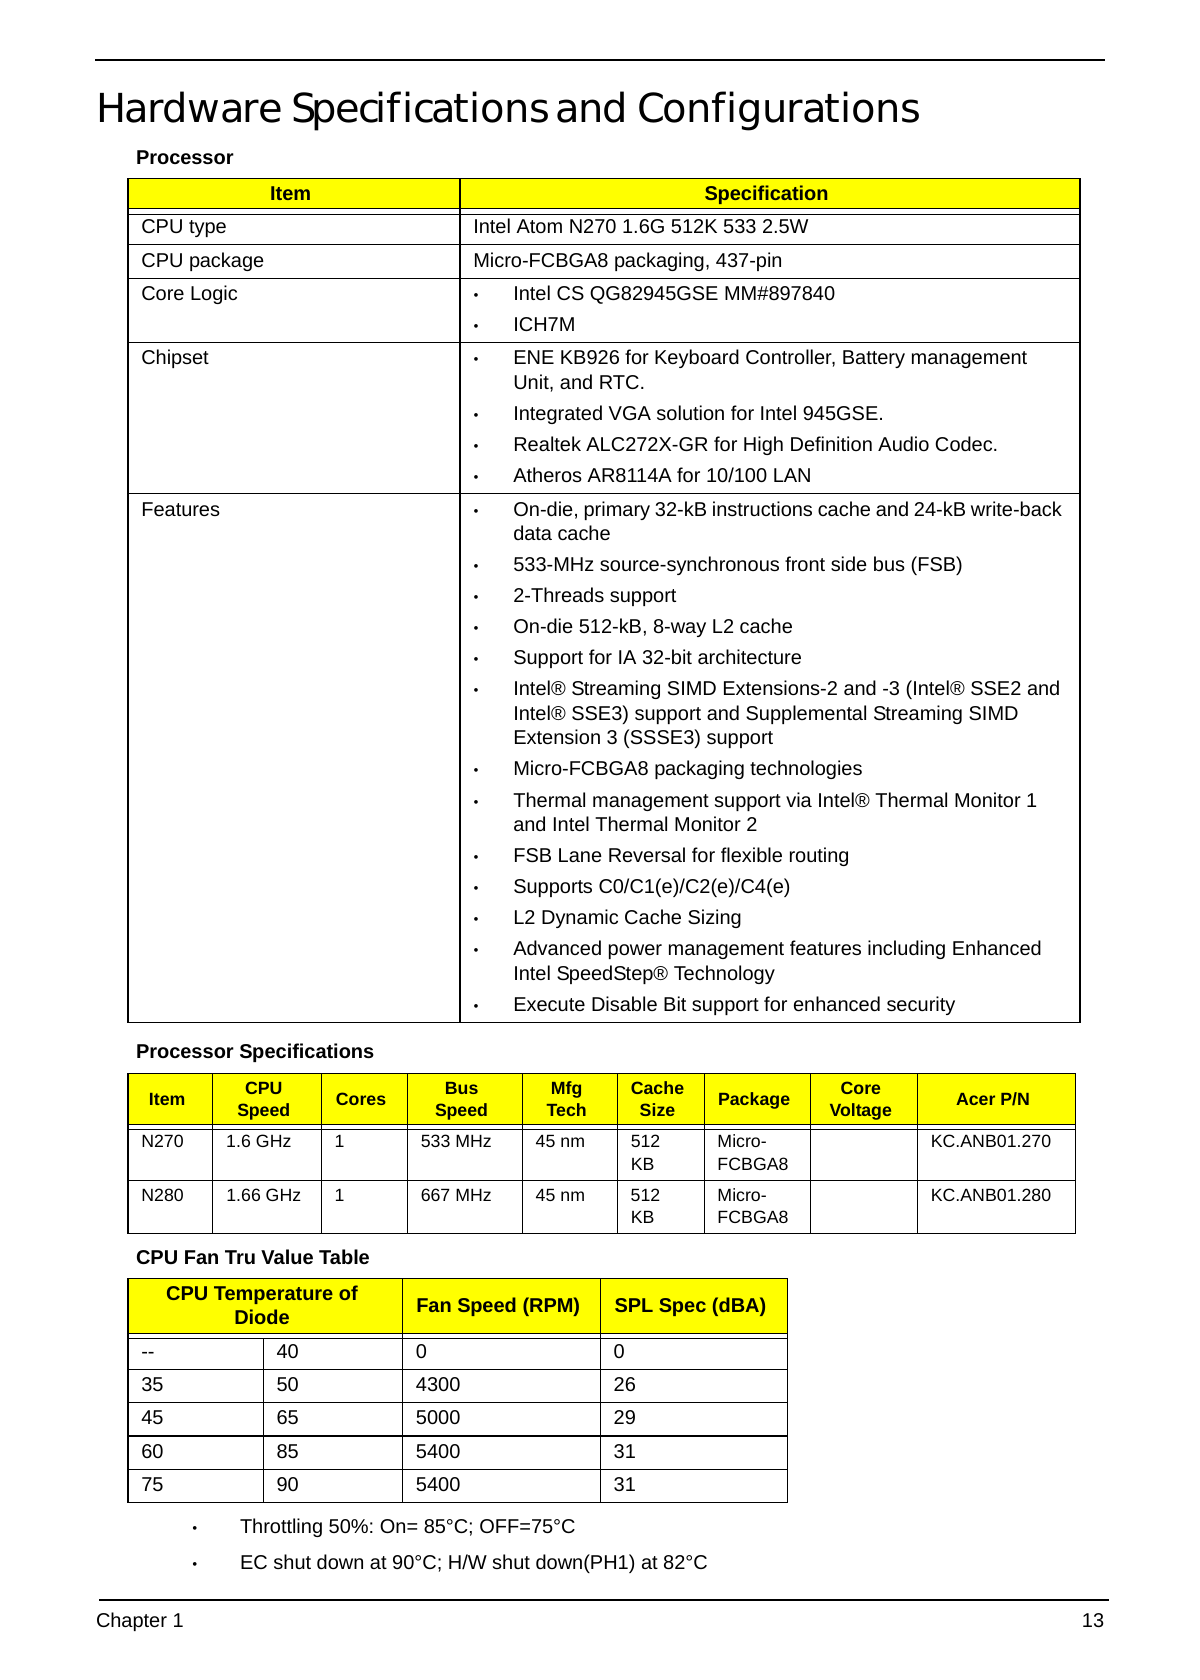
Hardware Specifications and Configurations
Processor
Item Specification
CPU type Intel Atom N270 1.6G 512K 533 2.5W
CPU package Micro-FCBGA8 packaging, 437-pin
Core Logic • Intel CS QG82945GSE MM#897840
• ICH7M
Chipset • ENE KB926 for Keyboard Controller, Battery management
Unit, and RTC.
• Integrated VGA solution for Intel 945GSE.
• Realtek ALC272X-GR for High Definition Audio Codec.
• Atheros AR8114A for 10/100 LAN
Features • On-die, primary 32-kB instructions cache and 24-kB write-back
data cache
• 533-MHz source-synchronous front side bus (FSB)
• 2-Threads support
• On-die 512-kB, 8-way L2 cache
• Support for IA 32-bit architecture
• Intel® Streaming SIMD Extensions-2 and -3 (Intel® SSE2 and
Intel® SSE3) support and Supplemental Streaming SIMD
Extension 3 (SSSE3) support
• Micro-FCBGA8 packaging technologies
• Thermal management support via Intel® Thermal Monitor 1
and Intel Thermal Monitor 2
• FSB Lane Reversal for flexible routing
• Supports C0/C1(e)/C2(e)/C4(e)
• L2 Dynamic Cache Sizing
• Advanced power management features including Enhanced
Intel SpeedStep® Technology
• Execute Disable Bit support for enhanced security
Processor Specifications
CPU Bus Mfg Cache Core
Item Cores Package Acer P/N
Speed Speed Tech Size Voltage
N270 1.6 GHz 1 533 MHz 45 nm 512 Micro- KC.ANB01.270
KB FCBGA8
N280 1.66 GHz 1 667 MHz 45 nm 512 Micro- KC.ANB01.280
KB FCBGA8
CPU Fan Tru Value Table
CPU Temperature of
Fan Speed (RPM) SPL Spec (dBA)
Diode
-- 40 0 0
35 50 4300 26
45 65 5000 29
60 85 5400 31
75 90 5400 31
• Throttling 50%: On= 85°C; OFF=75°C
• EC shut down at 90°C; H/W shut down(PH1) at 82°C
Chapter 1 13
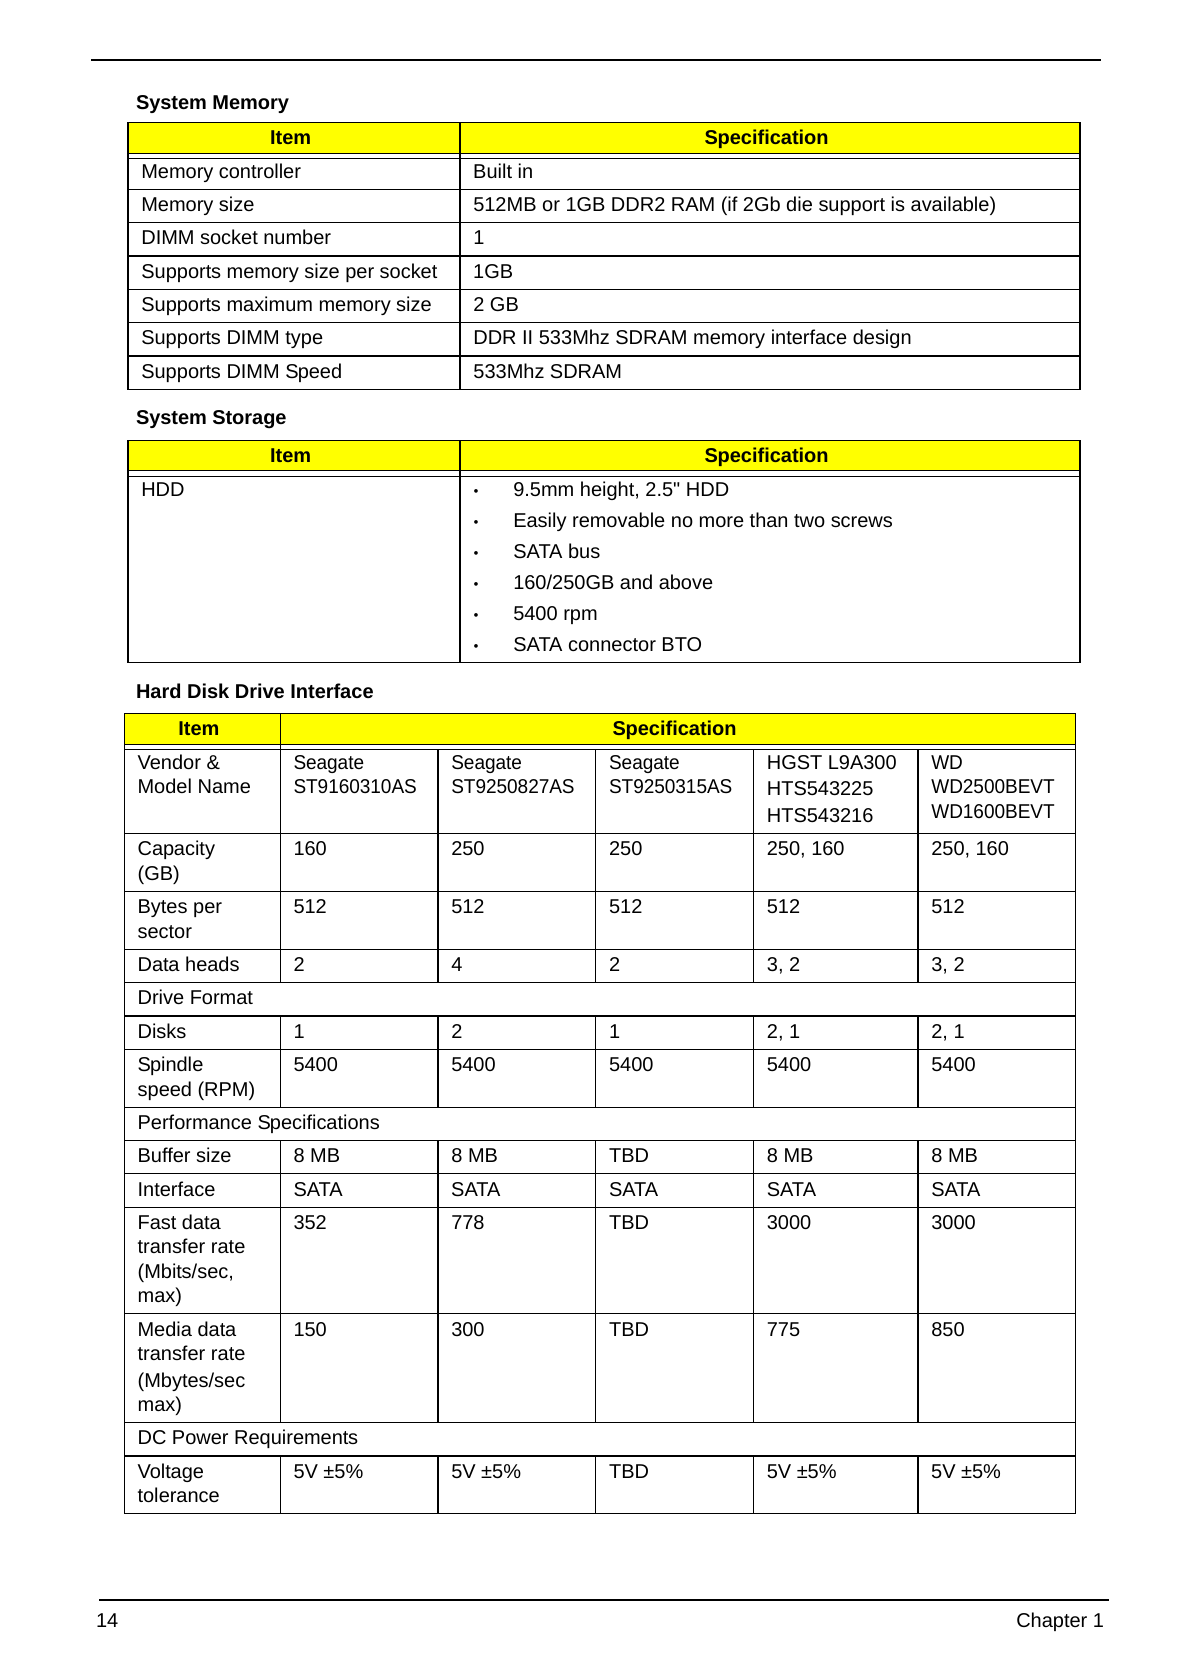
System Memory
Item Specification
Memory controller Built in
Memory size 512MB or 1GB DDR2 RAM (if 2Gb die support is available)
DIMM socket number 1
Supports memory size per socket 1GB
Supports maximum memory size 2 GB
Supports DIMM type DDR II 533Mhz SDRAM memory interface design
Supports DIMM Speed 533Mhz SDRAM
System Storage
Item Specification
HDD • 9.5mm height, 2.5" HDD
• Easily removable no more than two screws
• SATA bus
• 160/250GB and above
• 5400 rpm
• SATA connector BTO
Hard Disk Drive Interface
Item Specification
Vendor & Seagate Seagate Seagate HGST L9A300 WD
Model Name ST9160310AS ST9250827AS ST9250315AS HTS543225 WD2500BEVT
HTS543216 WD1600BEVT
Capacity 160 250 250 250, 160 250, 160
(GB)
Bytes per 512 512 512 512 512
sector
Data heads 2 4 2 3, 2 3, 2
Drive Format
Disks 1 2 1 2, 1 2, 1
Spindle 5400 5400 5400 5400 5400
speed (RPM)
Performance Specifications
Buffer size 8 MB 8 MB TBD 8 MB 8 MB
Interface SATA SATA SATA SATA SATA
Fast data 352 778 TBD 3000 3000
transfer rate
(Mbits/sec,
max)
Media data 150 300 TBD 775 850
transfer rate
(Mbytes/sec
max)
DC Power Requirements
Voltage 5V ±5% 5V ±5% TBD 5V ±5% 5V ±5%
tolerance
14 Chapter 1
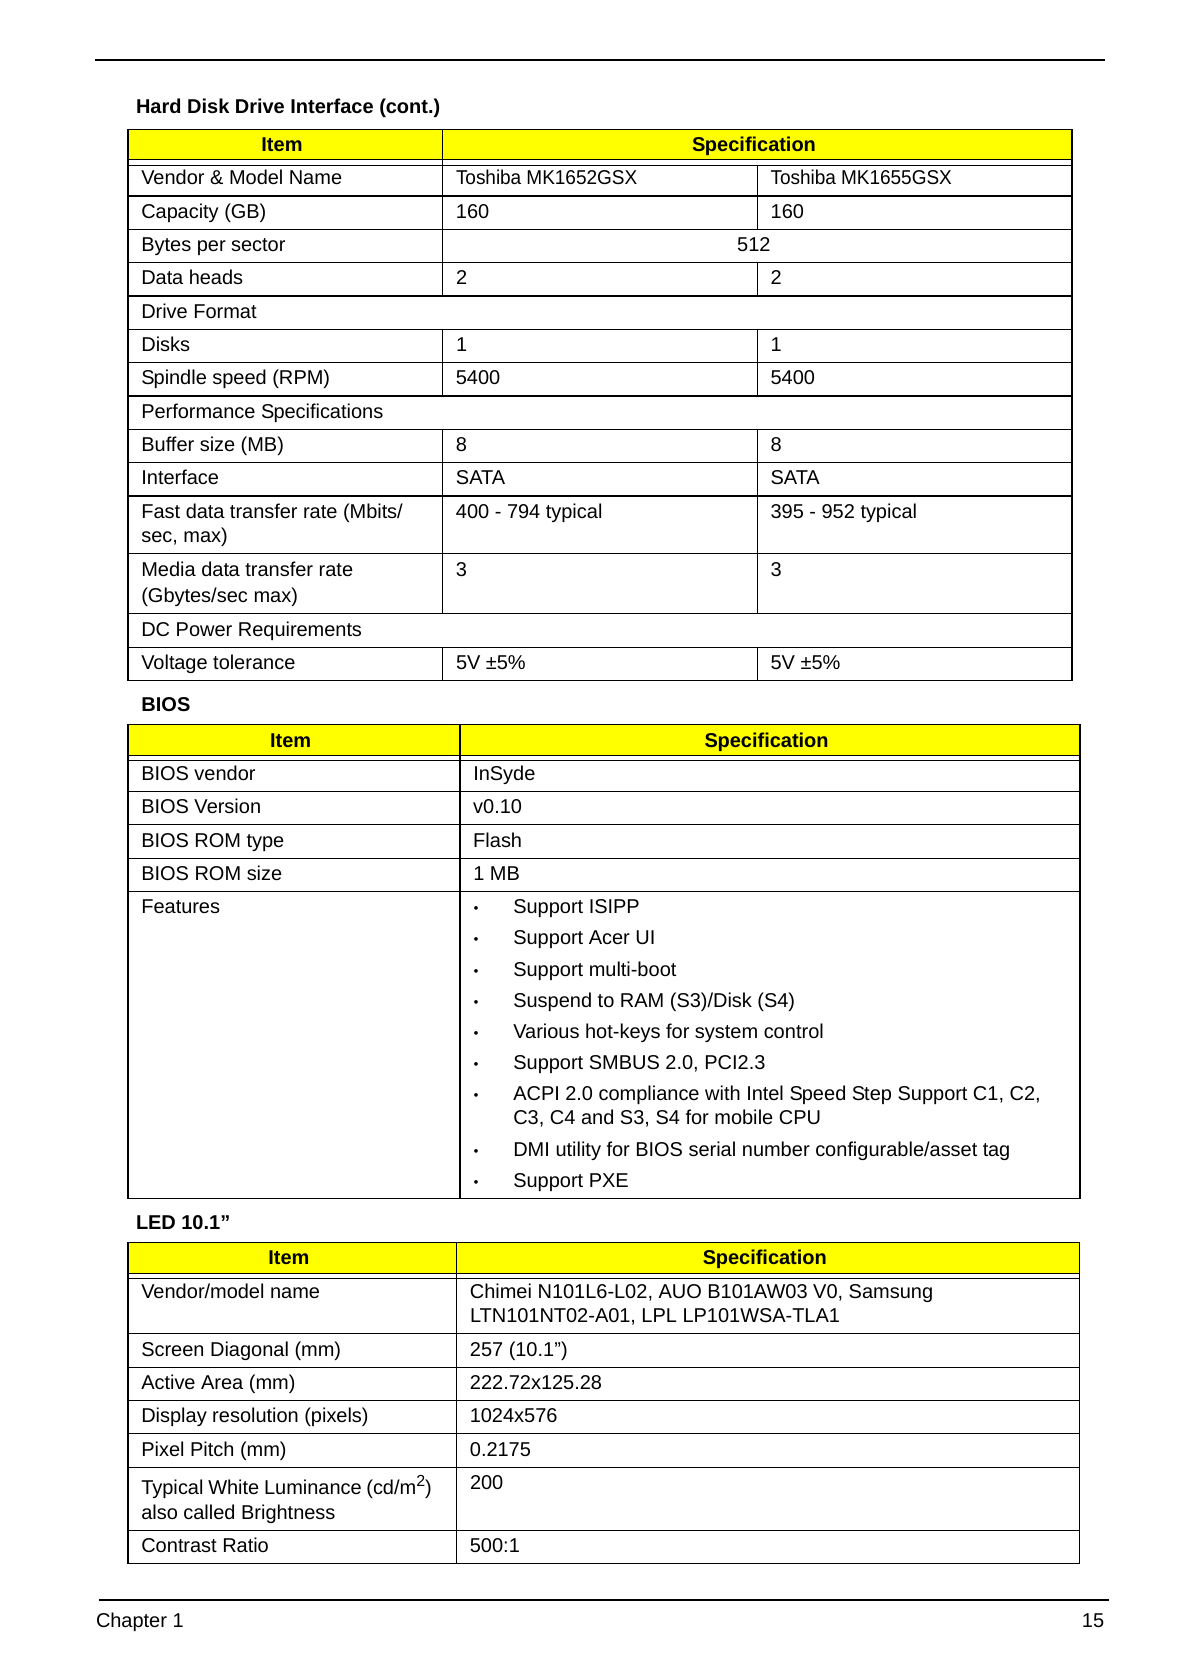
Hard Disk Drive Interface (cont.)
Item Specification
Vendor & Model Name Toshiba MK1652GSX Toshiba MK1655GSX
Capacity (GB) 160 160
Bytes per sector 512
Data heads 2 2
Drive Format
Disks 1 1
Spindle speed (RPM) 5400 5400
Performance Specifications
Buffer size (MB) 8 8
Interface SATA SATA
Fast data transfer rate (Mbits/ 400 - 794 typical 395 - 952 typical
sec, max)
Media data transfer rate 3 3
(Gbytes/sec max)
DC Power Requirements
Voltage tolerance 5V ±5% 5V ±5%
BIOS
Item Specification
BIOS vendor InSyde
BIOS Version v0.10
BIOS ROM type Flash
BIOS ROM size 1 MB
Features • Support ISIPP
• Support Acer UI
• Support multi-boot
• Suspend to RAM (S3)/Disk (S4)
• Various hot-keys for system control
• Support SMBUS 2.0, PCI2.3
• ACPI 2.0 compliance with Intel Speed Step Support C1, C2,
C3, C4 and S3, S4 for mobile CPU
• DMI utility for BIOS serial number configurable/asset tag
• Support PXE
LED 10.1”
Item Specification
Vendor/model name Chimei N101L6-L02, AUO B101AW03 V0, Samsung
LTN101NT02-A01, LPL LP101WSA-TLA1
Screen Diagonal (mm) 257 (10.1”)
Active Area (mm) 222.72x125.28
Display resolution (pixels) 1024x576
Pixel Pitch (mm) 0.2175
Typical White Luminance (cd/m2) 200
also called Brightness
Contrast Ratio 500:1
Chapter 1 15
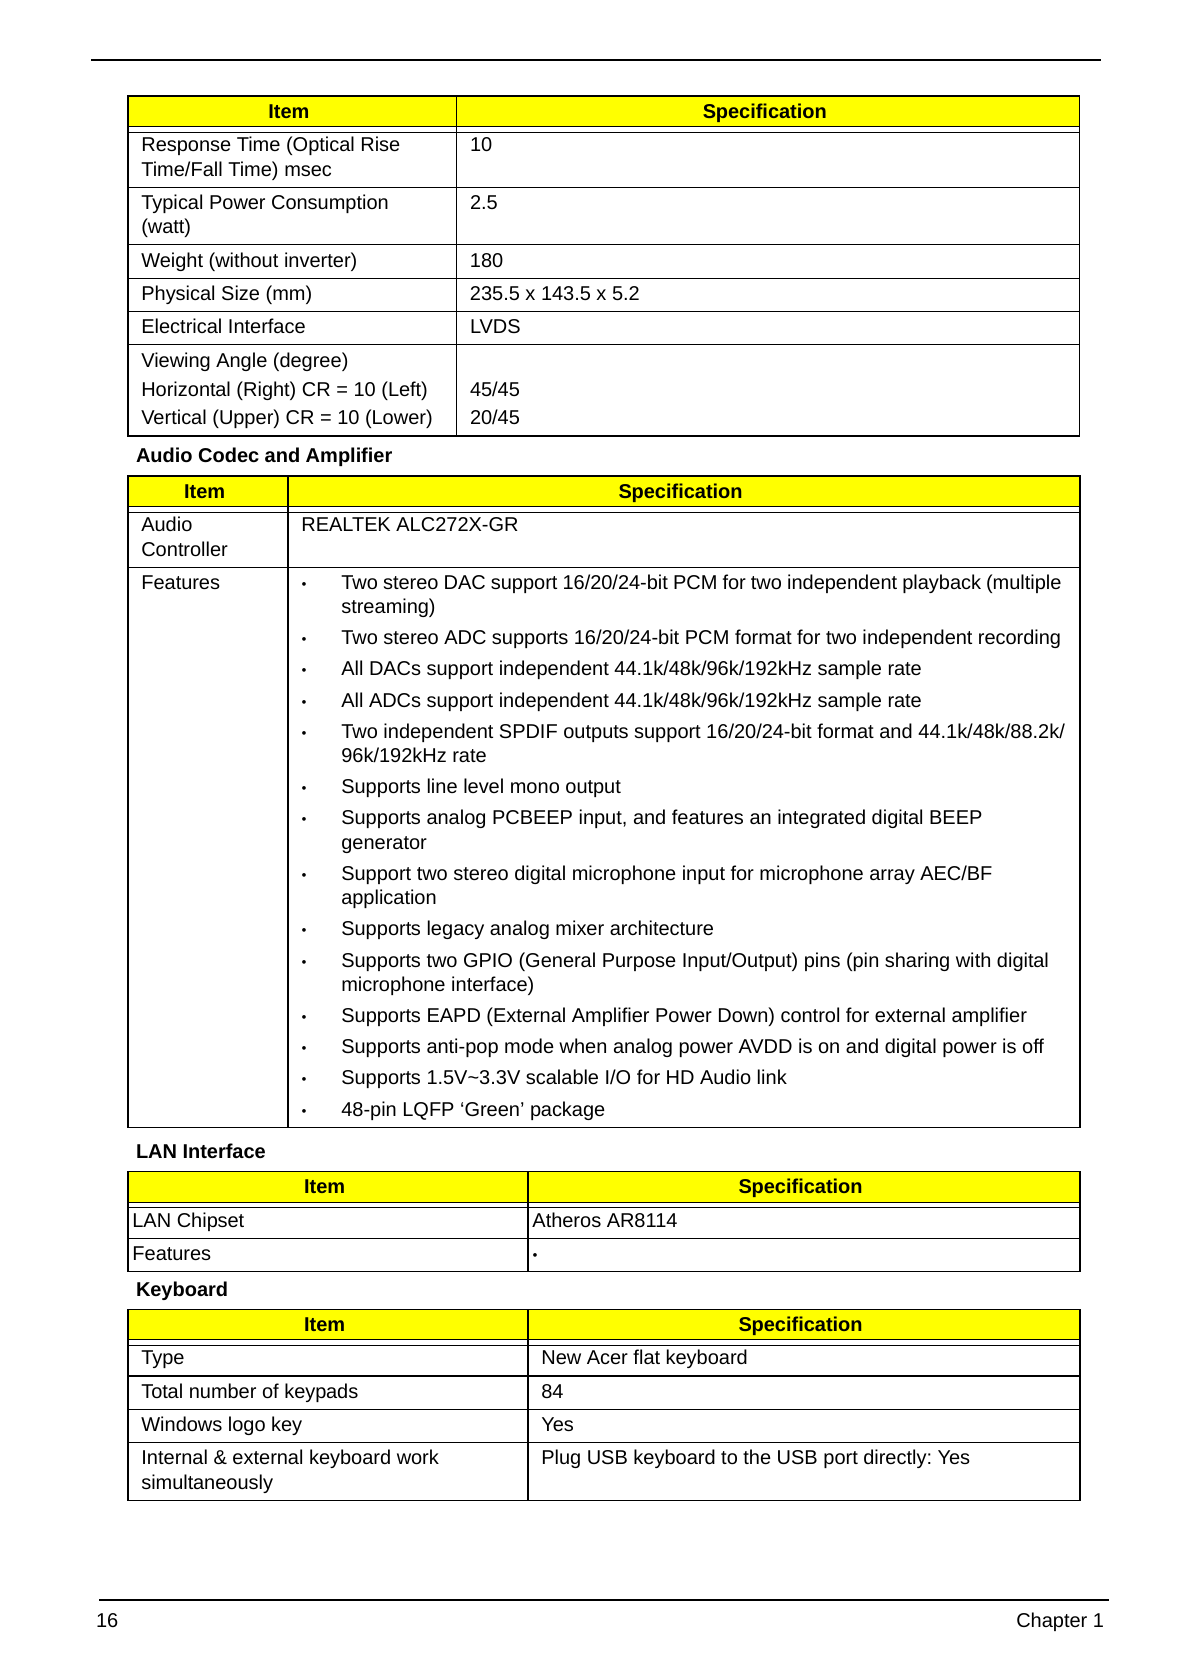
Item Specification
Response Time (Optical Rise 10
Time/Fall Time) msec
Typical Power Consumption 2.5
(watt)
Weight (without inverter) 180
Physical Size (mm) 235.5 x 143.5 x 5.2
Electrical Interface LVDS
Viewing Angle (degree)
Horizontal (Right) CR = 10 (Left) 45/45
Vertical (Upper) CR = 10 (Lower) 20/45
Audio Codec and Amplifier
Item Specification
Audio REALTEK ALC272X-GR
Controller
Features • Two stereo DAC support 16/20/24-bit PCM for two independent playback (multiple
streaming)
• Two stereo ADC supports 16/20/24-bit PCM format for two independent recording
• All DACs support independent 44.1k/48k/96k/192kHz sample rate
• All ADCs support independent 44.1k/48k/96k/192kHz sample rate
• Two independent SPDIF outputs support 16/20/24-bit format and 44.1k/48k/88.2k/
96k/192kHz rate
• Supports line level mono output
• Supports analog PCBEEP input, and features an integrated digital BEEP
generator
• Support two stereo digital microphone input for microphone array AEC/BF
application
• Supports legacy analog mixer architecture
• Supports two GPIO (General Purpose Input/Output) pins (pin sharing with digital
microphone interface)
• Supports EAPD (External Amplifier Power Down) control for external amplifier
• Supports anti-pop mode when analog power AVDD is on and digital power is off
• Supports 1.5V~3.3V scalable I/O for HD Audio link
• 48-pin LQFP ‘Green’ package
LAN Interface
Item Specification
LAN Chipset Atheros AR8114
Features •
Keyboard
Item Specification
Type New Acer flat keyboard
Total number of keypads 84
Windows logo key Yes
Internal & external keyboard work Plug USB keyboard to the USB port directly: Yes
simultaneously
16 Chapter 1
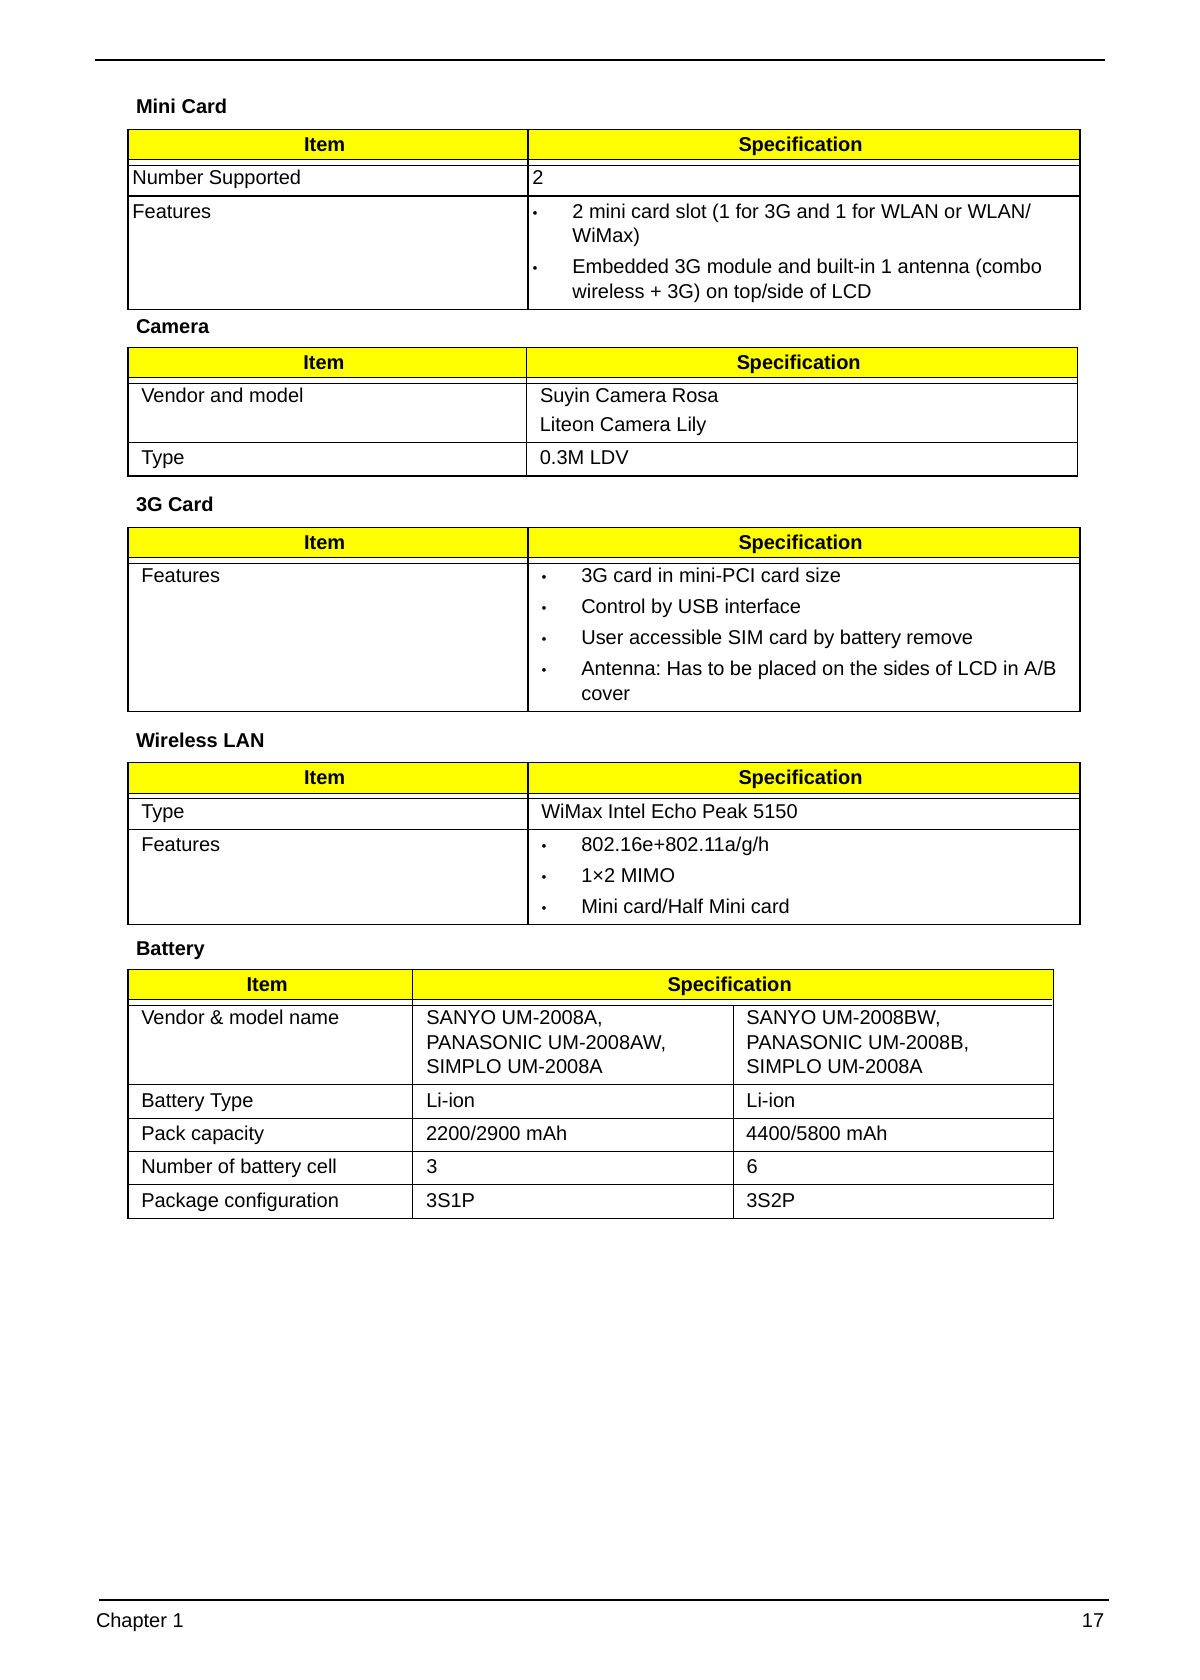
Mini Card
Item Specification
Number Supported 2
Features • 2 mini card slot (1 for 3G and 1 for WLAN or WLAN/
WiMax)
• Embedded 3G module and built-in 1 antenna (combo
wireless + 3G) on top/side of LCD
Camera
Item Specification
Vendor and model Suyin Camera Rosa
Liteon Camera Lily
Type 0.3M LDV
3G Card
Item Specification
Features • 3G card in mini-PCI card size
• Control by USB interface
• User accessible SIM card by battery remove
• Antenna: Has to be placed on the sides of LCD in A/B
cover
Wireless LAN
Item Specification
Type WiMax Intel Echo Peak 5150
Features • 802.16e+802.11a/g/h
• 1×2 MIMO
• Mini card/Half Mini card
Battery
Item Specification
Vendor & model name SANYO UM-2008A, SANYO UM-2008BW,
PANASONIC UM-2008AW, PANASONIC UM-2008B,
SIMPLO UM-2008A SIMPLO UM-2008A
Battery Type Li-ion Li-ion
Pack capacity 2200/2900 mAh 4400/5800 mAh
Number of battery cell 3 6
Package configuration 3S1P 3S2P
Chapter 1 17
18 Chapter 1
Chapter 2
System Utilities
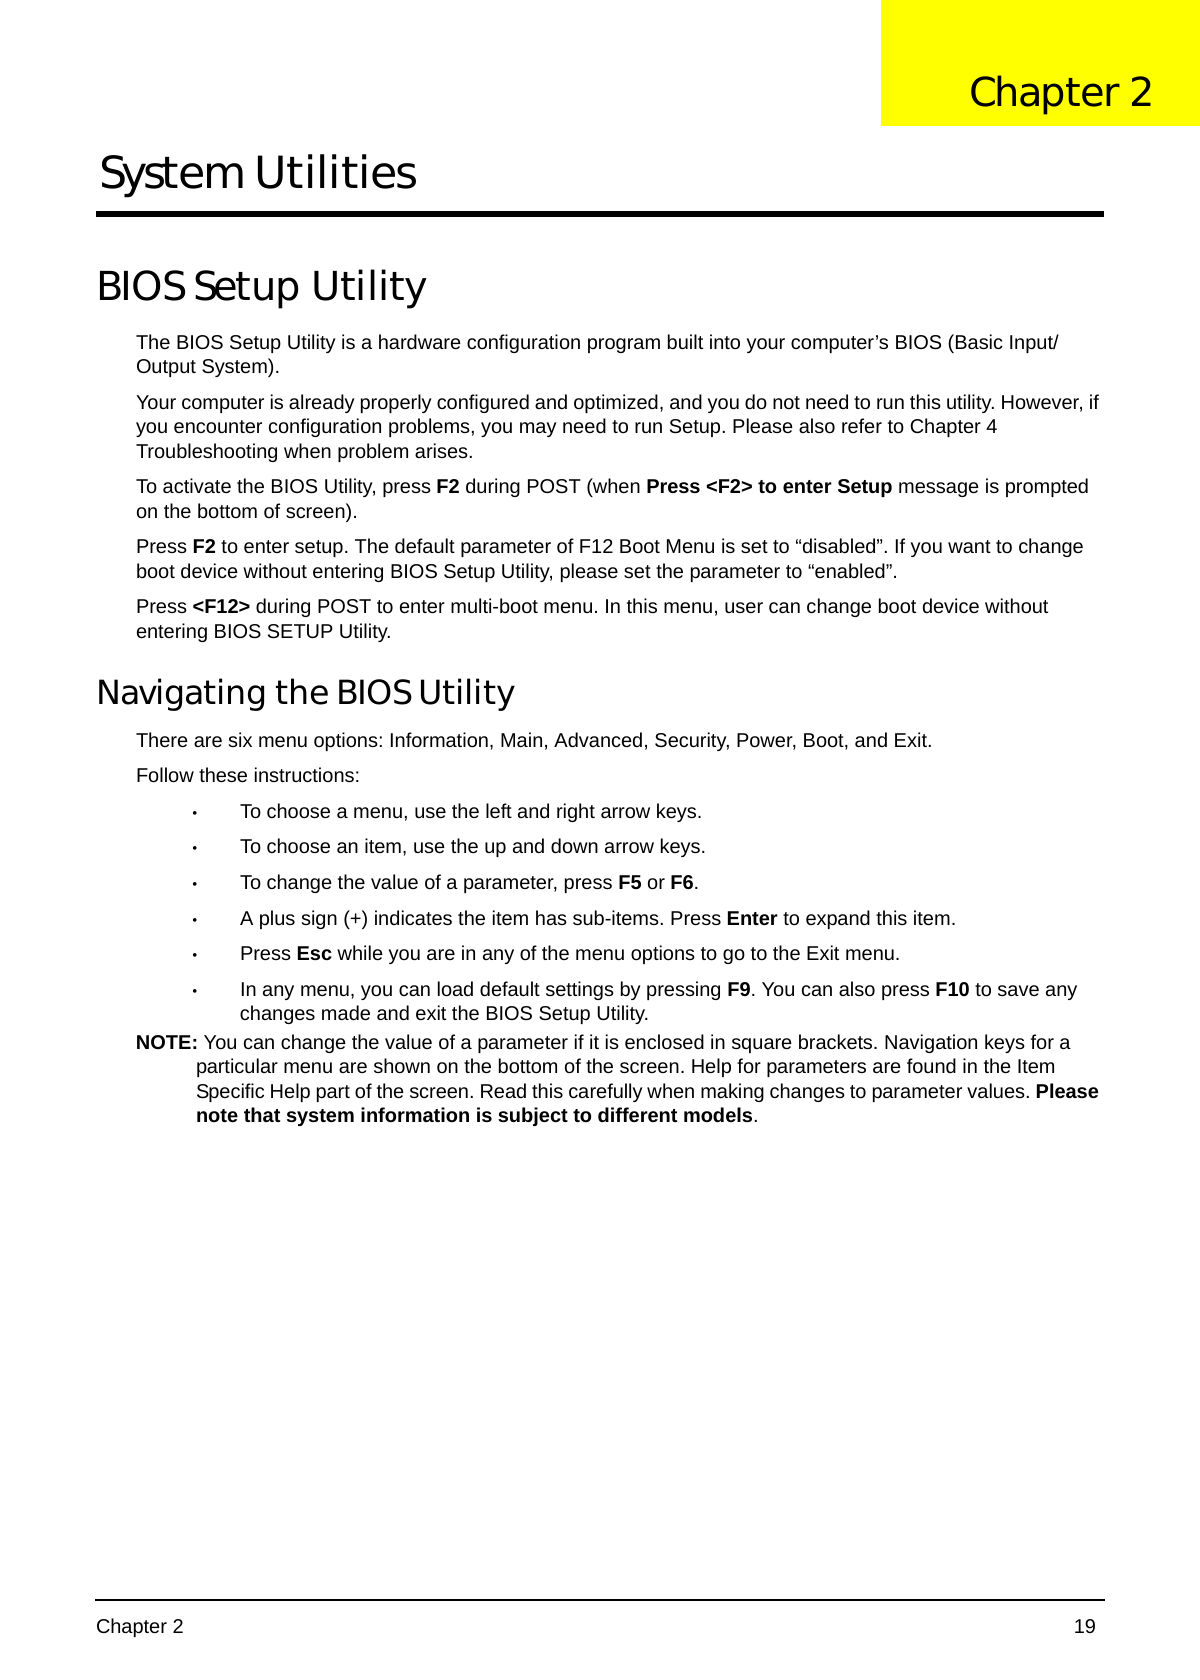
BIOS Setup Utility
The BIOS Setup Utility is a hardware configuration program built into your computer’s BIOS (Basic Input/
Output System).
Your computer is already properly configured and optimized, and you do not need to run this utility. However, if
you encounter configuration problems, you may need to run Setup. Please also refer to Chapter 4
Troubleshooting when problem arises.
To activate the BIOS Utility, press F2 during POST (when Press to enter Setup message is prompted
on the bottom of screen).
Press F2 to enter setup. The default parameter of F12 Boot Menu is set to “disabled”. If you want to change
boot device without entering BIOS Setup Utility, please set the parameter to “enabled”.
Press during POST to enter multi-boot menu. In this menu, user can change boot device without
entering BIOS SETUP Utility.
Navigating the BIOS Utility
There are six menu options: Information, Main, Advanced, Security, Power, Boot, and Exit.
Follow these instructions:
• To choose a menu, use the left and right arrow keys.
• To choose an item, use the up and down arrow keys.
• To change the value of a parameter, press F5 or F6.
• A plus sign (+) indicates the item has sub-items. Press Enter to expand this item.
• Press Esc while you are in any of the menu options to go to the Exit menu.
• In any menu, you can load default settings by pressing F9. You can also press F10 to save any
changes made and exit the BIOS Setup Utility.
NOTE: You can change the value of a parameter if it is enclosed in square brackets. Navigation keys for a
particular menu are shown on the bottom of the screen. Help for parameters are found in the Item
Specific Help part of the screen. Read this carefully when making changes to parameter values. Please
note that system information is subject to different models.
Chapter 2 19
Information
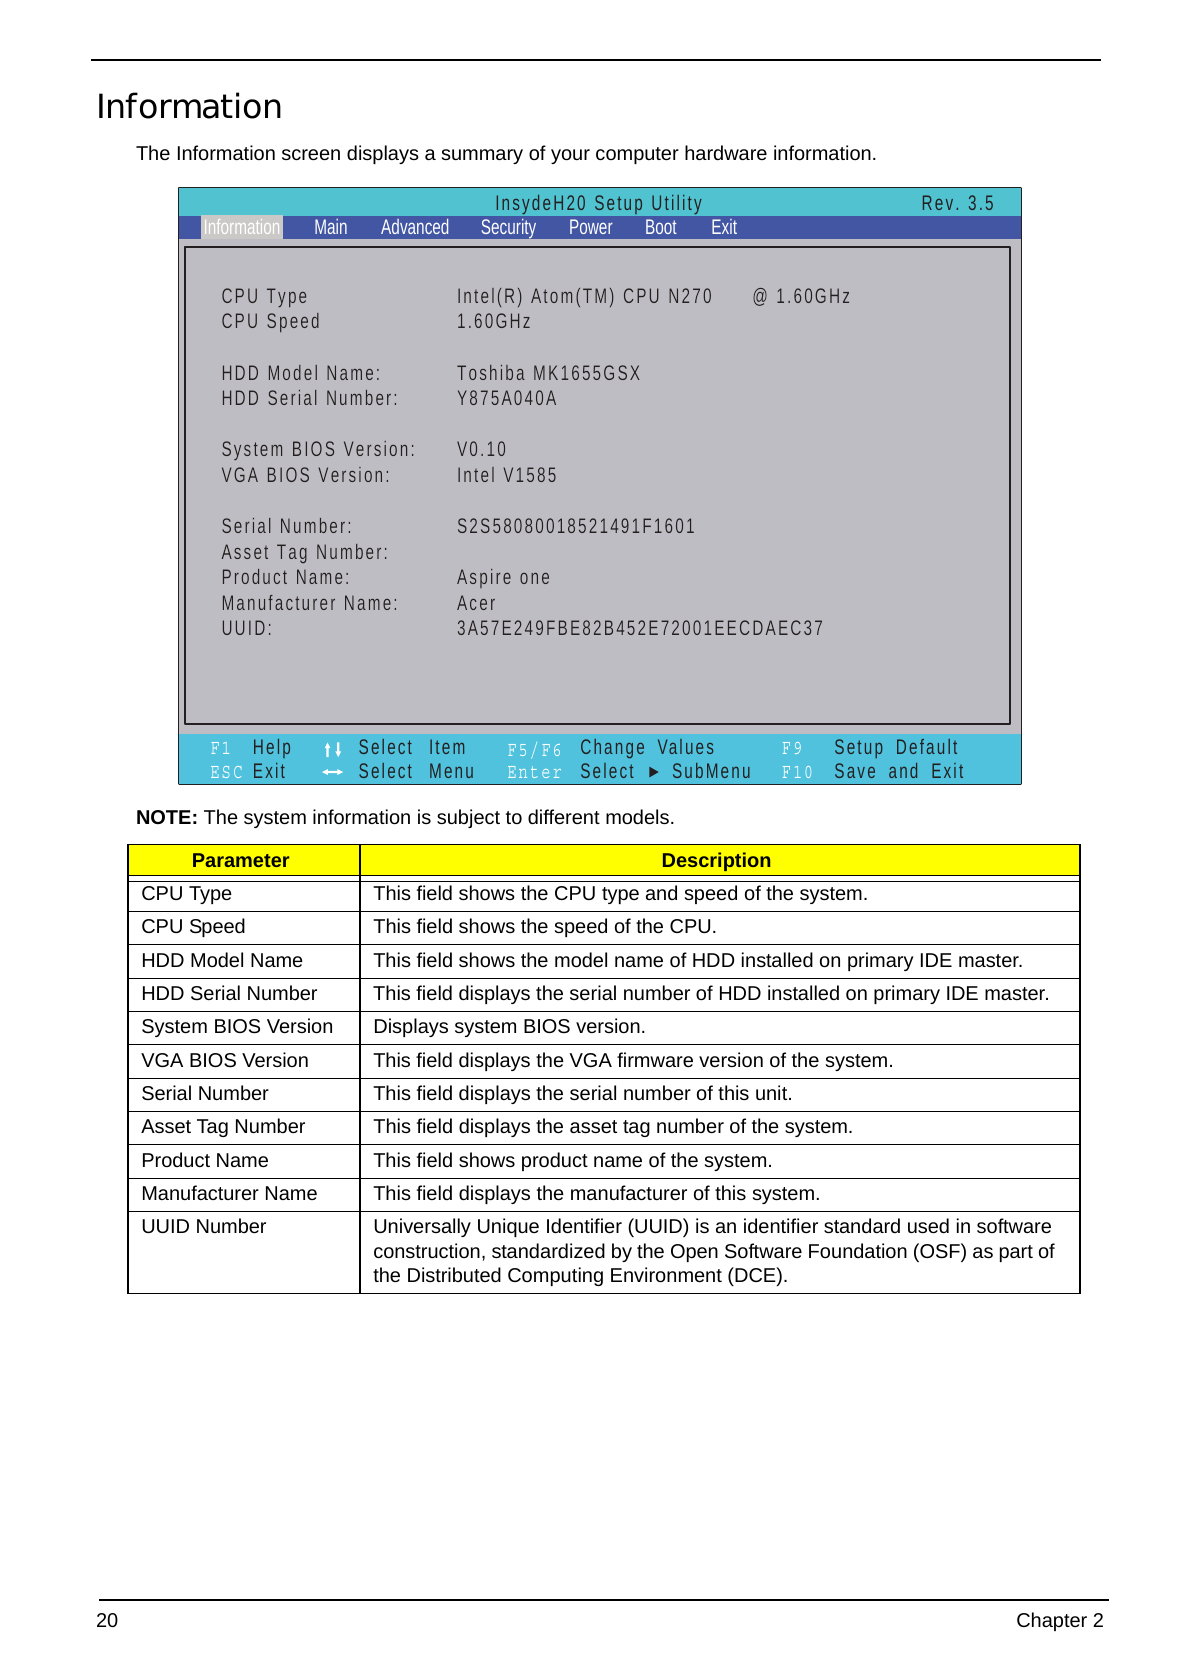
The Information screen displays a summary of your computer hardware information.
InsydeH20 Setup Utility Rev. 3.5
Information Main Advanced Security Power Boot Exit
CPU Type Intel(R) Atom(TM) CPU N270 @ 1.60GHz
CPU Speed 1.60GHz
HDD Model Name: Toshiba MK1655GSX
HDD Serial Number: Y875A040A
System BIOS Version: V0.10
VGA BIOS Version: Intel V1585
Serial Number: S2S58080018521491F1601
Asset Tag Number:
Product Name: Aspire one
Manufacturer Name: Acer
UUID: 3A57E249FBE82B452E72001EECDAEC37
F1 Help Select Item F 5 / F 6 C h a n g e Va l u e s F9 Setup Default
ESC Exit Select Menu Enter Select SubMenu F 10 Save and Exit
NOTE: The system information is subject to different models.
Parameter Description
CPU Type This field shows the CPU type and speed of the system.
CPU Speed This field shows the speed of the CPU.
HDD Model Name This field shows the model name of HDD installed on primary IDE master.
HDD Serial Number This field displays the serial number of HDD installed on primary IDE master.
System BIOS Version Displays system BIOS version.
VGA BIOS Version This field displays the VGA firmware version of the system.
Serial Number This field displays the serial number of this unit.
Asset Tag Number This field displays the asset tag number of the system.
Product Name This field shows product name of the system.
Manufacturer Name This field displays the manufacturer of this system.
UUID Number Universally Unique Identifier (UUID) is an identifier standard used in software
construction, standardized by the Open Software Foundation (OSF) as part of
the Distributed Computing Environment (DCE).
20 Chapter 2
Main
The Main screen allows the user to set the system time and date as well as enable and disable boot option
and recovery.
InsydeH20 Setup Utility Rev. 3.5
Information Main Advanced Security Power Boot Exit
Item Specific Help
System Time: [19:10:59]
System Date: [01/09/2009]
This is the help for the
Total Memory: 1024 MB hour field. Valid range
Video Memory: [8MB] is from 0 to 23.
INCREASE/REDUCE: F 5 / F 6
Quick Boot [Enabled]
Network Boot [Enabled]
F12 Boot Menu [Disabled]
D2D Recovery [Enabled]
SATA Mode [AHCI]
F1 Help Select Item F 5 / F 6 C h a n g e Va l u e s F9 Setup Default
ESC Exit Select Menu Enter Select SubMenu F 10 Save and Exit
NOTE: The screen above is for your reference only. Actual values may differ.
The table below describes the parameters in this screen. Settings in boldface are the default and suggested
parameter settings.
Parameter Description Format/Option
System Time Sets the system time. The hours are displayed with 24- Format: HH:MM:SS
hour format. (hour:minute:second)
System Date Sets the system date. Format MM/DD/YYYY
(month/day/year)
Total Memory This field reports the memory size of the system. N/A
Memory size is fixed to 3017 MB.
Video Memory Shows the video memory size. VGA Memory size=32 MB N/A
Quick Boot Allows startup to skip certain tests while booting, Option: Enabled or Disabled
decreasing the time needed to boot the system.
Network Boot Enables, disables the system boot from LAN (remote Option: Enabled or Disabled
server).
F12 Boot Menu Enables, disables Boot Menu during POST. Option: Enabled or Enabled
D2D Recovery Enables, disables D2D Recovery function. The function Option: Enabled or Disabled
allows the user to create a hidden partition on hard disc
drive to store operation system and restore the system
to factory defaults.
SATA Mode Control the mode in which the SATA controller should Option: AHCI or IDE
operate.
Chapter 2 21
Advanced
The Advanced screen allows the user to configure the various advanced BIOS options.
IMPORTANT: Making incorrect settings to items on these pages may cause the system to malfunction. Unless you
have experience adjusting these items, we recommend that you leave these settings at the default values. If
making settings to items on these pages causes your system to malfunction or prevents the system from booting,
open BIOS and choose Load Optimal Defaults in the Exit menu to boot up normally.
InsydeH20 Setup Utility Rev. 3.5
Information Main Advanced Security Power Boot Exit
Item Specific Help
XBoot Configuration
XPeripheral Configuration
XIDE Configuration Configures Boot
XVideo Configuration Settings.
XUSB Configuration
XChipset Configuration
XACPI Table/Features Control
F1 Help Select Item F 5 / F 6 C h a n g e Va l u e s F9 Setup Default
ESC Exit Select Menu Enter Select SubMenu F 10 Save and Exit
The table below describes the items, menus, and submenus in this screen. Settings in boldface are the default
and suggested parameter settings.
Parameter Description Submenu Items
Boot Enter the Boot Configuration menu. • Numlock
Configuration
Peripheral Enter the Peripheral Configuration menu. • Azalia
Configuration
IDE Enter the IDE Configuration menu. • IDE Controller
Configuration • HDC Configure as
• Channel 1 to 4 Master and Slave
Video Enter the Video Configuration menu. • IGD—Device2, Function1
Configuration • IGD—Pre-allocat Memory
• IGD—DVMT Size
USB Enter the USB Configuration menu. • USB 2.0
Configuration • USB Legacy
Chipset Enter the Chipset Configuration menu. • Energy Lake
Configuration
ACPI Table/ Enter the ACPI Table/Features Control • FACP—C2 Latency Value
Features Control menu. • FACP—C3 Latency Value
• FACP—RTC S4 Wakeup
• APIC—IO APIC Mode
• HPET—HPET Support
• Base Address select
22 Chapter 2
Security
The Security screen contains parameters that help safeguard and protect your computer from unauthorized
use.
InsydeH20 Setup Utility Rev. 3.5
Information Main Advanced Security Power Boot Exit
Item Specific Help
Supervisor Password Is: Clear
User Password Is: Clear
HDD Password Is: Clear Install or Change the
password and the length
Set Supervisor Password of password must be less
Set User Password than eight words.
Set Hdd Password
Power on password [Disabled]
F1 Help Select Item F 5 / F 6 C h a n g e Va l u e s F9 Setup Default
ESC Exit Select Menu Enter Select SubMenu F 10 Save and Exit
The table below describes the parameters in this screen. Settings in boldface are the default and suggested
parameter settings.
Parameter Description Option
Supervisor Password Is Shows the setting of the Supervisor password Clear or Set
User Password Is Shows the setting of the user password. Clear or Set
Set Supervisor Password Press Enter to set the supervisor password. When
set, this password protects the BIOS Setup Utility
from unauthorized access. The user can not either
enter the Setup menu nor change the value of
parameters.
Set User Password Press Enter to set the user password. When user
password is set, this password protects the BIOS
Setup Utility from unauthorized access. The user can
enter Setup menu only and does not have right to
change the value of parameters.
Set Hdd Password Enter HDD password.
Power on password Defines whether a password is required or not while Enabled or
the events defined in this group happened. The Disabled
following sub-options are all requires the Supervisor
password for changes and should be grayed out if the
user password was used to enter setup.
NOTE: When you are prompted to enter a password, you have three tries before the system halts. Don’t forget
your password. If you forget your password, you may have to return your notebook computer to your
dealer to reset it.
Chapter 2 23
Setting a Password
Follow these steps as you set the user or the supervisor password:
1. Use the ↑ and ↓ keys to highlight the Set Supervisor Password parameter and press the Enter key. The
Set Supervisor Password box appears:
Set Supervisor Password
Enter New Password [ ]
Confirm New Password [ ]
2. Type a password in the “Enter New Password” field. The password length can not exceeds 8
alphanumeric characters (A-Z, a-z, 0-9, not case sensitive). Retype the password in the “Confirm New
Password” field.
IMPORTANT:Be very careful when typing your password because the characters do not appear on the screen.
3. Press Enter. After setting the password, the computer sets the User Password parameter to “Set”.
4. If desired, you can opt to enable the Password on boot parameter.
5. When you are done, press F10 to save the changes and exit the BIOS Setup Utility.
Removing a Password
Follow these steps:
1. Use the ↑ and ↓ keys to highlight the Set Supervisor Password parameter and press the Enter key. The
Set Password box appears:
Set Supervisor Password
Enter Current Password [ ]
Enter New Password [ ]
Confirm New Password [ ]
2. Type the current password in the Enter Current Password field and press Enter.
3. Press Enter twice without typing anything in the Enter New Password and Confirm New Password fields.
The computer then sets the Supervisor Password parameter to “Clear”.
4. When you have changed the settings, press u to save the changes and exit the BIOS Setup Utility.
24 Chapter 2
Changing a Password
1. Use the ↑ and ↓ keys to highlight the Set Supervisor Password parameter and press the Enter key. The
Set Password box appears.
Set Supervisor Password
Enter Current Password [ ]
Enter New Password [ ]
Confirm New Password [ ]
2. Type the current password in the Enter Current Password field and press Enter.
3. Type a password in the Enter New Password field. Retype the password in the Confirm New Password
field.
4. Press Enter. After setting the password, the computer sets the User Password parameter to “Set”.
5. If desired, you can enable the Password on boot parameter.
6. When you are done, press F10 to save the changes and exit the BIOS Setup Utility.
If the verification is OK, the screen will display as following.
Setup Notice
Changes have been saved.
[Continue]
The password setting is complete after the user presses Enter.
If the current password entered does not match the actual current password, the screen will show you the
Setup Warning.
Setup Warning
Invalid Password.
[Continue]
If the new password and confirm new password strings do not match, the screen displays the following
message.
Setup Warning
Passwords do not match.
Re-enter password.
[Continue]
Chapter 2 25
Power
The Power screen allows the user to configure CPU and power management options.
InsydeH20 Setup Utility Rev. 3.5
Information Main Advanced Security Power Boot Exit
Item Specific Help
XAdvanced CPU Control
XPlatform Power Management
These items control
ACPI S3: [Enabled] various CPU parameters.
Wake on PME [Disabled]
Wake on Modem Ring [Disabled]
Auto wake on S5 [Disabled]
Quickly S4 Resume [Disabled]
F1 Help Select Item F 5 / F 6 C h a n g e Va l u e s F9 Setup Default
ESC Exit Select Menu Enter Select SubMenu F 10 Save and Exit
The table below describes the parameters in this screen. Settings in boldface are the default and suggested
parameter settings.
Parameter Description Submenu Items
Advanced CPU Enter the Advanced CPU Control menu. • IST Configuration
Control • Thermal Mode
• CMP Support
• Use NX capability
• C-State support
• Enhanced C-States Enable
• Pop Up Support
• Pop Down Support
• Hard C4E
• Bi-directional PROCHOT#
• ACPI 3.0 T-States
• DTS Enable
• Thermal Trip Points Setting
(Throttle On Temp.)
Platform Power Enter the Platform Power Management • PCI Clock Run
Management menu. • _CST - C4 Latency Value
ACPI S3 Enable or Disable ACPI S1/S3 Sleep State. N/A
Wake on PME Disable or Enable wake up when the N/A
system power is off and a PCI Power
Management Enable wake up event occurs.
Wake on Modem Disable or Enable wake up when the N/A
Ring system power is off and a modem attached
to the serial port is ringing.
26 Chapter 2
Parameter Description Submenu Items
Auto wake on S5 Disable or Enable auto wake up by date N/A
and time or at a fixed time everyday.
Quickly S4 Disable or Enable optional quick boot from N/A
Resume S4 Resume.
Chapter 2 27
Boot
This menu allows the user to decide the order of boot devices to load the operating system. Bootable devices
includes the USB diskette drives, the onboard hard disk drive and the DVD drive in the module bay.
InsydeH20 Setup Utility Rev. 3.5
Information Main Advanced Security Power Boot Exit
Item Specific Help
Boot priority order:
1. IDE0 : TOSHIBA MK1655GSX Use < > or < > to select
2. IDE1 : a device, then press
3. USB FDD : to move it down the
4. Network Boot : Atheros Boot Agent list, or to move
5. USB HDD : it up the list. Press
6. USB CDROM : to escape the menu
F1 Help Select Item F 5 / F 6 C h a n g e Va l u e s F9 Setup Default
ESC Exit Select Menu Enter Select SubMenu F 10 Save and Exit
28 Chapter 2
Exit
The Exit screen allows you to save or discard any changes you made and quit the BIOS Utility.
InsydeH20 Setup Utility Rev. 3.5
Information Main Advanced Security Power Boot Exit
Item Specific Help
Exit Saving Changes
Exit Discarding Changes
Load Setup Defaults Exit System Setup and
Discard Changes save your changes to
Save Changes CMOS.
F1 Help Select Item F 5 / F 6 C h a n g e Va l u e s F9 Setup Default
ESC Exit Select Menu Enter Select SubMenu F 10 Save and Exit
The table below describes the parameters in this screen.
Parameter Description
Exit Saving Changes Exit System Setup and save your changes to CMOS.
Exit Discarding Exit utility without saving setup data to CMOS.
Changes
Load Setup Default Load default values for all SETUP item.
Discard Changes Load previous values from CMOS for all SETUP items.
Save Changes Save Setup Data to CMOS.
Chapter 2 29
BIOS Flash Utility
The BIOS flash memory update is required for the following conditions:
• New versions of system programs
• New features or options
• Restore a BIOS when it becomes corrupted.
Use the Phlash utility to update the system BIOS flash ROM.
NOTE: If you do not have a crisis recovery diskette at hand, then you should create a Crisis Recovery
Diskette before you use the Phlash utility.
NOTE: Do not install memory-related drivers (XMS, EMS, DPMI) when you use the Phlash.
NOTE: Please use the AC adaptor power supply when you run the Phlash utility. If the battery pack does not
contain enough power to finish BIOS flash, you may not boot the system because the BIOS is not
completely loaded.
Fellow the steps below to run the Phlash.
1. Prepare a bootable diskette.
2. Copy the flash utilities to the bootable diskette.
3. Then boot the system from the bootable diskette. The flash utility has auto-execution function.
30 Chapter 2
DOS Flash Utility
Perform the following steps to use the DOS Flash Utility:
1. Press F2 during boot to enter the Setup Menu.
2. Select Boot Menu to modify the boot priority order, for example, if using USB HDD to Update BIOS, move
USB HDD to position 1.
InsydeH20 Setup Utility Rev. 3.5
Information Main Advanced Security Power Boot Exit
Item Specific Help
Boot priority order:
1. IDE0 : TOSHIBA MK1655GSX Use < > or < > to select
2. IDE1 : a device, then press
3. USB FDD : to move it down the
4. Network Boot : Atheros Boot Agent list, or to move
5. USB HDD : it up the list. Press
6. USB CDROM : to escape the menu
F1 Help Select Item F 5 / F 6 C h a n g e Va l u e s F9 Setup Default
ESC Exit Select Menu Enter Select SubMenu F 10 Save and Exit
3. Execute the FLASH.BAT batch file to update BIOS.
The flash process begins as shown.
4. In flash BIOS, the message Please do not remove AC Power Source displays.
NOTE: If the AC power is not connected, the following message displays.
Plug in the AC power to continue.
Chapter 2 31
5. Flash is complete when the message Flash programming complete displays.
32 Chapter 2
WinFlash Utility
Perform the following steps to use the WinFlash Utility:
1. Double click the WinFlash executable.
2. Click OK to begin the update. A progress screen displays.
3. When the process is complete, close all programs and applications and reboot the system.
Chapter 2 33
Remove HDD/BIOS Password Utilities
This section provide you with removing HDD/BIOS method:
Remove HDD Password:
When the user keys in the wrong password three times, the system reports the following error code to user.
To unlock the HDD password, perform the following steps:
1. Press Enter to display the Select Item screen.
2. Select Enter Unlock Password and press Enter.
An Unlock Password displays.
3. Make a note of the key, 76943488 in the example.
4. Boot up the system and open a DOS prompt.
5. Enter the UnlockHD.EXE command and input the key to create an unlock code. Make a note of the
result, for example 46548274.
6. Reboot and enter the BIOS by pressing F2 when prompted.
7. Go to the Security menu and select Set Hdd Password.
8. Enter the unlock code generated by UnlockHD.EXE as the current password, 46548274 in the example,
and complete the New Password and Confirm fields to create a new HDD password.
9. Save and exit the BIOS to complete the process.
34 Chapter 2
Removing BIOS Passwords:
If you key in the wrong Supervisor Password three times, System Disabled displays on the screen. See the
image below.
To reset the BIOS password, run BIOS_PW.EXE as follows:
1. Key in bios_pw 14452 0
2. Select one string from the list.
Chapter 2 35
3. Reboot the system and key in the selected string (qjjg9vy, 07yqmjd etc.) for the BIOS user
password.
Cleaning BIOS Passwords
To clear the password, perform the following steps:
1. From a DOS prompt, Execute clnpwd.exe
2. Press 1 or 2 to clean the desired password shown on the screen.
The onscreen message determines whether the function is successful or not.
36 Chapter 2
Miscellaneous Utilities
Using Boot Sequence Selector
Boot Sequence Selector allows the boot order to be changes without accessing the BIOS. To use Boot
Sequence Selector, perform the following steps:
1. Enter into DOS.
2. Execute BS.exe to display the usage screen.
3. Select the desired boot sequence by entering the corresponding sequence, for example, enter BS2 to
change the boot sequence to HDD|CD ROM|LAN|Floppy.
Using DMITools
The DMI (Desktop Management Interface) Tool copies BIOS information to eeprom to be used in the DMI pool
for hardware management.
When the BIOS displays Verifying DMI pool data it is checking the table correlates with the hardware before
sending to the operating system (Windows, etc.).
To update the DMI Pool, perform the following steps:
1. Enter into DOS.
2. Execute dmitools.exe. The following messages show dmitools usage:
IMPORTANT:The following write examples (2 to 5) require a system reboot to take effect
Chapter 2 37
Example 1: Read DMI Information from Memory
Input:
dmitools /r
Output:
Manufacturer (Type1, Offset04h): Acer
Product Name (Type1, Offset05h): Aspire one xxxxx
Serial Number (Type1, Offset07h): 01234567890123456789
UUID String (Type1, Offset08h): xxxxxxxx-xxxx-xxxx-xxxx-xxxxxxxxxxxx
Asset Tag (Type3, Offset04h): Acer Asstag
Example 2: Write Product Name to EEPROM
Input:
dmitools /wp Acer
Example 3: Write Serial Number to EEPROM
Input:
dmitools /ws 01234567890123456789
Example 4: Write UUID to EEPROM
Input:
dmitools /wu
Example 5: Write Asset Tag to EEPROM
Input:
dmitools /wa Acer Asstag
Using the LAN MAC Utility
Perform the following steps to write MAC information to eeprom:
1. Use a text editor, for example Notepad, to edit the MAC.CFG file as shown:
• WriteData= '001122334455' <------- MAC value
• StartAddr=7A <------- MAC address
• WriteLeng=6 <------- MAC value length
• KeepByte=0 <------- can be any value
2. Boot into DOS.
3. Execute MAC.BAT to write MAC information to eeprom.
38 Chapter 2
Chapter 3
Machine Disassembly and Replacement
This chapter contains step-by-step procedures on how to disassemble the notebook computer for
maintenance and troubleshooting.
Disassembly Requirements
To disassemble the computer, you need the following tools:
• Wrist grounding strap and conductive mat for preventing electrostatic discharge
• Flat screwdriver
• Philips screwdriver
• Plastic flat screwdriver
• Plastic tweezers
NOTE: The screws for the different components vary in size. During the disassembly process, group the
screws with the corresponding components to avoid mismatch when putting back the components.
Related Information
The product previews seen in the disassembly procedures may not represent the final product color or
configuration.
IMPORTANT:Cable paths and positioning may not represent the actual model. During the removal and
replacement of components, ensure all available cable channels and clips are used and that the cables are
replaced in the same position.
Chapter 3 39
General Information
Pre-disassembly Instructions
Before proceeding with the disassembly procedure, make sure that you do the following:
1. Turn off the power to the system and all peripherals.
2. Unplug the AC adapter and all power and signal cables from the system.
3. Place the system on a flat, stable surface.
4. Remove the battery pack.
Disassembly Process
The disassembly process is divided into the following sections:
• External components disassembly
• Main unit disassembly
• LCD module disassembly
The flowcharts provided in the succeeding disassembly sections illustrate the entire disassembly sequence.
Observe the order of the sequence to avoid damage to any of the hardware components. For example, if you
want to remove the Mainboard, you must first remove the Keyboard, and LCD Module then disassemble the
inside assembly frame in that order.
Main Screw List
Screw Quantity Part Number
M2*3 16 86.S5502.001
M2*6 21 86.S5502.002
M3*3 4 86.S5502.003
40 Chapter 3
External Module Disassembly Process
External Modules Disassembly Flowchart
Turn off system
and peripherals
power
Disconnect power
and signal cables
from system
Remove
Battery
Remove Remove
Lower Covers Dummy Card
Remove Remove Remove
DIMM WLAN HDD
Screw List
Step Screw Quantity Part No.
Lower Covers M2*6 2 86.S5502.002
HDD Carrier M3*3 4 86.S5502.003
WLAN Module M2*3 1 86.S5502.001
Chapter 3 41
Removing the Battery Pack
1. Turn the computer over.
2. Slide the battery lock/unlock latch to the unlock position.
3. Slide and hold the battery release latch to the release position (1), then slide out the battery pack from the main
unit (2).
2
1
42 Chapter 3
Removing the SD Dummy Card
1. Push the SD dummy card all the way in to eject it.
2. Pull the card out from the slot.
Chapter 3 43
Removing the Lower Covers
1. See “Removing the Battery Pack” on page 42.
2. Loosen the two captive screws in the HDD cover (red callout) and remove the two screws from the Memory
and WLAN covers (green callout).
Step Size Quantity Screw Type
Lower Covers M2*6 2
(green callout)
3. Lift the HDD cover up to remove.
44 Chapter 3
4. Lift the Memory cover up to remove.
5. Lift the WLAN cover up to remove.
Chapter 3 45
Removing the Hard Disk Drive Module
1. See “Removing the Lower Covers” on page 44.
2. Use the pull-tab to disconnect the HDD from the interface connector.
3. Lift the hard disk drive module out of the bay.
NOTE: To prevent damage to device, avoid pressing down on it or placing heavy objects on top of it.
46 Chapter 3
4. Remove the four screws securing the hard disk to the carrier in reverse numerical order, from 4 to 1.
3
4
1
2
Step Size Quantity Screw Type
HDD Carrier M3*3 4
5. Remove the HDD from the carrier.
Chapter 3 47
Removing the DIMM Module
1. See “Removing the Lower Covers” on page 44.
2. Push out the release latches on both sides of the DIMM socket to release the DIMM module.
3. Remove the DIMM module.
48 Chapter 3
Removing the WLAN Module
1. See “Removing the Lower Covers” on page 44.
2. Remove the adhesive tape securing the cables in place.
3. Disconnect the antenna cables from the WLAN board.
IMPORTANT:The black cable attaches to the MAIN (J3) terminal and the gray cable attaches to the AUX (J2)
terminal.
Chapter 3 49
4. Move the antenna away and remove the single screw on the WLAN board.
Step Size Quantity Screw Type
WLAN Module M2*3 1
5. Detach the WLAN board from the WLAN socket.
NOTE: When reattaching the antennas, ensure the cables are tucked into the chassis to prevent damage.
50 Chapter 3
Main Unit Disassembly Process
IMPORTANT: Cable paths and positioning may not represent the actual model. During the removal and
replacement of components, ensure all available cable channels and clips are used and that the cables are
replaced in the same position.
Main Unit Disassembly Flowchart
Remove External
Modules before
proceeding
Remove
Keyboard
Remove
Upper Cover
Remove
Remove Remove Remove Remove
TouchPad
Power Board USB Board LCD Module Bluetooth Module
Bracket
Remove
Mainboard
Remove Remove
Thermal Module Speaker Modue
Screw List
Step Screw Quantity Part No.
Upper Cover M2*3 3 86.S5502.001
M2*6 11 86.S5502.002
Power Board M2*3 1 86.S5502.001
TouchPad Bracket M2*3 1 86.S5502.001
LCD Module M2*6 2 86.S5502.002
USB Board M2*3 1 86.S5502.001
Mainboard M2*3 1 86.S5502.001
Speaker Module M2*3 2 86.S5502.001
Thermal Module M2*3 2 86.S5502.001
Chapter 3 51
Removing the Keyboard
1. See “Removing the Battery Pack” on page 42.
2. Turn the computer rightside up and open the lid to the full extent.
3. Unlock the single securing latch above the F8 key by pressing down with plastic tweezers.
IMPORTANT:The use of metal tools may damage the outer casing. Use plastic tools where available.
4. Grasp the Keyboard and lift upward in the centre as shown.
5. Grasp the Keyboard at both sides as shown, and slide it toward the LCD Panel to release the securing clips.
52 Chapter 3
6. Turn the Keyboard over and place it on the TouchPad area as shown.
7. Lift the Keyboard FFC securing latch as shown.
8. Disconnect the FFC and remove the Keyboard.
Chapter 3 53
Removing the Upper Cover
1. See “Removing the Lower Covers” on page 44.
2. Turn the computer over. Remove the nine securing screws.
Step Size Quantity Screw Type
Upper Cover M2*3 3
(red callouts)
Upper Cover M2*6 6
(green callouts)
3. Turn the computer over and disconnect the following cables from the Mainboard.
A
B
54 Chapter 3
Release the locking latch on A as shown. Disconnect A from the Mainboard.
Release the locking latch on B as shown. Disconnect B from the Mainboard.
4. Remove the five securing screws from the Upper Cover.
Step Size Quantity Screw Type
Upper Cover M2*6 5
Chapter 3 55
5. Grasp the top-right side of the upper cover and pry apart.
6. Work along the top and right sides as shown, gradually prying up the cover.
56 Chapter 3
7. Lift the Upper Cover clear of the computer.
Chapter 3 57
Removing the Power Board
1. See “Removing the Upper Cover” on page 54.
2. Remove the single securing screw from the Power Board.
Step Size Quantity Screw Type
Power Board M2*3 1
3. Disconnect the FFC adhesive from the Upper Cover as shown.
4. Lift up the right side of the Power Board as shown, ensuring that the board is free of the securing pin.
58 Chapter 3
5. Grasp the right side of the Power Board as shown and lift the left side of the board to release the left side
securing pin.
6. Rotate the Power Board as shown to disengage the final securing clip.
7. Remove the board from the Upper Cover.
Chapter 3 59
Removing the TouchPad Bracket
1. See “Removing the Upper Cover” on page 54.
2. Remove the single securing screw from the TouchPad Bracket.
Step Size Quantity Screw Type
TouchPad M2*3 1
Bracket
3. Lift the left side of the TouchPad Bracket (1) and slide the bracket to the left to clear the securing pin (2).
1
2
60 Chapter 3
4. Lift the bracket up to clear the right side securing pin.
5. Slide the TouchPad Bracket out of the Upper Cover as shown.
6. Release the FFC locking latch as shown.
Chapter 3 61
7. Grasp the FFC from the underside of the Upper Cover and disconnect it from the TouchPad.
NOTE: It may be necessary to disengage the FFC from the adhesive covering on the TouchPad (blue callout).
62 Chapter 3
Removing the LCD Module
IMPORTANT: Cable paths and positioning may not represent the actual model. During the removal and
replacement of the LCD Module, ensure all available cable channels and clips are used and that the cables are
replaced in the same position.
1. See “Removing the Upper Cover” on page 54.
2. Remove the adhesive strip securing the antenna cables in place.
3. Carefully pull the antenna cables through from the underside of the computer and remove the cables from the
cable clips.
4. Disconnect the Camera cable from the Mainboard.
Chapter 3 63
5. Remove the cable from the cable clips.
6. Disconnect the LCD power cable from the Mainboard.
7. Remove the cable from the cable clips.
64 Chapter 3
8. Disconnect the MIC cable from the Mainboard.
IMPORTANT:The MIC cable passes under the hinge, not along the same path as the LCD power cable.
9. Remove the two securing screws from the LCD brackets.
Step Size Quantity Screw Type
LCD Module M2*6 2
IMPORTANT:Ensure all cables are clear of the lower cover before removing the LCD module.
Chapter 3 65
10. Grasp the module with both hands and lift upwards.
Removing the RTC Battery
IMPORTANT:Follow local regulations for disposal of all batteries.
The RTC Battery is soldered to the Mainboard. To replace the battery, solder the new battery to the
connections shown.
66 Chapter 3
Removing the USB Board and Cable
1. Disconnect the USB cable from the Mainboard.
2. Peel back the adhesive strip securing the USB cable and disconnect the cable from the USB Board.
3. Remove the single securing screw from the USB Board.
Step Size Quantity Screw Type
USB Board M2*3 1
Chapter 3 67
4. Lift the USB Board clear of the computer rear edge first.
68 Chapter 3
Removing the Bluetooth Module
1. Remove the adhesive tape securing the Bluetooth cable in place.
2. Disconnect the Bluetooth cable from the Mainboard.
3. Lift the Bluetooth Module clear of the casing.
Chapter 3 69
4. Turn the Bluetooth Module over and disconnect the Bluetooth cable.
70 Chapter 3
Removing the Mainboard and Power Cable
1. See “Removing the LCD Module” on page 63.
2. See “Removing the USB Board and Cable” on page 67.
3. See “Removing the Bluetooth Module” on page 69.
4. Disconnect the Speaker cable from the Mainboard.
5. Remove the single securing screw from the Mainboard.
Step Size Quantity Screw Type
Mainboard M2*3 1
Chapter 3 71
6. Remove the power jack from the Lower Cover.
7. Remove the cable cluster from the Lower Cover.
8. Lift the Mainboard, right side first, and remove it from the Lower Cover.
72 Chapter 3
9. Turn the Mainboard over and disconnect the Power Cable.
Chapter 3 73
Removing the Speaker Module
1. See “Removing the Mainboard and Power Cable” on page 71.
2. Remove the adhesive strips holding the cables in place.
3. Remove the two securing screws (one for each Speaker).
Step Size Quantity Screw Type
Speaker Module M2*3 2
4. Lift the Speakers individually from the upper cover as shown.
74 Chapter 3
5. Remove the Speaker Module from the Lower Cover.
Chapter 3 75
Removing the Thermal Module
1. See “Removing the Mainboard and Power Cable” on page 71.
2. Turn the Mainboard CPU side up, and place it on a clean surface.
3. Disconnect the Fan cable from the Mainboard.
4. Remove the two securing screws from the Thermal Module.
Step Size Quantity Screw Type
Thermal Module M2*3 2
76 Chapter 3
5. Grasp the Thermal Module and gently twist side to side to break the seal between the Thermal Module and
heat pad.
6. Lift the Thermal Module clear of the Mainboard.
Chapter 3 77
LCD Module Disassembly Process
IMPORTANT:Cable paths and positioning may not represent the actual model. During the removal and
replacement of components, ensure all available cable channels and clips are used and that the
cables are replaced in the same position.
LCD Module Disassembly Flowchart
Remove LCD
Panel from Main
Unit before
proceeding
Remove
LCD Bracket
Extensions
Remove
LCD Bezel
Remove Remove
LCD Panel Camera Module
Remove Remove Remove Remove Remove
LCD FPC Cable LCD Brackets Camera Cable Microphone Antennas
Screw List
Step Screw Quantity Part No.
LCD Bezel M2*6 4 86.S5502.002
LCD Panel M2*6 2 86.S5502.002
LCD Brackets M2*3 4 86.S5502.001
78 Chapter 3
Removing the LCD Bracket Extensions
1. See “Removing the LCD Module” on page 63.
2. Remove the right side LCD Bracket Extension from the LCD Bracket as shown.
IMPORTANT:The Extensions may not represent the actual model. During the removal and replacement of
components, ensure all available cable channels and clips are used and that the cables are replaced
in the same position.
3. Remove the left side LCD Bracket Extension from the LCD Bracket as shown.
Chapter 3 79
Removing the LCD Bezel
1. See “Removing the LCD Bracket Extensions” on page 79.
2. Remove the four screw caps and screws from the LCD Bezel.
NOTE: The two center screw caps at the top of the bezel are for protection only.
Step Size Quantity Screw Type
LCD Bezel M2*6 4
3. Starting from the inside top edge, pry the bezel away from the panel. Continue moving down the sides until the
bezel is removed. If necessary, use a plastic pry to release the corners of the bezel.
80 Chapter 3
4. Lift up the bezel and remove it from the LCD Module.
IMPORTANT: If the LCD Bezel is replaced, remove the lid sensor magnet from the bezel, and attach it to the
replacement bezel.
Chapter 3 81
Removing the Camera Board
1. See “Removing the LCD Bezel” on page 80.
2. Disconnect the cable from the Camera Board as shown.
3. Remove the Camera Board from the LCD Module.
82 Chapter 3
Removing the LCD Panel
1. See “Removing the Camera Board” on page 82.
2. Remove the two securing screws from the LCD Panel.
Step Size Quantity Screw Type
LCD Panel M2*6 2
3. Hold the LCD Panel from the sides and lift to remove. Place it on a clean surface.
Chapter 3 83
Removing the LCD Brackets and FPC Cable
1. See “Removing the LCD Panel” on page 83.
2. Remove the four securing screws (two each side) from the LCD Panel brackets.
Step Size Quantity Screw Type
LCD Brackets M2*3 4
3. Turn the LCD panel over on a clean surface. Remove the adhesive strips securing the LCD cable.
84 Chapter 3
4. Carefully lift the adhesive tape securing the cable connector to the LCD Panel.
5. Hold the adhesive tape clear of the LCD Panel and disconnect the LCD cable as shown.
Chapter 3 85
Removing the Microphone Board
1. See “Removing the LCD Panel” on page 83.
2. Remove the adhesive strips holding the MIC cable in place.
3. Remove the MIC Board from the LCD Module.
86 Chapter 3
Removing the Camera Cable
1. See “Removing the LCD Panel” on page 83.
2. Remove the adhesive strips holding the Camera cable in place.
3. Remove the Camera cable from the LCD Module.
Chapter 3 87
Removing the Antennas
1. See “Removing the LCD Panel” on page 83.
2. Remove the adhesive strips holding the Antenna cables in place.
3. Carefully pry up the Antenna pads, as shown, and remove the pads from the LCD Module.
IMPORTANT: A strong adhesive is used to secure the Antenna pads in place. Take care not to bend the pads
during removal.
88 Chapter 3
LCD Module Reassembly Procedure
Replacing the Antennas, Camera Cable, and MIC
1. Replace the left and right Antenna cables as shown.
2. Ensure the cables run through all the available adhesive securing strips as shown. Press down the Antenna
pads to secure them to the LCD Module (green callouts).
3. Replace the Camera cable in the LCD Module as 4. Press the Camera cable down to secure it in place.
shown.
Chapter 3 89
5. Run the cable as shown using all the available cable 6. Replace the MIC Board in the LCD Module as
clips and replace the adhesive strip (green callout). shown.
7. Press the MIC Board down to secure it in place. 8. Run the MIC cable along the LCD Module as shown
and replace the adhesive strips to secure it in place.
NOTE: The LCD Module appears as shown when the Antennas, Camera Cable, and MIC Board are replaced
correctly.
90 Chapter 3
Replacing the LCD Cable and Brackets
1. Insert the LCD Cable into the panel connector as 2. Secure the connector by replacing the adhesive strip
shown. as shown.
3. Run the LCD Cable as shown and replace the securing strips.
IMPORTANT:Ensure that the LCD Cable runs as shown to avoid trapping when the Bezel is replaced.
Chapter 3 91
4. Align the screw holes and replace the left and right LCD brackets as shown.
5. Secure the brackets to the panel using four bracket screws (two each side).
92 Chapter 3
Replacing the LCD Panel
1. Replace the LCD Panel top edge first as shown.
2. Ensure the cables pass through the hinge wells as shown and rotate the panel downward in to the LCD
Module.
3. Replace the two securing screws.
Chapter 3 93
Replacing the Camera Module
1. Place the Camera Module in the LCD Module and 2. Connect the Camera cable as shown.
press down to secure it in place.
94 Chapter 3
Replacing the LCD Bezel
IMPORTANT: If the LCD Bezel is replaced, remove the lid sensor magnet from the bezel, and attach it to the
replacement bezel.
1. Replace the bezel bottom edge first as shown. 2. Starting at the hinge wells, press down to secure the
bezel in place.
Chapter 3 95
3. Press down around the edges of the bezel to secure it in place.
4. Replace the four screws and screw caps.
96 Chapter 3
Replacing the LCD Bracket Extensions
IMPORTANT: The Extensions may not represent the actual model. During the removal and replacement of
components, ensure all available cable channels and clips are used and that the cables are replaced in the same
position.
1. Ensure the left side Power and MIC cables run as shown.
NOTE: The MIC cable runs underneath the left side bracket extension.
2. Replace the left side LCD Bracket Extension an press down to secure it in place.
3. Replace the right side LCD Bracket Extension an press down to secure it in place.
Chapter 3 97
Main Module Reassembly Procedure
Replacing the Thermal Module
IMPORTANT:Ensure all heat pads are in place before replacing the Thermal Module.
The following thermal pads are approved for use:
• Eapus XR-PE
1. Align the screw holes on the Thermal Module and 2. Replace the two securing screws in the Thermal
Mainboard and replace the module. Module.
3. Connect the Fan cable to the Mainboard as shown.
98 Chapter 3
Replacing the Speaker Module
1. Replace the left and right Speakers in the Lower Cover as shown.
2. Replace the two securing screws (one in each Speaker).
3. Run the Speaker Module cable along the Lower Cover as shown
Chapter 3 99
4. Secure the Speaker Module cable in place with the adhesive strips.
100 Chapter 3
Replacing the Mainboard
1. Connect the Power Cable to the Mainboard. 2. Insert the Mainboard left side first to ensure the I/O
ports pass through the Lower Cover.
3. Lower the Mainboard into place as shown. 4. Place the cable cluster in to the Mainboard and
NOTE: Ensure the Speaker cable (green callout) is press down secure it in place.
accessible before placing the Mainboard.
5. Place the power jack in to the Mainboard and press 6. Replace the single securing screw.
down secure it in place.
Chapter 3 101
7. Connect the Speaker cable to the Mainboard.
Replacing the Bluetooth Module
1. Connect the Bluetooth cable to the Bluetooth 2. Place the Bluetooth Module in the Lower Cover as
Module. shown.
3. Connect the Bluetooth cable to the Mainboard. 4. Secure the Bluetooth cable in place with the
adhesive strip.
102 Chapter 3
Replacing the USB Board
1. Place the USB Board in the Lower Cover as shown. Ensure that the WLAN switch (red callout) is correctly
placed in the spacer (green callout).
2. Replace the single securing screw. 3. Connect the USB cable to the USB Board.
4. Secure the cable in the connector with the adhesive 5. Connect the USB cable to the Mainboard.
strip.
Chapter 3 103
Replacing the LCD Module
1. Place the LCD Module on the Lower Cover and secure it in place with the two screws.
2. Run the MIC cable along the cable channel and 3. Run the Power cable along the cable channel and
reconnect it to the Mainboard. reconnect it to the Mainboard.
104 Chapter 3
4. Run the Camera cable along the Lower Cover using all available cable clips.
5. Connect the Camera cable to the Mainboard. 6. Run the Antenna cables along the Lower Cover
using all available cable clips.
7. Pass the Antenna cables through the Lower Cover and them in place with an adhesive strip.
Chapter 3 105
8. The Lower Cover appears as follows when all the LCD cables are correctly placed.
106 Chapter 3
Replacing the TouchPad Bracket
1. Insert the FFC through the Upper Cover as shown, 2. Secure the FFC in place by closing the FFC latch.
and connect it to the TouchPad Board.
3. Insert the TouchPad Bracket bottom edge first as 4. Rotate the bracket on to the Upper Cover, ensuring
shown. Ensure that the three securing clips are that the two locating pins are properly located.
engaged.
5. Slide the bracket in the direction of the arrow to 6. Replace the single securing screw.
engage the final securing pin.
Chapter 3 107
Replacing the Power Board
1. 2.
3. Press down the left and right sides of the Power Board to locate the securing pins.
4. Replace the single securing screw and press down on the FFC (green callout) to secure it to the Upper Cover.
108 Chapter 3
Replacing the Upper Cover
1. Place the Upper Cover on the Lower Cover left side 2. Press down the Upper Cover at either side to snap it
first as shown. in to place.
3. Continue pressing down both sides of the Upper Cover and along the bottom edge to snap the covers together.
NOTE: Ensure there are no gaps between the Upper and Lower Covers.
4. Replace the five securing screws in the Upper Cover.
Chapter 3 109
5. Reconnect the following cables to the Mainboard.
A
B
Connect A to the Mainboard. Secure the locking latch on A as shown.
Connect B to the Mainboard. Secure the locking latch on B as shown.
110 Chapter 3
6. Turn the computer over and replace the nine securing screws as shown.
NOTE: Ensure the correct screw type is used for each hole. Red callout: M2*3, Green callout: M2*6.
Chapter 3 111
Replacing the Keyboard
1. Turn the computer over. Insert the Keyboard FFC in 2. Close the FFC locking latch as shown.
to the Mainboard connector.
3. Turn the Keyboard over and slide it in the direction of 4. Using the tweezers, push the locking latch in and
the arrow. press down in the areas indicated to secure the
Keyboard.
IMPORTANT: Ensure the Keyboard slides underneath
the two securing pins.
112 Chapter 3
Replacing the WLAN Board
1. Turn the computer over. Insert the WLAN board in to 2. Replace the single securing screw.
the WLAN slot.
3. Connect the two Antenna cables to the WLAN 4. Secure the cables in place with adhesive tape.
board.
IMPORTANT: The black cable attaches to the MAIN (J3) terminal and the gray cable attaches to the AUX (J2)
terminal.
Chapter 3 113
Replacing the DIMM Module
1. Insert the DIMM Module in to the DIMM slot. 2. Press the module down to complete the installation.
Repl[acing the Hard Disk Drive Module
1. Insert the HDD in to the HDD Carrier. 2. Secure the Carrier to the HDD by replacing the four
screws in numerical order from 1 to 4.
3
4
1
2
3. Insert the HDD Module into the Lower Cover as 4. Slide the HDD Module in the direction of the arrow to
shown. connect the interface.
114 Chapter 3
Replacing the Lower Covers
1. Replace the WLAN Cover and press down around 2. Replace the Memory Cover and press down around
the perimeter to snap it in to place. the perimeter to snap it in to place.
3. Replace the HDD Cover and press down around the perimeter to snap it in to place.
4. Replace the screws in the WLAN and Memory Covers and tighten the two captive screws in the HDD Cover.
Chapter 3 115
Replacing the SD Dummy Card
1. Insert the SD Dummy Card as shown. 2. Press the card in to the slot until it clicks in to place.
Replacing the Battery
1. Slide and hold the battery release latch to the 2. Slide the battery lock/unlock latch to the lock
release position (1), then insert the battery pack in to position.
the main unit (2).
2
1
116 Chapter 3
Chapter 4
Troubleshooting
Common Problems
Use the following procedure as a guide for computer problems.
NOTE: The diagnostic tests are intended to test only Acer products. Non-Acer products, prototype cards, or
modified options can give false errors and invalid system responses.
1. Obtain the failing symptoms in as much detail as possible.
2. Verify the symptoms by attempting to re-create the failure by running the diagnostic test or by repeating
the same operation.
3. Use the following table with the verified symptom to determine which page to go to.
Symptoms (Verified) Go To
Power On Issue Page 118
No Display Issue Page 119
LCD Failure Page 121
Internal Keyboard Failure Page 121
TouchPad Failure Page 122
Internal Speaker Failure Page 122
Internal Microphone Failure Page 124
Rightside USB Failure Page 126
Power Button Failure Page 126
Other Functions Failure Page 127
Intermittent Failures Page 128
Undermined Failures Page 128
4. If the Issue is still not resolved, see “Online Support Information” on page 217.
Chapter 4 117
Power On Issue
If the system doesn’t power on, perform the following actions one at a time to correct the problem. Do not
replace a non-defective FRUs:
START
Check AC/Batt Swap AC/
NG
only power on Battery
OK
Check Power/B NG Swap Power/B
Replace
Mainboard
Computer Shutsdown Intermittently
If the system powers off at intervals, perform the following actions one at a time to correct the problem.
1. Check the power cable is properly connected to the computer and the electrical outlet.
2. Remove any extension cables between the computer and the outlet.
3. Remove any surge protectors between the computer and the electrical outlet. Plug the computer directly
into a known good electrical outlet.
4. Remove all external and non-essential hardware connected to the computer that are not necessary to
boot the computer to the failure point.
5. Remove any recently installed software.
6. If the Issue is still not resolved, see “Online Support Information” on page 217.
118 Chapter 4
No Display Issue
If the Display doesn’t work, perform the following actions one at a time to correct the problem. Do not replace
a non-defective FRUs:
START
Go to Power
Power On? NG On Issue
section
OK
Extenal RAM
NG Connect well
well connected?
OK
External RAM Swap External
NG
OK? RAM module
OK
LCD Cable
NG Connect well
well connected?
OK
LCD
Swap LCD
Panel/Cable NG
Panel/Cable
OK?
OK
Replace
Mainboard
No POST or Video
If the POST or video doesn’t display, perform the following actions one at a time to correct the problem.
1. Make sure that the internal display is selected. On this notebook model, switching between the internal
display and the external display is done by pressing Fn+F5. Reference Product pages for specific model
procedures.
2. Make sure the computer has power by checking at least one of the following occurs:
• Fans start up
• Status LEDs light up
If there is no power, see “Power On Issue” on page 118.
3. Drain any stored power by removing the power cable and battery and holding down the power button for
10 seconds. Reconnect the power and reboot the computer.
4. Connect an external monitor to the computer and switch between the internal display and the external
display is by pressing Fn+F5 (on this model).
Chapter 4 119
If the POST or video appears on the external display, see “LCD Failure” on page 121.
5. Disconnect power and all external devices including port replicators or docking stations. Remove any
memory cards and CD/DVD discs. Restart the computer.
If the computer boots correctly, add the devices one by one until the failure point is discovered.
6. Reseat the memory modules.
7. Remove the drives (see “Disassembly Process” on page 40).
8. If the Issue is still not resolved, see “Online Support Information” on page 217.
Abnormal Video Display
If video displays abnormally, perform the following actions one at a time to correct the problem.
1. Reboot the computer.
2. If permanent vertical/horizontal lines or dark spots display in the same location, the LCD is faulty and
should be replaced. See “Disassembly Process” on page 40.
3. If extensive pixel damage is present (different colored spots in the same locations on the screen), the LCD
is faulty and should be replaced. See “Disassembly Process” on page 40.
4. Adjust the brightness to its highest level. See the User Manual for instructions on adjusting settings.
NOTE: Ensure that the computer is not running on battery alone as this may reduce display brightness.
If the display is too dim at the highest brightness setting, the LCD is faulty and should be replaced. See
“Disassembly Process” on page 40.
5. Check the display resolution is correctly configured:
a. Minimize or close all Windows.
b. If display size is only abnormal in an application, check the view settings and control/mouse wheel
zoom feature in the application.
c. If desktop display resolution is not normal, right-click on the desktop and select
Personalize´ Display Settings.
d. Click and drag the Resolution slider to the desired resolution.
e. Click Apply and check the display. Readjust if necessary.
6. Roll back the video driver to the previous version if updated.
7. Remove and reinstall the video driver.
8. Check the Device Manager to determine that:
• The device is properly installed. There are no red Xs or yellow exclamation marks.
• There are no device conflicts.
• No hardware is listed under Other Devices.
9. If the Issue is still not resolved, see “Online Support Information” on page 217.
10. Run the Windows Memory Diagnostic from the operating system DVD and follow the onscreen prompts.
11. If the Issue is still not resolved, see “Online Support Information” on page 217.
Random Loss of BIOS Settings
If the computer is experiencing intermittent loss of BIOS information, perform the following actions one at a
time to correct the problem.
1. If the computer is more than one year old, replace the CMOS battery.
2. Run a complete virus scan using up-to-date software to ensure the computer is virus free.
3. If the computer is experiencing HDD or ODD BIOS information loss, disconnect and reconnect the power
and data cables between devices.
120 Chapter 4
If the BIOS settings are still lost, replace the cables.
4. If HDD information is missing from the BIOS, the drive may be defective and should be replaced.
5. Replace the Motherboard.
6. If the Issue is still not resolved, see “Online Support Information” on page 217.
LCD Failure
If the LCD fails, perform the following actions one at a time to correct the problem. Do not replace a non-
defective FRUs:
START
Check LCD Swap LCD
NG
module Panel/Cable
OK
Replace
Mainboard
Built-In Keyboard Failure
If the built-in Keyboard fails, perform the following actions one at a time to correct the problem. Do not replace
a non-defective FRUs:
START
Keyboard FFC
NG Connect well
well connected?
OK
Swap
Keyboard OK? NG
Keyboard
OK
Replace
Mainboard
Chapter 4 121
TouchPad Failure
If the TouchPad doesn’t work, perform the following actions one at a time to correct the problem. Do not
replace a non-defective FRUs:
START
Reassemble
Check M/B
NG T/P FFC to
T/P FCC
Mainboard
OK
Swap/
Check Upper Reassemble T/
NG
Cover P board or T/P
FFC
OK
Replace
Mainboard
Internal Speaker Failure
If the internal Speakers fail, perform the following actions one at a time to correct the problem. Do not replace
a non-defective FRUs:
START
Reassemble
Check M/B
NG Speaker cable
Speaker cable
to Mainboard
OK
Check Lower Swap Lower
NG
Cover Cover
OK
Replace
Mainboard
Sound Problems
If sound problems are experienced, perform the following actions one at a time to correct the problem.
1. Reboot the computer.
2. Navigate to Start´ Control Panel´ System and Maintenance´ System´ Device Manager. Check
the Device Manager to determine that:
122 Chapter 4
• The device is properly installed.
• There are no red Xs or yellow exclamation marks.
• There are no device conflicts.
• No hardware is listed under Other Devices.
3. Roll back the audio driver to the previous version, if updated recently.
4. Remove and reinstall the audio driver.
5. Ensure that all volume controls are set mid range:
a. Click the volume icon on the taskbar and drag the slider to 50. Ensure that the volume is not muted.
b. Click Mixer to verify that other audio applications are set to 50 and not muted.
6. Navigate to Start´ Control Panel´ Hardware and Sound´ Sound. Ensure that Speakers are selected
as the default audio device (green check mark).
NOTE: If Speakers does not show, right-click on the Playback tab and select Show Disabled Devices
(clear by default).
7. Select Speakers and click Configure to start Speaker Setup. Follow the onscreen prompts to configure
the speakers.
8. Remove and recently installed hardware or software.
9. Restore system and file settings from a known good date using System Restore.
If the issue is not fixed, repeat the preceding steps and select an earlier time and date.
10. Reinstall the Operating System.
11. If the Issue is still not resolved, see “Online Support Information” on page 217.
Chapter 4 123
Internal Microphone Failure
If the internal Microphone fails, perform the following actions one at a time to correct the problem. Do not
replace a non-defective FRUs:
START
Reassemble
Check M/B
NG MIC cable to
MIC cable
Mainboard
OK
Check LCD Swap LCD
NG
MIC cable MIC cable
OK
Replace
Mainboard
Microphone Problems
If internal or external Microphones do no operate correctly, perform the following actions one at a time to
correct the problem.
1. Check that the microphone is enabled. Navigate to Start´ Control Panel´ Hardware and Sound´
Sound and select the Recording tab.
2. Right-click on the Recording tab and select Show Disabled Devices (clear by default).
3. The microphone appears on the Recording tab.
4. Right-click on the microphone and select Enable.
5. Select the microphone then click Properties. Select the Levels tab.
6. Increase the volume to the maximum setting and click OK.
7. Test the microphone hardware:
a. Select the microphone and click Configure.
b. Select Set up microphone.
c. Select the microphone type from the list and click Next.
d. Follow the onscreen prompts to complete the test.
8. If the Issue is still not resolved, see “Online Support Information” on page 217.
124 Chapter 4
HDD Not Operating Correctly
If the HDD does not operate correctly, perform the following actions one at a time to correct the problem.
1. Disconnect all external devices.
2. Run a complete virus scan using up-to-date software to ensure the computer is virus free.
3. Run the Windows Vista Startup Repair Utility:
a. insert the Windows Vista Operating System DVD in the ODD and restart the computer.
b. When prompted, press any key to start to the operating system DVD.
c. The Install Windows screen displays. Click Next.
d. Select Repair your computer.
e. The System Recovery Options screen displays. Click Next.
f. Select the appropriate operating system, and click Next.
NOTE: Click Load Drivers if controller drives are required.
g. Select Startup Repair.
h. Startup Repair attempts to locate and resolve issues with the computer.
i. When complete, click Finish.
If an issue is discovered, follow the onscreen information to resolve the problem.
4. Run the Windows Memory Diagnostic Tool. For more information see Windows Help and Support.
5. Restart the computer and press F2 to enter the BIOS Utility. Check the BIOS settings are correct and that
CD/DVD drive is set as the first boot device on the Boot menu.
6. Ensure all cables and jumpers on the HDD and ODD are set correctly.
7. Remove any recently added hardware and associated software.
8. Run the Windows Disk Defragmenter. For more information see Windows Help and Support.
9. Run Windows Check Disk by entering chkdsk /r from a command prompt. For more information see
Windows Help and Support.
10. Restore system and file settings from a known good date using System Restore.
If the issue is not fixed, repeat the preceding steps and select an earlier time and date.
11. Replace the HDD. See “Disassembly Process” on page 40.
Chapter 4 125
USB Failure (Rightside)
If the rightside USB port fails, perform the following actions one at a time to correct the problem. Do not
replace a non-defective FRUs:
Power Button Failure
If the Power Button fails, perform the following actions one at a time to correct the problem. Do not replace a
non-defective FRUs:
126 Chapter 4
External Mouse Failure
If an external Mouse fails, perform the following actions one at a time to correct the problem.
1. Try an alternative mouse.
2. If the mouse uses a wireless connection, insert new batteries and confirm there is a good connection. See
the mouse user manual.
3. If the mouse uses a USB connection, try an alternate USB port.
4. Try an alternative program to verify mouse operation. Reinstall the program experiencing mouse failure.
5. Restart the computer.
6. Remove any recently added hardware and associated software.
7. Remove any recently added software and reboot.
8. Restore system and file settings from a known good date using System Restore.
If the issue is not fixed, repeat the preceding steps and select an earlier time and date.
9. Run the Event Viewer to check the events log for errors. For more information see Windows Help and
Support.
10. Roll back the mouse driver to the previous version if updated recently.
11. Remove and reinstall the mouse driver.
12. Check the Device Manager to determine that:
• The device is properly installed. There are no red Xs or yellow exclamation marks.
• There are no device conflicts.
• No hardware is listed under Other Devices.
13. If the Issue is still not resolved, see “Online Support Information” on page 217.
Other Failures
If the CRT Switch, Dock, LAN Port, external MIC or Speakers, PCI Express Card, 5-in-1 Card Reader or
Volume Wheel fail, perform the following general steps to correct the problem. Do not replace a non-defective
FRUs:
1. Check Drive whether is OK.
2. Check Test Fixture is ok.
3. Swap M/B to Try.
Chapter 4 127
Intermittent Problems
Intermittent system hang problems can be caused by a variety of reasons that have nothing to do with a
hardware defect, such as: cosmic radiation, electrostatic discharge, or software errors. FRU replacement
should be considered only when a recurring problem exists.
When analyzing an intermittent problem, do the following:
1. Run the advanced diagnostic test for the system board in loop mode at least 10 times.
2. If no error is detected, do not replace any FRU.
3. If any error is detected, replace the FRU. Rerun the test to verify that there are no more errors.
Undetermined Problems
The diagnostic problems does not identify which adapter or device failed, which installed devices are incorrect,
whether a short circuit is suspected, or whether the system is inoperative.
Follow these procedures to isolate the failing FRU (do not isolate non-defective FRU).
NOTE: Verify that all attached devices are supported by the computer.
NOTE: Verify that the power supply being used at the time of the failure is operating correctly. (See “Power On
Issue” on page 118):
1. Power-off the computer.
2. Visually check them for damage. If any problems are found, replace the FRU.
3. Remove or disconnect all of the following devices:
• Non-Acer devices
• Printer, mouse, and other external devices
• Battery pack
• Hard disk drive
• DIMM
• CD-ROM/Diskette drive Module
• PC Cards
4. Power-on the computer.
5. Determine if the problem has changed.
6. If the problem does not recur, reconnect the removed devices one at a time until you find the failing FRU.
7. If the problem remains, replace the following FRU one at a time. Do not replace a non-defective FRU:
• System board
• LCD assembly
128 Chapter 4
POST Code Reference Tables
These tables describe the POST codes and components of the POST process.
Sec:
NO_EVICTION_MODE_DEBUG EQU 1 (CommonPlatform\sec\Ia32\SecCore.inc)
Code Description
0xC2 MTRR setup
0xC3 Enable cache
0xC4 Establish cache tags
0xC5 Enter NEM, Place the BSP in No Fill mode, set CR0.CD = 1, CR0.NW = 0.
0xCF Cache Init Finished
Memory:
DEBUG_BIOS equ 1 (Chipset\Alviso\MemoryInitAsm\IA32\IMEMORY.INC)
Code Description
0xA0 First memory check point
0x01 Enable MCHBAR
0x02 Check for DRAM initialization interrupt and reset fail
0x03 Verify all DIMMs are DDR or DDR2 and unbuffered
0x04 Detect an improper warm reset and handle
0x05 Detect if ECC SO-DIMMs are present in the system
0x06 Verify all DIMMs are single or double sided and not asymmetric
0x07 Verify all DIMMs are x8 or x16 width
0x08 Find a common CAS latency between the DIMMS and the MCH
0x09 Determine the memory frequency and CAS latency to program
0x10 Determine the smallest common TRAS for all DIMMs
0x11 Determine the smallest common TRP for all DIMMs
0x12 Determine the smallest common TRCD for all DIMMs
0x13 Determine the smallest refresh period for all DIMMs
0x14 Verify burst length of 8 is supported by all DIMMs
0x15 Determine the smallest tWR supported by all DIMMs
0x16 Determine DIMM size parameters
0x17 Program the correct system memory frequency
0x18 Determine and set the mode of operation for the memory channels
0x19 Program clock crossing registers
0x20 Disable Fast Dispatch
0x21 Program the DRAM Row Attributes and DRAM Row Boundary registers
0x22 Program the DRAM Bank Architecture register
0x23 Program the DRAM Timing & and DRAM Control registers
0x24 Program ODT
0x25 Perform steps required before memory init
0x26 Program the receive enable reference timing control register
Program the DLL Timing Control Registers, RCOMP settings
Chapter 4 129
Code Description
0x27 Enable DRAM Channel I/O Buffers
0x28 Enable all clocks on populated rows
0x29 Perform JEDEC memory initialization for all memory rows
0x30 Perform steps required after memory init
0x31 Program DRAM throttling and throttling event registers
0x32 Setup DRAM control register for normal operation and enable
0x33 Enable RCOMP
0x34 Clear DRAM initialization bit in the SB
0x35 Initialization Sequence Completed, program graphic clocks
0x43 Program Thermal Throttling
BDS & Specific action:
Code Description
0x00 Report the legacy boot is happening
0x12 Wake up the Aps
0x13 Initialize SMM Private Data and relocate BSP SMBASE
0x21 PC init begin at the stage1
0x27 Report every memory range do the hard ware ECC init
0x28 Report status code of every memory range
0x50 Get the root bridge handle
0x51 Notify pci bus driver starts to program the resource
0x58 Reset the host controller
0x5A IdeBus begin initialization
0x79 Report that the remote terminal is being disabled
0x7A Report that the remote terminal is being enabled
0x90 Keyboard reset
0x91 USB Keyboard disable
0x92 Keyboard detection
0x93 Report that the usb keyboard is being enabled
0x94 Clear the keyboard buffer
0x95 Init Keyboard
0x98 Mouse reset
0x99 Mouse disable
0x9A Detect PS2 mouse
0x9B Report that the mouse is being enabled
0xB8 Peripheral removable media reset (ex: IsaFloppy, USB device)
0xB9 Peripheral removable media disable
0xBB Peripheral removable media enable
0xE4 Report Status Code here for DXE_ENTRY_POINT once it is available
0xF8 Report that ExitBootServices () has been called
0xF9 Runtime driver set virtual address map
130 Chapter 4
Each PEIM entry point used in 80_PORT
Code Description
0x00
0x01 PEI_EVENT_LOG
0xA1 PEI_OEM_SERVICE
0xA2 PEI_SIO_INIT
0xA3 PEI_MONO_STATUS_CODE
0xA4 PEI_CPU_IO_PCI_CFG
0x06 PEI_CPU_IO
0x07 PEI_PCI_CFG
0xA5 PEI_CPU_PEIM
0xA6 PEI_PLATFORM_STAGE1
0xA7 PEI_VARIABLE
0xA8 PEI_SB_INIT
0x0C PEI_CAPSULE
0xAA PEI_PLATFORM_STAGE2
0xAC PEI_SB_SMBUS_ARP_DISABLED
0x0F PEI_HOST_TO_SYSTEM
0x40 PEI_MEMORY_INIT
0x41 PEI_S3_RESUME
0xAD PEI_CLOCK_GEN
0xAB PEI_OP_PRESENCE
0xAE PEI_FIND_FV
0x16 PEI_H2O_DEBUG_IO
0x17 PEI_H2O_DEBUG_COMM
0x16~0x1F PEI_RESERVED
0x20~0x2E PEI_OEM_DEFINED
0xAF PEI_DXE_IPL
Each Driver entry point used in 80_PORT
Code Description
0x30 RESERVED
0xB6 DXE_CRC32_SECTION_EXTRACT
0xB8 SCRIPT_SAVE
0xB9 ACPI_S3_SAVE
0xBA SMART_TIMER
0xBB JPEG_DECODER
0xBC PCX_DECODER
0xBE HT_CPU / MP_CPU
0xBF LEGACY_METRONOME
0xC0 FTWLITE
0xC1 RUN_RIME
0xC2 MONOTONIC_COUNTER
0xC3 WATCH_DOG_TIMER
Chapter 4 131
Code Description
0xC4 SECURITY_STUB
0xC5 DXE_CPU_IO
0xC6 CF9_RESET
0xC7 PC_RTC
0xC8 STATUS_CODE
0xC9 VARIABLE
EMU_VARIABLE
0xD9 DXE_CHIPSET_INIT
0x45 DXE_ALERT_FORMAT
0xD6 PCI_HOST_BRIDGE
0xD7 PCI_EXPRESS
0xD5 DXE_SB_INIT
0xDA IDE_CONTROLLER
0xDB SATA_CONTROLLER
0xDD SB_SM_BUS
0xE7 ISA_ACPI_DRIVER
0xE8 ISA_BUS
0xE9 ISA_SERIAL
0xED BUS_PCI_UNDI
0xEC PCI_BUS
0xF6 BOOT_PRIORITY
0xF7 FVB_SERVICE
0xF8 ACPI_PLATFORM
0xFB PCI_HOT_PLUG
0xFC DXE_PLATFORM
0xFD PLATFORM_IDE
0x97 SMBIOS
0x98 MEMORY_SUB_CLASS
0x99 MISC_SUB_CLASS
0x82 CON_PLATFORM
0x83 SAVE_MEMORY_CONFIG
0x84 ACPI_SUPPORT
0x85 CON_SPLITTER_UGA_VGA / CON_SPLITTER
0x88 VGA_CLASS
0x89 DATA_HUB
0x60 DISK_IO
0x8B MEMORY_TEST
0x62 CRISIS_RECOVERY
0x8D LEGACY_8259
0x8E LEGACY_REGION
0x8F LEGACY_INTERRUPT
0x70 BIOS_KEYBOARD
0x71 BIOS_VEDIO
0x72 MONITER_KEY
132 Chapter 4
Code Description
0x73 LEGACY_BIOS
0x75 LEGACY_BIOS_PLATFORM
0x76 PCI_PLATFORM
0x6C ISA_FLOOPY
0x6D PS2_MOUSE
0x6E USB_BOT
0x6F USB_CBI0
0x74 USB_MOUSE
0xFA SETUP_UTILITY
0x90 FW_BLOCK_SERVICE
0x78 SMM_USB_LEGACY
0x86 GRAPHICS_CONSOLE
0x87 TERMINAL
0x8A DATA_HUB_STD_ERR
0x7C FAT
0x7D PARTITION
0x7E ENGLISH
0x7F FRENCH
0x9E HII_DATABASE
0x9F OEM_SETUP_BROWSER
0x8C OEM_BADGING_SUPPORT
0xF9 SETUP_MOUSE
0x72 MONITOR_KEY
0xBD PLATFORM_BDS
0x8D RESERVED
0x8E RESERVED
0x8F RESERVED
0xA0 DXE_H2O_DEBUG_IO
0xB3 DXE_TPM_TCG
0xB4 DXE_TPM_PHYSICAL_PRESENCE
0xB7 DXE_OEM_SERVICE
0x9B DXE_ SECURITY_HDD_PASSWORD_SERVICE
0xA9 DXE_LAN_IDER_CONTROLLER
0x9C DXE_ SECURITY_SYSTEM_PASSWORD_SERVICE
0x9D DXE_ SECURITY_ PASSWORD_CONSOLE
0xCB DXE_ DATA_HUB_RECORD_POLICY
0xB5 DXE_TPM_DRIVER
0x11 CHINESE
0xB0 JAPANESE
0xB1 DXE_UNICODE_COLLACTION
Chapter 4 133
Each SmmDriver entry point used in 80_PORT
Code Description
0xD4 SMM_ACCESS
0xDE SMM_CONTROL
0xCC SMM_BASE
0xD2 SMM_RUNTIME
0xDF SB_SMM_DISPATCH
0xD0 SMM_THUNK
0xCA SMM_ACPI_SW_CHILD
0xFE SMM_PLATFORM
0xD8 SMM_GMCH_MBI
0x90 SMM_FW_BLOCK_SERVICE
0x91 SMM_VARIABLE
0x92 SMM_IHISI
0x93 SMM_INT15_MICROCODE
0x94 SMM_PNP
0x95 SMM_INIT_PPM
0xD3 SMM_OEM_SERVICE
134 Chapter 4
Chapter 5
Jumper and Connector Locations
Top View
Item Description Item Description
JP1 Internal camera Connector JBT1 Bluetooth Connector
JP2 TO PWR/B Connector JMINI2 MINI Card (3G) Socket
JP3 TO USB/B Connector SW2 Left Button
JP4 Internal DMIC Connector SW3 Right Button
JP5 SIM Card Connector SW4 Bluetooth Button
JP11 Internal TouchPad Connector LED2 Battery LED
JP12 Internal Keyboard Connector LED3 Media LED
JP20 Speaker Connector LED4 Bluetooth LED
JLVDS1 LCD Connector LED5 NUM LED
JREAD1 Card Reader Connector LED6 CAP LED
Chapter 5 135
Bottom View
Item Description Item Description
JDIM1 DDR2 Socket JMIC1 MIC IN Connector
JSATA1 HDD Connector JP13 FAN Connector
JMINI1 MINI Card (Wireless) Socket PJP1 TO Power Core Connector
JCRT1 CRT Connector PJP2 Battery Connector
JRJ451 RJ45 LAN Connector U1 NB
JUSB1 External USB Connector U5 CPU
JHP1 Head-Phone Connector U6 SB
136 Chapter 5
Clearing Password Check and BIOS Recovery
This section provide you the standard operating procedures of clearing password and BIOS recovery for
Aspire one. Aspire one provide one Hardware Open Gap on main board for clearing password check, and one
Hotkey for enabling BIOS Recovery.
Clearing Password Check
Hardware Open Gap Description
Item Description Location
R72 Clear CMOS Jumper Memory Bay
Steps for Clearing BIOS Password Check
If users set BIOS Password (Supervisor Password and/or User Password) for a security reason, BIOS will ask
the password during systems POST or when systems enter to BIOS Setup menu. However, once it is
necessary to bypass the password check, users need to short the HW Gap to clear the password by the
following steps:
• Power Off a system, and remove HDD, AC and Battery from the machine.
• Open the back cover of the machine, and find out the HW Gap on M/B as picture.
• Use an electric conductivity tool to short the two points of the HW Gap.
• Plug in AC, keep the short condition on the HW Gap, and press Power Button to power on the
system till BIOS POST finish. Then remove the tool from the HW Gap.
• Restart system. Press F2 key to enter BIOS Setup menu.
•If there is no Password request, BIOS Password is cleared. Otherwise, please follow the steps and
try again.
NOTE: The steps are only for clearing BIOS Password (Supervisor Password and User Password).
Chapter 5 137
BIOS Recovery by Crisis Disk
BIOS Recovery Boot Block:
BIOS Recovery Boot Block is a special block of BIOS. It is used to boot up the system with minimum BIOS
initialization. Users can enable this feature to restore the BIOS firmware to a successful one once the previous
BIOS flashing process failed.
BIOS Recovery Hotkey:
The system provides a function hotkey: Fn+Esc, for enable BIOS Recovery process when system is powered
on during BIOS POST. To use this function, it is strongly recommended to have the AC adapter and Battery
present. If this function is enabled, the system will force the BIOS to enter a special BIOS block, called Boot
Block.
Steps for BIOS Recovery from USB Storage:
Before doing this, prepare the Crisis USB key. The Crisis USB key could be made by executing the Crisis Disk
program in another system with Windows XP OS.
Follow the steps below:
1. Save ROM file (file name: JAL90x64.fd) to the root directory of USB storage.
2. Plug USB storage into USB port.
3. Press Fn + ESC button then plug in AC.
The Power button flashes once.
4. Press Power button to initiate system CRISIS mode.
When CRISIS is complete, the system auto restarts with a workable BIOS.
5. Update the latest version BIOS for this machine by regular BIOS flashing process.
138 Chapter 5
Chapter 6
FRU (Field Replaceable Unit) List
This chapter gives you the FRU (Field Replaceable Unit) listing in global configurations of Aspire one. Refer to this chapter
whenever ordering for parts to repair or for RMA (Return Merchandise Authorization).
Please note that WHEN ORDERING FRU PARTS, you should check the most up-to-date information available on your
regional web or channel. For whatever reasons a part number change is made, it will not be noted on the printed Service
Guide. For ACER AUTHORIZED SERVICE PROVIDERS, your Acer office may have a DIFFERENT part number code from
those given in the FRU list of this printed Service Guide. You MUST use the local FRU list provided by your regional Acer
office to order FRU parts for repair and service of customer machines.
NOTE: To scrap or to return the defective parts, you should follow the local government ordinance or regulations on how to
dispose it properly, or follow the rules set by your regional Acer office on how to return it.
Chapter 6 139
Aspire one Exploded Diagrams
Main Assembly
1
2
6
7
8
3
4
5
5
Item Description Part Number
1 Keyboard TBD
2 Upper Cover 60.S5702.001
3 Mainboard MB.S6102.001
4 Heatsink 60.S5502.005
5 Lower Cover 60.S5502.001
6 Memory Door 42.S5502.003
7 WLAN Door 42.S5502.005
8 HDD Door 42.S5502.004
140 Chapter 6
Upper Cover Assembly
4
1
2
3
3
Item Description Part Number
1 TouchPad Bracket 33.S5502.001
2 TouchPad FFC Cable 50.S5502.004
3 Upper Cover 60.S5702.001
4 Power Board 55.S5502.002
Chapter 6 141
Lower Cover Assembly
1
3
4
2
Item Description Part Number
1 Speaker Module 23.S5502.002
2 Lower Cover 60.S5502.001
3 USB Board 55.S5502.001
4 USB Cable 50.S5502.002
142 Chapter 6
LCD Assembly
1
2
8
3
4
9
10
5
6
7
Item Description Part Number Item Description Part Number
1 LCD Bezel 60.S5502.004 6 LCD Bracket_L 33.S5502.003
2 LCD Panel 6M.S5502.001 7 LCD Module 60.S5502.003
3 ANTENNA WL-AUX 50.S5502.006 8 ANTENNA WL-MAIN 50.S5502.005
4 MIC Module 6M.S5502.001 9 LCD Bracket_R 33.S5502.003
5 Camera Cable 50.S5502.008 10 Camera Module 57.S5502.001
Chapter 6 143
Aspire one FRU List
Category Description Acer PN
Adapter
Adapter DELTA 30W 19V 1.7x5.5x11 Black ADP-30JH BA AP.03001.001
LF
Adapter LITE-ON 30W 19V 1.7x5.5x11 Black PA-1300- AP.03003.001
04AC LF
Adapter HIPRO 30W 19V 1.7x5.5x11 Black HP-A0301R3 AP.0300A.001
B1LF LF
Battery
Battery SANYO UM-2008A Li-Ion 3S1P SANYO 3 cell BT.00303.008
2200mAh Main COMMON Macles
Battery SANYO UM-2008AW Li-Ion 3S1P SANYO 3 cell BT.00303.009
2200mAh Main COMMON Macles / White
Battery PANASONIC UM-2008A Li-Ion 3S1P PANASONIC BT.00305.005
3 cell 2200mAh Main COMMON Macles
Battery PANASONIC UM-2008AW Li-Ion 3S1P BT.00305.006
PANASONIC 3 cell 2200mAh Main COMMON Macles /
White
Battery SIMPLO UM-2008A Li-Ion 3S1P SAMSUNG 3 cell BT.00307.006
2200mAh Main COMMON 2.2(F), black, new fuse
Battery SIMPLO UM-2008AW Li-Ion 3S1P SAMSUNG 3 BT.00307.007
cell 2200mAh Main COMMON 2.2 (F), white, new fuse
(NEC)
Battery PANASONIC UM-2008A Li-Ion 3S1P PANASONIC BT.00305.007
3 cell 2900mAh Main COMMON
Battery PANASONIC UM-2008AW Li-Ion 3S1P BT.00305.008
PANASONIC 3 cell 2900mAh Main COMMON white color
Battery SANYO UM-2008B Li-Ion 3S2P SANYO 6 cell BT.00603.067
4400mAh Main COMMON Black, 2.2Ah (A)
Battery SANYO UM-2008BW Li-Ion 3S2P SANYO 6 cell BT.00603.068
4400mAh Main COMMON White, 2.2 Ah (A)
Battery SIMPLO UM-2008A Li-Ion 3S2P SAMSUNG 6 cell BT.00607.033
4400mAh Main COMMON Macles
Battery SIMPLO UM-2008BW Li-Ion 3S2P PANASONIC 6 BT.00607.039
cell 4400mAh Main COMMON White color, PSS CG type
Battery SIMPLO UM-2008BW Li-Ion 3S2P SAMSUNG 6 BT.00607.040
cell 4400mAh Main COMMON white color, F type
Battery SANYO UM-2008B Li-Ion 3S2P SANYO 6 cell BT.00603.058
5200mAh Main COMMON Black
Battery SANYO UM-2008BW Li-Ion 3S2P SANYO 6 cell BT.00603.059
5200mAh Main COMMON white
Battery SIMPLO UM-2008B Li-Ion 3S2P SAMSUNG 6 cell BT.00607.042
5200mAh Main COMMON Macles Black
Battery SIMPLO UM-2008B Li-Ion 3S2P LGC 6 cell BT.00607.055
5200mAh Main COMMON Black, LGC 2.6 (B3)
Battery SIMPLO UM-2008BW Li-Ion 3S2P LGC 6 cell BT.00607.056
5200mAh Main COMMON White, LGC 2.6 (B3)
Battery SIMPLO UM-2008BW Li-Ion 3S2P SAMSUNG 6 BT.00607.058
cell 5200mAh Main COMMON 2.6(C), white, new fuse
(NEC)
144 Chapter 6
Category Description Acer PN
Battery PANASONIC UM-2008B Li-Ion 3S2P PANASONIC BT.00605.034
6 cell 5800mAh Main COMMON Black, Macles
Battery PANASONIC UM-2008BW Li-Ion 3S2P BT.00605.035
PANASONIC 6 cell 5800mAh Main COMMON white,
Macles
Board
BLUE TOOTH BOARD BT.21100.005
USB BOARD 55.S5502.001
POWER BOARD 55.S5502.002
WLAN CARD-XB63 NI.23600.007
3G CARD GTM382-Option LC.21300.007
3G CARD GTM380-Option TBD
3G CARD-Foxconn TBD
Cable
BLUE TOOTH CABLE 50.S5502.001
USB CABLE 50.S5502.002
DC-IN CABLE-30W 50.S5702.001
T/P FFC 50.S5502.004
Chapter 6 145
Category Description Acer PN
Case/Cover/Bracket Assembly
UPPER CASE ASSY FOR W/BT F-BLACK 60.S5702.001
UPPER CASE ASSY FOR W/O BT-BLACK 60.S5702.002
UPPER CASE ASSY FOR W/BT F-RED 60.S5602.001
UPPER CASE ASSY FOR W/O BT-RED 60.S5602.002
UPPER CASE ASSY FOR W/BT F-GRAY 60.S5702.003
UPPER CASE ASSY FOR W/O BT-GRAY 60.S5702.004
UPPER CASE ASSY FOR W/BT F-BLUE 60.S6302.001
UPPER CASE ASSY FOR W/O BT F-BLUE 60.S6302.002
LOWER CASE ASSY FOR W/3G F-WHITE 60.S5502.001
LOWER CASE ASSY FOR W/O 3G F-WHITE 60.S5502.002
LOWER CASE ASSY FOR W/3G F-BLACK 60.S5702.005
LOWER CASE ASSY FOR W/O 3G F-BLACK 60.S5702.006
T/P BRACKET 33.S5502.001
UP HINGE COVER R-BLACK 42.S5702.001
UP HINGE COVER R-WHITE 42.S5502.001
UP HINGE COVER L-BLACK 42.S5702.002
UP HINGE COVER L-WHITE 42.S5502.002
RAM DOOR-WHITE 42.S5502.003
RAM DOOR-BLACK 42.S5702.003
HDD DOOR-BLACK 42.S5702.004
HDD DOOR-WHITE 42.S5502.004
MINI PCI DOOR-BLACK 42.S5702.005
MINI PCI DOOR-WHITE 42.S5502.005
146 Chapter 6
Category Description Acer PN
HDD
Flash Disk SAMSUNG Flash Module NAND 16GB KF.16G0B.002
MMBRE16GSMPP-MVA LF
HDD SEAGATE 2.5" 5400rpm 160GB ST9160310AS KH.16001.034
Crockett SATA LF F/W:0303
HDD TOSHIBA 2.5" 5400rpm 160GB MK1652GSX Virgo KH.16004.004
BS SATA LF F/W:LV020J
HDD TOSHIBA 2.5" 5400rpm 160GB MK1655GSX Libra KH.16004.006
SATA LF F/W: FG011J
HDD HGST 2.5" 5400rpm 160GB HTS543216L9A300 KH.16007.019
Falcon-B SATA LF F/W:C40C
HDD WD 2.5" 5400rpm 160GB WD1600BEVT-22ZCTO KH.16008.022
ML160 SATA LF F/W:11.01A11
HDD SEAGATE 2.5" 5400rpm 250GB ST9250827AS KH.25001.011
Corsair SATA LF F/W:3.AAA
HDD SEAGATE 2.5" 5400rpm 250GB ST9250315AS KH.25001.016
Wyatt SATA LF F/W:0001SDM1
HDD HGST 2.5" 5400rpm 250GB HTS543225L9A300 KH.25007.013
Falcon-B SATA LF F/W:C40C
HDD WD 2.5" 5400rpm 250GB WD2500BEVT-22ZCT0 KH.25008.021
ML160 SATA LF F/W:11.01A11
HDD CARRIER 33.S5502.002
Keyboard
KEYBOARD INTE(UI)-BLK
KEYBOARD (ARE) ARABIC ENGLISH-BLK
KEYBOARD (BE) BELGIAN-BLK
KEYBOARD (BZ) BRAZILIAN-BLK
KEYBOARD (CF) CANADIAN FRENCH-BLK
KEYBOARD (CH) T-CHINESE-BLK
KEYBOARD (CZ/SK) CZECH-SLOVAKIAN-BLK
KEYBOARD (DM) DENMARK-BLK
KEYBOARD (NL) NETHERLANDS-BLK
KEYBOARD (FR) FRENCH-BLK
KEYBOARD (GR) GERMAN-BLK
KEYBOARD (GK) GREEK-BLK
KEYBOARD (HG) HUNGARY-BLK
KEYBOARD (IT) ITALIAN-BLK
KEYBOARD (KO) KOREAN-BLK
KEYBOARD (NW) NORWEGIAN-BLK
KEYBOARD (PO) PORTUGUESE-BLK
KEYBOARD (RU) RUSSIAN-BLK
KEYBOARD (SA/CR) SLO/CRO-BLK
KEYBOARD (SV) SLOVAK-BLK
Chapter 6 147
Category Description Acer PN
KEYBOARD (SP) SPANISH-BLK
KEYBOARD (SD/FN) SWEDISH-BLK
KEYBOARD (SW) SWITZERLAND-BLK
KEYBOARD (TI) THAILAND-BLK
KEYBOARD (TR) TURKISH-BLK
KEYBOARD (UK)-BLK
KEYBOARD (HB) HEBREW-BLK
KEYBOARD (JP)-BLK
KEYBOARD (ND) SCANDINAVIAN-BLK
KEYBOARD (AR/FR) ARABIC/FRENCH-BLK
KEYBOARD (CB) CANADIAN BILINGUAL-BLK
LCD
ASSY LED MODULE 10.1 IN. WXGA GLARE W/ 6M.S5502.001
ANTENNA CCD WHITE
LED LCD AUO 10.1" WSVGA Glare B101AW01 V0 LF LK.10105.001
200nit 8ms 500:1
LED LCD SAMSUNG 10.1" WSVGA Glare LTN101NT02- LK.10106.001
A01 LF 200nit 16ms 500:1
LED LCD SAMSUNG 10.1" WSVGA Glare LTN101NT02- LK.10106.003
A01 LF 200nit 16ms 400:1
LED LCD LPL 10.1" WSVGA Glare LP101WSA-TLA1 LF LK.10108.001
200nit 16ms 400:1
LED LCD CMO 10.1" WSVGA Glare N101L6-L02 LF LK.1010D.001
200nit 8ms 400:1
LCD COVER-WHITE-IMR 60.S5502.003
ANTENNA WL-MAIN 50.S5502.005
ANTENNA WL-AUX 50.S5502.006
LCD BEZEL 60.S5502.004
148 Chapter 6
Category Description Acer PN
LCD CABLE 50.S5502.007
LCD BRACKET-R&L 33.S5502.003
CAMERA MODULE-0.3M 57.S5502.001
CMOS CABLE 50.S5502.008
ASSY LED MODULE 10.1 IN. WXGA GLARE W/ 6M.S5702.001
ANTENNA CCD BLACK
LED LCD AUO 10.1" WSVGA Glare B101AW01 V0 LF LK.10105.001
200nit 8ms 500:1
LED LCD SAMSUNG 10.1" WSVGA Glare LTN101NT02- LK.10106.001
A01 LF 200nit 16ms 500:1
LED LCD SAMSUNG 10.1" WSVGA Glare LTN101NT02- LK.10106.003
A01 LF 200nit 16ms 400:1
LED LCD LPL 10.1" WSVGA Glare LP101WSA-TLA1 LF LK.10108.001
200nit 16ms 400:1
LED LCD CMO 10.1" WSVGA Glare N101L6-L02 LF LK.1010D.001
200nit 8ms 400:1
LCD COVER-BLACK-IMR 60.S5702.007
ANTENNA WL-MAIN 50.S5502.005
ANTENNA WL-AUX 50.S5502.006
LCD BEZEL 60.S5502.004
Chapter 6 149
Category Description Acer PN
LCD CABLE 50.S5502.007
LCD BRACKET-R&L 33.S5502.003
CAMERA MODULE-0.3M 57.S5502.001
CMOS CABLE 50.S5502.008
ASSY LED MODULE 10.1 IN. WXGA GLARE W/ 6M.S5602.001
ANTENNA CCD RED
LED LCD AUO 10.1" WSVGA Glare B101AW01 V0 LF LK.10105.001
200nit 8ms 500:1
LED LCD SAMSUNG 10.1" WSVGA Glare LTN101NT02- LK.10106.001
A01 LF 200nit 16ms 500:1
LED LCD SAMSUNG 10.1" WSVGA Glare LTN101NT02- LK.10106.003
A01 LF 200nit 16ms 400:1
LED LCD LPL 10.1" WSVGA Glare LP101WSA-TLA1 LF LK.10108.001
200nit 16ms 400:1
LED LCD CMO 10.1" WSVGA Glare N101L6-L02 LF LK.1010D.001
200nit 8ms 400:1
LCD COVER-RED-IMR 60.S5602.003
ANTENNA WL-MAIN 50.S5502.005
ANTENNA WL-AUX 50.S5502.006
LCD BEZEL 60.S5502.004
150 Chapter 6
Category Description Acer PN
LCD CABLE 50.S5502.007
LCD BRACKET-R&L 33.S5502.003
CAMERA MODULE-0.3M 57.S5502.001
CMOS CABLE 50.S5502.008
ASSY LED MODULE 10.1 IN. WXGA GLARE W/ 6M.S6202.001
ANTENNA CCD BLUE
LED LCD AUO 10.1" WSVGA Glare B101AW01 V0 LF LK.10105.001
200nit 8ms 500:1
LED LCD SAMSUNG 10.1" WSVGA Glare LTN101NT02- LK.10106.001
A01 LF 200nit 16ms 500:1
LED LCD SAMSUNG 10.1" WSVGA Glare LTN101NT02- LK.10106.003
A01 LF 200nit 16ms 400:1
LED LCD LPL 10.1" WSVGA Glare LP101WSA-TLA1 LF LK.10108.001
200nit 16ms 400:1
LED LCD CMO 10.1" WSVGA Glare N101L6-L02 LF LK.1010D.001
200nit 8ms 400:1
LCD COVER-BLUE-IMR 60.S6302.003
ANTENNA WL-MAIN 50.S5502.005
ANTENNA WL-AUX 50.S5502.006
LCD BEZEL 60.S5502.004
Chapter 6 151
Category Description Acer PN
LCD CABLE 50.S5502.007
LCD BRACKET-R&L 33.S5502.003
CAMERA MODULE-0.3M 57.S5502.001
CMOS CABLE 50.S5502.008
ASSY LED MODULE 10.1 IN. WXGA GLARE W/ 6M.S5802.001
ANTENNA CCD WHITE 3G
LED LCD AUO 10.1" WSVGA Glare B101AW01 V0 LF LK.10105.001
200nit 8ms 500:1
LED LCD SAMSUNG 10.1" WSVGA Glare LTN101NT02- LK.10106.001
A01 LF 200nit 16ms 500:1
LED LCD SAMSUNG 10.1" WSVGA Glare LTN101NT02- LK.10106.003
A01 LF 200nit 16ms 400:1
LED LCD LPL 10.1" WSVGA Glare LP101WSA-TLA1 LF LK.10108.001
200nit 16ms 400:1
LED LCD CMO 10.1" WSVGA Glare N101L6-L02 LF LK.1010D.001
200nit 8ms 400:1
LCD COVER-WHITE-IMR 60.S5502.003
ANTENNA 3G-MAIN 50.S5802.001
ANTENNA 3G-AUX 50.S5802.002
ANTENNA 3G-WL/AUX 50.S5802.003
LCD BEZEL 60.S5502.004
152 Chapter 6
Category Description Acer PN
LCD CABLE 50.S5502.007
LCD BRACKET-R&L 33.S5502.003
CAMERA MODULE-0.3M 57.S5502.001
CMOS CABLE 50.S5502.008
ASSY LED MODULE 10.1 IN. WXGA GLARE W/ 6M.S6102.001
ANTENNA CCD BLACK 3G
LED LCD AUO 10.1" WSVGA Glare B101AW01 V0 LF LK.10105.001
200nit 8ms 500:1
LED LCD SAMSUNG 10.1" WSVGA Glare LTN101NT02- LK.10106.001
A01 LF 200nit 16ms 500:1
LED LCD SAMSUNG 10.1" WSVGA Glare LTN101NT02- LK.10106.003
A01 LF 200nit 16ms 400:1
LED LCD LPL 10.1" WSVGA Glare LP101WSA-TLA1 LF LK.10108.001
200nit 16ms 400:1
LED LCD CMO 10.1" WSVGA Glare N101L6-L02 LF LK.1010D.001
200nit 8ms 400:1
LCD COVER-BLACK-IMR 60.S5702.007
ANTENNA 3G-MAIN 50.S5802.001
ANTENNA 3G-AUX 50.S5802.002
ANTENNA 3G-WL/AUX 50.S5802.003
LCD BEZEL 60.S5502.004
Chapter 6 153
Category Description Acer PN
LCD CABLE 50.S5502.007
LCD BRACKET-R&L 33.S5502.003
CAMERA MODULE-0.3M 57.S5502.001
CMOS CABLE 50.S5502.008
ASSY LED MODULE 10.1 IN. WXGA GLARE W/ 6M.S5902.001
ANTENNA CCD RED 3G
LED LCD AUO 10.1" WSVGA Glare B101AW01 V0 LF LK.10105.001
200nit 8ms 500:1
LED LCD SAMSUNG 10.1" WSVGA Glare LTN101NT02- LK.10106.001
A01 LF 200nit 16ms 500:1
LED LCD SAMSUNG 10.1" WSVGA Glare LTN101NT02- LK.10106.003
A01 LF 200nit 16ms 400:1
LED LCD LPL 10.1" WSVGA Glare LP101WSA-TLA1 LF LK.10108.001
200nit 16ms 400:1
LED LCD CMO 10.1" WSVGA Glare N101L6-L02 LF LK.1010D.001
200nit 8ms 400:1
LCD COVER-RED-IMR 60.S5602.003
ANTENNA 3G-MAIN 50.S5802.001
ANTENNA 3G-AUX 50.S5802.002
ANTENNA 3G-WL/AUX 50.S5802.003
LCD BEZEL 60.S5502.004
154 Chapter 6
Category Description Acer PN
LCD CABLE 50.S5502.007
LCD BRACKET-R&L 33.S5502.003
CAMERA MODULE-0.3M 57.S5502.001
CMOS CABLE 50.S5502.008
ASSY LED MODULE 10.1 IN. WXGA GLARE W/ 6M.S6302.001
ANTENNA CCD BLUE 3G
LED LCD AUO 10.1" WSVGA Glare B101AW01 V0 LF LK.10105.001
200nit 8ms 500:1
LED LCD SAMSUNG 10.1" WSVGA Glare LTN101NT02- LK.10106.001
A01 LF 200nit 16ms 500:1
LED LCD SAMSUNG 10.1" WSVGA Glare LTN101NT02- LK.10106.003
A01 LF 200nit 16ms 400:1
LED LCD LPL 10.1" WSVGA Glare LP101WSA-TLA1 LF LK.10108.001
200nit 16ms 400:1
LED LCD CMO 10.1" WSVGA Glare N101L6-L02 LF LK.1010D.001
200nit 8ms 400:1
LCD COVER-BLUE-IMR 60.S6302.003
ANTENNA 3G-MAIN 50.S5802.001
ANTENNA 3G-AUX 50.S5802.002
ANTENNA 3G-WL/AUX 50.S5802.003
LCD BEZEL 60.S5502.004
Chapter 6 155
Category Description Acer PN
LCD CABLE 50.S5502.007
LCD BRACKET-R&L 33.S5502.003
CAMERA MODULE-0.3M 57.S5502.001
CMOS CABLE 50.S5502.008
Mainboard
MB ASSY 945GSE/ICH7M/ UMA FOR W/CPU W/O RAM MB.S6102.001
FOR W/3G F
MB ASSY 945GSE/ICH7M/ UMA FOR W/CPU W/O RAM MB.S5702.001
FOR W/O 3G F
Memory
Memory NANYA SO-DIMM DDRII 667 1GB KN.1GB03.026
NT1GT64UH8D0FN-3C LF 64*16 0.07um
Memory SAMSUNG SO-DIMM DDRII 667 1GB KN.1GB0B.027
M470T2864EH3-CE6 LF 64*16 0.055um
Memory HYNIX SO-DIMM DDRII 667 1GB KN.1GB0G.022
HMP112S6EFR6C-Y5 LF 64*16 0.055um
Memory NANYA SO-DIMM DDRII 667 2GB KN.2GB03.011
NT2GT64U8HD0BN-3C LF 128*8 0.07um
Memory SAMSUNG SO-DIMM DDRII 667 2GB KN.2GB0B.011
M470T5663EH3-CE6 LF 128*8 0.055um
Memory HYNIX SO-DIMM DDRII 667 2GB KN.2GB0G.012
HMP125S6EFR8C-Y5 LF 128*8 0.055um
Memory SAMSUNG SO-DIMM DDRII 667 512MB KN.5120B.026
M470T6464QZ3-CE6 LF
Memory HYNIX SO-DIMM DDRII 667 512MB KN.5120G.024
HYMP164S64CP6-Y5 LF 64*16 0.065um
Heat sink
CPU THERMAL MODULE 60.S5502.005
Speaker
MIC SET 23.S5502.001
156 Chapter 6
Category Description Acer PN
SPEAKER-R&L 23.S5502.002
Miscellaneous
NAME PLATE FOR W/BT MYLAR
NAME PLATE FOR W/O BT MYALR
NAME PLATE FOR W/WL MYLAR 40.S5502.001
NAME PLATE FOR W/ 3G+WL MYLAR 40.S5802.001
NAME PLATE FOR W/CMOS MYLAR
NAME PLATE FOR HINGE CAP MYLAR R-GREEN 40.S5502.002
NAME PLATE FOR HINGE CAP MYLAR L-GREEN 40.S5502.003
KAV10 NAME PLATE-HINGE CAP MYLAR-R-RED 40.S5602.001
KAV10 NAME PLATE-HINGE CAP MYLAR-L-RED 40.S5602.002
KAV10 NAME PLATE-HINGE CAP MYLAR-R-BLK 40.S5702.001
KAV10 NAME PLATE-HINGE CAP MYLAR-L-BLK 40.S5702.002
KAV10 NAME PLATE-HINGE CAP MYLAR-R-BLUE 40.S6202.001
KAV10 NAME PLATE-HINGE CA
AP MYLAR-L-BLUE 40.S6202.002
SCREW PAD 47.S5502.001
Screw List
Category Description Acer P/N
SCREW SCREW M1.98D 3.0L K4.6D 0.8T ZK 86.S5502.001
SCREW SCREW M2D 6L K4.6D ZK NL + CR3 86.S5502.002
SCREW SCREW M3.0D 3.0L K 4.9D(NI) 86.S5502.003
Chapter 6 157
Appendix A
Model Definition and Configuration
Aspire one Series
Model RO Country Acer P/N Description CPU
AOD150-0Bb PA ACLA- LU.S620B.089 AOD150-0Bb EM AOXPHSTEA1 ATMN270B
Spanish MC UMACb 1*1G/160/3L/5R/
CB_bg_0.3D_GEb_ES21
AOD150-0Bb PA ACLA- LU.S620B.085 AOD150-0Bb EM AOXPHSTEA1 ATMN270B
Spanish MC UMACb 1*1G/160/3L/5R/
CB_bg_0.3D_BAG_GEb_ES21
AOD150-1Bb AAP Thailand LU.S620B.088 AOD150-1Bb AOXPHSTTH1 MC ATMN280B
UMACb 1*1G/160/BT/3L/5R/
CB_bg_0.3D_BAG_GEb_TH22
AOD150-0Bb AAP Japan LU.S620B.026 AOD150-0Bb AOXPHSJP1 MC ATMN270B
UMACb 1*1G/160/BT/3L/5R/
CB_bg_0.3D_BAG_GEb_JA11_Bb7
3_IMR
AOD150-1Bb EMEA Denmark LU.S620B.087 AOD150-1Bb AOXPHSTDK2 MC ATMN280B
UMACb 1*1G/160/BT/6L/5R/
CB_bg_0.3D_GEb_ENS1
AOD150-0Bb PA ACLA- LU.S620B.086 AOD150-0Bb EM AOXPHSTXC2 ATMN270B
Portuguese MC UMACb 1*1G/160/3L/5R/
CB_bg_0.3D_GEb_XC21
AOD150-0Bb PA ACLA- LU.S620B.083 AOD150-0Bb EM AOXPHSTXC2 ATMN270B
Portuguese MC UMACb 1*1G/160/6L2.6/5R/
CB_bg_0.3D_BAG_GEb_XC21
AOD150-0Bb PA ACLA- LU.S620B.084 AOD150-0Bb EM AOXPHSTEA3 ATMN270B
Spanish MC UMACb 1*1G/160/3L/5R/
CB_bg_0.3D_GEb_ES21
AOD150-0Bb PA ACLA- LU.S620B.082 AOD150-0Bb EM AOXPHSTEA1 ATMN270B
Spanish MC UMACb 1*1G/160/6L2.6/5R/
CB_bg_0.3D_BAG_GEb_ES21
AOD150-0Bb PA ACLA- LU.S620B.081 AOD150-0Bb EM AOXPHSTEA3 ATMN270B
Spanish MC UMACb 1*1G/160/6L2.6/5R/
CB_bg_0.3D_BAG_GEb_ES21
AOD150-1Bb EMEA South Africa LU.S620B.079 AOD150-1Bb EM AOXPHSTZA1 ATMN280B
MC UMACb 1*1G/160/3L/5R/
CB_bg_0.3D_GEb_FR22
AOD150-1Bb EMEA South Africa LU.S620B.080 AOD150-1Bb EM AOXPHSTZA2 ATMN280B
MC UMACb 1*1G/160/3L/5R/
CB_bg_0.3D_GEb_EN12
AOD150-1Bb EMEA Germany LU.S620B.074 AOD150-1Bb AOXPHSTDE1 MC ATMN280B
UMACb 1*1G/160/3L/5R/
CB_bg_0.3D_GEb_DE51
AOD150-1Bb EMEA Germany LU.S620B.075 AOD150-1Bb AOXPHSTDE1 MC ATMN280B
UMACb 1*1G/160/3L/5R/
CB_bg_0.3D_GEb_DE12
AOD150-1Bb EMEA Denmark LU.S620B.077 AOD150-1Bb AOXPHSTDK2 MC ATMN280B
UMACb 1*1G/160/3L/5R/
CB_bg_0.3D_GEb_ENS1
Appendix A 158
Model RO Country Acer P/N Description CPU
AOD150-1Bb EMEA Belgium LU.S620B.073 AOD150-1Bb AOXPHSTBE1 MC ATMN280B
UMACb 1*1G/160/3L/5R/
CB_bg_0.3D_GEb_NL12
AOD150-1Bb EMEA Denmark LU.S620B.076 AOD150-1Bb AOXPHSTDK1 MC ATMN280B
UMACb 1*1G/160/3L/5R/
CB_bg_0.3D_GEb_NO12
AOD150-1Bb EMEA France LU.S620B.078 AOD150-1Bb AOXPHSTFR1 MC ATMN280B
UMACb 1*1G/160/3L/5R/
CB_bg_0.3D_GEb_FR22
AOD150-1Bb EMEA Eastern LU.S620B.068 AOD150-1Bb AOXPHSTEU7 MC ATMN280B
Europe UMACb 1*1G/160/3L/5R/
CB_bg_0.3D_GEb_EN11
AOD150-1Bb EMEA Luxembourg LU.S620B.070 AOD150-1Bb AOXPHSTLU3 MC ATMN280B
UMACb 1*1G/160/3L/5R/
CB_bg_0.3D_GEb_IT41
AOD150-1Bb EMEA Austria LU.S620B.066 AOD150-1Bb AOXPHSTAT1 MC ATMN280B
UMACb 1*1G/160/3L/5R/
CB_bg_0.3D_GEb_DE11
AOD150-1Bb EMEA Eastern LU.S620B.064 AOD150-1Bb AOXPHSTEU5 MC ATMN280B
Europe UMACb 1*1G/160/3L/5R/
CB_bg_0.3D_GEb_PL14
AOD150-1Bb EMEA Holland LU.S620B.069 AOD150-1Bb AOXPHSTNL1 MC ATMN280B
UMACb 1*1G/160/3L/5R/
CB_bg_0.3D_GEb_NL12
AOD150-1Bb EMEA Norway LU.S620B.071 AOD150-1Bb AOXPHSTNO1 MC ATMN280B
UMACb 1*1G/160/3L/5R/
CB_bg_0.3D_GEb_NO12
AOD150-1Bb EMEA Eastern LU.S620B.065 AOD150-1Bb AOXPHSTEU3 MC ATMN280B
Europe UMACb 1*1G/160/3L/5R/
CB_bg_0.3D_GEb_RU24
AOD150-1Bb EMEA Russia LU.S620B.072 AOD150-1Bb AOXPHSTRU1 MC ATMN280B
UMACb 1*1G/160/3L/5R/
CB_bg_0.3D_GEb_RU12
AOD150-1Bb EMEA Sweden LU.S620B.067 AOD150-1Bb AOXPHSTSE1 MC ATMN280B
UMACb 1*1G/160/3L/5R/
CB_bg_0.3D_GEb_FI13
AOD150-1Bb EMEA Eastern LU.S620B.063 AOD150-1Bb AOXPHSTEU7 MC ATMN280B
Europe UMACb 1*1G/160/3L/5R/
CB_bg_0.3D_GEb_ENR2
AOD150-1Bb EMEA Portugal LU.S620B.055 AOD150-1Bb AOXPHSTPT1 MC ATMN280B
UMACb 1*1G/160/3L/5R/
CB_bg_0.3D_GEb_PT12
AOD150-1Bb EMEA Greece LU.S620B.053 AOD150-1Bb AOXPHSTGR1 MC ATMN280B
UMACb 1*1G/160/3L/5R/
CB_bg_0.3D_GEb_EL32
AOD150-1Bb EMEA Spain LU.S620B.054 AOD150-1Bb AOXPHSTES1 MC ATMN280B
UMACb 1*1G/160/3L/5R/
CB_bg_0.3D_GEb_ES22
AOD150-1Bb EMEA Eastern LU.S620B.059 AOD150-1Bb AOXPHSTEU5 MC ATMN280B
Europe UMACb 1*1G/160/3L/5R/
CB_bg_0.3D_GEb_RO12
AOD150-1Bb EMEA Finland LU.S620B.062 AOD150-1Bb AOXPHSTFI2 MC ATMN280B
UMACb 1*1G/160/3L/5R/
CB_bg_0.3D_GEb_FI11
AOD150-1Bb EMEA Finland LU.S620B.057 AOD150-1Bb AOXPHSTFI2 MC ATMN280B
UMACb 1*1G/160/3L/5R/
CB_bg_0.3D_GEb_FI41
159 Appendix A
Model RO Country Acer P/N Description CPU
AOD150-1Bb EMEA Finland LU.S620B.058 AOD150-1Bb AOXPHSTFI2 MC ATMN280B
UMACb 1*1G/160/3L/5R/
CB_bg_0.3D_GEb_SV41
AOD150-1Bb EMEA Finland LU.S620B.056 AOD150-1Bb AOXPHSTFI2 MC ATMN280B
UMACb 1*1G/160/3L/5R/
CB_bg_0.3D_GEb_FI31
AOD150-1Bb EMEA Eastern LU.S620B.060 AOD150-1Bb AOXPHSTEU4 MC ATMN280B
Europe UMACb 1*1G/160/3L/5R/
CB_bg_0.3D_GEb_FI13
AOD150-1Bb EMEA Eastern LU.S620B.061 AOD150-1Bb AOXPHSTEU7 MC ATMN280B
Europe UMACb 1*1G/160/3L/5R/
CB_bg_0.3D_GEb_SL11
AOD150-1Bb EMEA Middle East LU.S620B.047 AOD150-1Bb EM AOXPHSTME3 ATMN280B
MC UMACb 1*1G/160/3L/5R/
CB_bg_0.3D_GEb_FR22
AOD150-1Bb EMEA Hungary LU.S620B.052 AOD150-1Bb AOXPHSTHU1 MC ATMN280B
UMACb 1*1G/160/3L/5R/
CB_bg_0.3D_GEb_HU14
AOD150-1Bb EMEA Israel LU.S620B.049 AOD150-1Bb AOXPHSTIL1 MC ATMN280B
UMACb 1*1G/160/3L/5R/
CB_bg_0.3D_GEb_HE13
AOD150-1Bb EMEA Middle East LU.S620B.046 AOD150-1Bb EM AOXPHSTME4 ATMN280B
MC UMACb 1*1G/160/3L/5R/
CB_bg_0.3D_GEb_EN12
AOD150-1Bb EMEA Middle East LU.S620B.048 AOD150-1Bb EM AOXPHSTME2 ATMN280B
MC UMACb 1*1G/160/3L/5R/
CB_bg_0.3D_GEb_AR22
AOD150-1Bb EMEA Italy LU.S620B.051 AOD150-1Bb AOXPHSTIT1 MC ATMN280B
UMACb 1*1G/160/3L/5R/
CB_bg_0.3D_GEb_IT51
AOD150-1Bb EMEA Italy LU.S620B.050 AOD150-1Bb AOXPHSTIT1 MC ATMN280B
UMACb 1*1G/160/3L/5R/
CB_bg_0.3D_GEb_IT12
AOD150-1Bb EMEA Middle East LU.S620B.042 AOD150-1Bb EM AOXPHSTME2 ATMN280B
MC UMACb 1*1G/160/3L/5R/
CB_bg_0.3D_GEb_AR12
AOD150-1Bb EMEA UK LU.S620B.036 AOD150-1Bb AOXPHSTGB1 MC ATMN280B
UMACb 1*1G/160/3L/5R/
CB_bg_0.3D_GEb_EN12
AOD150-1Bb EMEA Switzerland LU.S620B.038 AOD150-1Bb AOXPHSTCH1 MC ATMN280B
UMACb 1*1G/160/3L/5R/
CB_bg_0.3D_GEb_IT81
AOD150-1Bb EMEA Turkey LU.S620B.041 AOD150-1Bb AOXPHSTTR1 MC ATMN280B
UMACb 1*1G/160/3L/5R/
CB_bg_0.3D_GEb_TR33
AOD150-1Bb EMEA Middle East LU.S620B.044 AOD150-1Bb EM AOXPHSTME9 ATMN280B
MC UMACb 1*1G/160/3L/5R/
CB_bg_0.3D_GEb_FR22
AOD150-1Bb EMEA Switzerland LU.S620B.039 AOD150-1Bb AOXPHSTCH1 MC ATMN280B
UMACb 1*1G/160/3L/5R/
CB_bg_0.3D_GEb_IT42
AOD150-1Bb EMEA Ukraine LU.S620B.037 AOD150-1Bb AOXPHSTUK1 MC ATMN280B
UMACb 1*1G/160/3L/5R/
CB_bg_0.3D_GEb_RU11
AOD150-1Bb EMEA Middle East LU.S620B.043 AOD150-1Bb EM AOXPHSTME6 ATMN280B
MC UMACb 1*1G/160/3L/5R/
CB_bg_0.3D_GEb_EN12
Appendix A 160
Model RO Country Acer P/N Description CPU
AOD150-1Bb EMEA Poland LU.S620B.040 AOD150-1Bb AOXPHSTPL1 MC ATMN280B
UMACb 1*1G/160/3L/5R/
CB_bg_0.3D_GEb_PL11
AOD150-1Bb EMEA Middle East LU.S620B.045 AOD150-1Bb EM AOXPHSTME2 ATMN280B
MC UMACb 1*1G/160/3L/5R/
CB_bg_0.3D_GEb_EN12
AOD150-1Bb AAP Philippines LU.S620B.027 AOD150-1Bb AOXPHSTPH1 MC ATMN280B
UMACb 1*1G/160/BT/6L2.6/5R/
CB_bg_0.3D_BAG_GEb_EN12
AOD150-0Bb AAP Japan LU.S620B.034 AOD150-0Bb AOXPHSJP1 MC ATMN270B
UMACb 1*1G/160/BT/3L/5R/
CB_bg_0.3D_BAG_GEb_JA11_Bb7
3_UV
AOD150-1Bb AAP Indonesia LU.S620B.033 AOD150-1Bb EM AOXPHSTID1 MC ATMN280B
UMACb 1*1G/160/BT/6L/5R/
CB_bg_0.3D_BAG_GEb_ID22
AOD150-0Bb AAP Japan LU.S620B.035 AOD150-0Bb AOXPHSJP1 MC ATMN270B
UMACb 1*1G/160/BT/6L2.6/5R/
CB_bg_0.3D_BAG_GEb_JA11_Bb7
6_UV
AOD150-0Bb AAP Japan LU.S620B.025 AOD150-0Bb AOXPHSJP1 MC ATMN270B
UMACb 1*1G/160/BT/6L2.6/5R/
CB_bg_0.3D_BAG_GEb_JA11_Bb7
6_IMR
AOD150-1Bb TWN GCTWN LU.S620B.005 AOD150-1Bb AOXPHSTTW1 MC ATMN280B
UMACb 1*1G/160/BT/6L2.6/5R/
CB_bg_0.3D_BAG_GEb_TC11
AOD150-0Bb TWN GCTWN LU.S620B.007 AOD150-0Bb AOXPHSTTW1 MC ATMN270B
UMACb 1*1G/160/BT/6L2.6/5R/
CB_bg_0.3D_BAG_GEb_TC11
AOD150-0Bb CHINA China LU.S620B.002 AOD150-0Bb AOXPHSTCN1 MC ATMN270B
UMACb 1*1G/160/6L2.6/5R/
CB_bg_0.3D_BAG_GEb_SC11
AOD150-0Bb CHINA Hong Kong LU.S620B.001 AOD150-0Bb AOXPHSTHK2 MC ATMN270B
UMACb 1*1G/160/BT/6L2.6/5R/
CB_bg_0.3D_BAG_GEb_ZH31
AOD150-1Bb AAP Philippines LU.S620B.024 AOD150-1Bb AOXPHSTPH1 MC ATMN280B
UMACb 1*1G/160/BT/3L/5R/
CB_bg_0.3D_BAG_GEb_EN12
AOD150-0Bb AAP Japan LU.S620B.031 AOD150-0Bb AOXPHSJP1 MC ATMN270B
UMACb 1*1G/160/BT/6L/5R/
CB_bg_0.3D_BAG_GEb_JA11
AOD150-1Bb AAP Japan LU.S620B.029 AOD150-1Bb AOXPHSJP1 MC ATMN280B
UMACb 1*1G/160/BT/6L/5R/
CB_bg_0.3D_BAG_GEb_JA11
AOD150-1Bb AAP Singapore LU.S620B.030 AOD150-1Bb AOXPHSTSG1 MC ATMN280B
UMACb 1*1G/160/BT/6L/5R/
CB_bg_0.3D_BAG_GEb_EN11
AOD150-0Bb AAP Singapore LU.S620B.028 AOD150-0Bb AOXPHSTSG1 MC ATMN270B
UMACb 1*1G/160/BT/6L/5R/
CB_bg_0.3D_BAG_GEb_EN11
AOD150-0Bb AAP Australia/ LU.S620B.032 AOD150-0Bb AOXPHSTAU1 MC ATMN270B
New UMACb 1*1G/160/BT/6L/5R/
Zealand CB_bg_0.3D_BAG_GEb_EN11
AOD150-0Bb PA Canada LU.S620B.014 AOD150-0Bb AOXPHSTCA2 MC ATMN270B
UMACb 1*1G/160/6L/5R/
CB_bg_0.3D_GEb_FR31
161 Appendix A
Model RO Country Acer P/N Description CPU
AOD150-0Bb PA USA LU.S620B.011 AOD150-0Bb AOXPHSTUS1 MC ATMN270B
UMACb 1*1G/160/6L/5R/
CB_bg_0.3D_GEb_EN31
AOD150-0Bb CHINA Hong Kong LU.S620B.023 AOD150-0Bb AOXPHSTHK2 MC ATMN270B
UMACb 1*1G/160/3L/5R/
CB_bg_0.3D_BAG_GEb_ZH31
AOD150-1Bb CHINA Hong Kong LU.S620B.021 AOD150-1Bb AOXPHSTHK2 MC ATMN280B
UMACb 1*1G/160/3L/5R/
CB_bg_0.3D_BAG_GEb_ZH31
AOD150-1Bb CHINA China LU.S620B.022 AOD150-1Bb AOXPHSTCN1 MC ATMN280B
UMACb 1*1G/160/3L/5R/
CB_bg_0.3D_BAG_GEb_SC11
AOD150-0Bb PA Canada LU.S620B.020 AOD150-0Bb AOXPHSTCA2 MC ATMN270B
UMACb 1*1G/160/3L/5R/
CB_bg_0.3D_GEb_FR34
AOD150-0Bb PA Canada LU.S620B.019 AOD150-0Bb AOXPHSTCA2 MC ATMN270B
UMACb 1*1G/160/3L/5R/
CB_bg_0.3D_GEb_FR33
AOD150-0Bb PA USA LU.S620B.018 AOD150-0Bb AOXPHSTUS1 MC ATMN270B
UMACb 1*1G/160/3L/5R/
CB_bg_0.3D_GEb_EN31
AOD150-0Bb PA Canada LU.S620B.013 AOD150-0Bb AOXPHSTCA2 MC ATMN270B
UMACb 1*1G/160/6L/5R/
CB_bg_0.3D_GEb_FR34
AOD150-0Bb PA Canada LU.S620B.015 AOD150-0Bb AOXPHSTCA2 MC ATMN270B
UMACb 1*1G/160/3L/5R/
CB_bg_0.3D_GEb_FR31
AOD150-0Bb PA USA LU.S620B.016 AOD150-0Bb AOXPHSTUS1 MC ATMN270B
UMACb 1*1G/160/3L/5R/
CB_bg_0.3D_GEb_EN35
AOD150-0Bb PA USA LU.S620B.017 AOD150-0Bb AOXPHSTUS1 MC ATMN270B
UMACb 1*1G/160/3L/5R/
CB_bg_0.3D_GEb_EN33
AOD150-0Bb PA Canada LU.S620B.012 AOD150-0Bb AOXPHSTCA2 MC ATMN270B
UMACb 1*1G/160/6L/5R/
CB_bg_0.3D_GEb_FR33
AOD150-0Bb PA USA LU.S620B.010 AOD150-0Bb AOXPHSTUS1 MC ATMN270B
UMACb 1*1G/160/6L/5R/
CB_bg_0.3D_GEb_EN33
AOD150-1Bb TWN GCTWN LU.S620B.006 AOD150-1Bb AOXPHSTTW1 MC ATMN280B
UMACb 1*1G/160/BT/3L/5R/
CB_bg_0.3D_BAG_GEb_TC11
AOD150-0Bb TWN GCTWN LU.S620B.008 AOD150-0Bb AOXPHSTTW1 MC ATMN270B
UMACb 1*1G/160/BT/3L/5R/
CB_bg_0.3D_BAG_GEb_TC11
AOD150-0Bb PA USA LU.S620B.009 AOD150-0Bb AOXPHSTUS1 MC ATMN270B
UMACb 1*1G/160/6L/5R/
CB_bg_0.3D_GEb_EN35
AOD150-0Bb CHINA China LU.S620B.004 AOD150-0Bb AOXPHSTCN1 MC ATMN270B
UMACb 1*1G/160/3L/5R/
CB_bg_0.3D_BAG_GEb_SC11
AOD150-0Bb CHINA Hong Kong LU.S620B.003 AOD150-0Bb AOXPHSTHK2 MC ATMN270B
UMACb 1*1G/160/BT/3L/5R/
CB_bg_0.3D_BAG_GEb_ZH31
AOD150-1Bk EMEA Holland LU.S570B.067 AOD150-1Bk AOXPHSTNL1 MC ATMN280B
UMACk 1*1G/160/BT/6L/5R/
CB_bg_0.3D_GEk_NL12
Appendix A 162
Model RO Country Acer P/N Description CPU
AOD150-1Bk EMEA Middle East LU.S570B.039 AOD150-1Bk EM AOXPHSTME2 ATMN280B
MC UMACk 1*1G/160/BT/6L/5R/
CB_bg_0.3D_GEk_AR22
AOD150-0Bk EMEA France LU.S570B.177 AOD150-0Bk AOXPHSTFR1 MC ATMN270B
UMACk 1*1G/160/BT/3L/5R/
CB_bg_0.3D_GEk_FR22
AOD150-1Bk EMEA Norway LU.S570B.062 AOD150-1Bk AOXPHSTNO1 MC ATMN280B
UMACk 1*1G/160/BT/6L/5R/
CB_bg_0.3D_GEk_NO12
AOD150-0Bk PA USA LU.S570B.146 AOD150-0Bk AOXPHSTUS1 MC ATMN270B
UMACk 1*1G/160/6L/5R/
CB_bg_0.3D_GEk_EN31
AOD150-0Bk AAP Japan LU.S570B.011 AOD150-0Bk AOXPHSJP1 MC ATMN270B
UMACk 1*1G/160/BT/3L/5R/
CB_bg_0.3D_BAG_GEk_JA11_bk7
3
AOD150-1Bk EMEA Denmark LU.S570B.176 AOD150-1Bk AOXPHSTDK2 MC ATMN280B
UMACk 1*1G/160/3L/5R/
CB_bg_0.3D_GEk_ENS1
AOD150-1Bk EMEA Denmark LU.S570B.175 AOD150-1Bk AOXPHSTDK2 MC ATMN280B
UMACk 1*1G/160/BT/6L/5R/
CB_bg_0.3D_GEk_ENS1
AOD150-0Bk EMEA France LU.S570B.174 AOD150-0Bk AOXPHSTFR1 MC ATMN270B
UMACk 1*1G/160/BT/3L/5R/
CB_bg_0.3D_BAG_GEk_FR22
AOD150-1Bk EMEA South Africa LU.S570B.173 AOD150-1Bk EM AOXPHSTZA1 ATMN280B
MC UMACk 1*1G/160/3L/5R/
CB_bg_0.3D_BAG_GEk_FR22
AOD150-1Bk EMEA South Africa LU.S570B.172 AOD150-1Bk EM AOXPHSTZA2 ATMN280B
MC UMACk 1*1G/160/3L/5R/
CB_bg_0.3D_BAG_GEk_EN12
AOD150-1Bk EMEA Denmark LU.S570B.171 AOD150-1Bk AOXPHSTDK1 MC ATMN280B
UMACk 1*1G/160/3L/5R/
CB_bg_0.3D_BAG_GEk_NO12
AOD150-1Bk EMEA Denmark LU.S570B.168 AOD150-1Bk AOXPHSTDK2 MC ATMN280B
UMACk 1*1G/160/3L/5R/
CB_bg_0.3D_BAG_GEk_ENS1
AOD150-1Bk EMEA France LU.S570B.169 AOD150-1Bk AOXPHSTFR1 MC ATMN280B
UMACk 1*1G/160/3L/5R/
CB_bg_0.3D_BAG_GEk_FR22
AOD150-1Bk EMEA Norway LU.S570B.164 AOD150-1Bk AOXPHSTNO1 MC ATMN280B
UMACk 1*1G/160/3L/5R/
CB_bg_0.3D_BAG_GEk_NO12
AOD150-1Bk EMEA Belgium LU.S570B.165 AOD150-1Bk AOXPHSTBE1 MC ATMN280B
UMACk 1*1G/160/3L/5R/
CB_bg_0.3D_BAG_GEk_NL12
AOD150-1Bk EMEA Germany LU.S570B.170 AOD150-1Bk AOXPHSTDE1 MC ATMN280B
UMACk 1*1G/160/3L/5R/
CB_bg_0.3D_BAG_GEk_DE12
AOD150-1Bk EMEA Luxembourg LU.S570B.167 AOD150-1Bk AOXPHSTLU3 MC ATMN280B
UMACk 1*1G/160/3L/5R/
CB_bg_0.3D_BAG_GEk_IT41
AOD150-1Bk EMEA Holland LU.S570B.166 AOD150-1Bk AOXPHSTNL1 MC ATMN280B
UMACk 1*1G/160/3L/5R/
CB_bg_0.3D_BAG_GEk_NL12
163 Appendix A
Model RO Country Acer P/N Description CPU
AOD150-1Bk EMEA UK LU.S570B.163 AOD150-1Bk AOXPHSTGB1 MC ATMN280B
UMACk 1*1G/160/3L/5R/
CB_bg_0.3D_BAG_GEk_EN12
AOD150-0Bk PA ACLA- LU.S570B.161 AOD150-0Bk EM AOXPHSTEA1 ATMN270B
Spanish MC UMACk 1*1G/160/3L/5R/
CB_bg_0.3D_BAG_GEk_ES21
AOD150-0Bk PA ACLA- LU.S570B.162 AOD150-0Bk EM AOXPHSTXC2 ATMN270B
Portuguese MC UMACk 1*1G/160/3L/5R/
CB_bg_0.3D_BAG_GEk_XC21
AOD150-0Bk PA ACLA- LU.S570B.158 AOD150-0Bk EM AOXPHSTEA1 ATMN270B
Spanish MC UMACk 1*1G/160/6L2.6/5R/
CB_bg_0.3D_BAG_GEk_ES21
AOD150-0Bk PA ACLA- LU.S570B.157 AOD150-0Bk EM AOXPHSTEA3 ATMN270B
Spanish MC UMACk 1*1G/160/6L2.6/5R/
CB_bg_0.3D_BAG_GEk_ES21
AOD150-0Bk PA ACLA- LU.S570B.160 AOD150-0Bk EM AOXPHSTEA3 ATMN270B
Spanish MC UMACk 1*1G/160/3L/5R/
CB_bg_0.3D_BAG_GEk_ES21
AOD150-0Bk PA ACLA- LU.S570B.159 AOD150-0Bk EM AOXPHSTXC2 ATMN270B
Portuguese MC UMACk 1*1G/160/6L2.6/5R/
CB_bg_0.3D_BAG_GEk_XC21
AOD150-0Bk AAP Japan LU.S570B.010 AOD150-0Bk AOXPHSJP1 MC ATMN270B
UMACk 1*1G/160/BT/6L2.6/5R/
CB_bg_0.3D_BAG_GEk_JA11_Bk7
6
AOD150-0Bk AAP Japan LU.S570B.019 AOD150-0Bk AOXPHSPJP1 MC ATMN270B
UMACk 1*1G/160/BT/6L2.6/5R/
CB_bg_0.3D_BAG_GEk_JA11_Bk7
6f
AOD150-1Bk AAP Japan LU.S570B.026 AOD150-1Bk AOXPHSJP1 MC ATMN280B
UMACk 1*1G/160/BT/6L2.6/5R/
CB_bg_0.3D_BAG_GEk_JA11_Bk8
6
AOD150-0Bk AAP Indonesia LU.S570B.153 AOD150-0Bk AOXPHSTID1 MC ATMN270B
UMACk 1*1G/160/BT/6L2.6/5R/
CB_bg_0.3D_BAG_GEk_ID23
AOD150-0Bk TWN GCTWN LU.S570B.005 AOD150-0Bk AOXPHSTTW1 MC ATMN270B
UMACk 1*1G/160/BT/6L2.6/
CB_bg_0.3D_BAG_GEk_TC11
AOD150-1Bk AAP Philippines LU.S570B.154 AOD150-1Bk AOXPHSTPH1 MC ATMN280B
UMACk 1*1G/160/BT/6L2.6/5R/
CB_bg_0.3D_BAG_GEk_EN12
AOD150-0Bk AAP Philippines LU.S570B.013 AOD150-0Bk AOXPHSTPH1 MC ATMN270B
UMACk 1*1G/160/6L2.6/5R/
CB_bg_0.3D_BAG_GEk_EN12
AOD150-1Bk AAP Japan LU.S570B.024 AOD150-1Bk AOXPHSPJP1 MC ATMN280B
UMACk 1*1G/160/BT/6L2.6/5R/
CB_bg_0.3D_BAG_GEk_JA11_Bk8
6f
AOD150-0Bk CHINA China LU.S570B.009 AOD150-0Bk AOXPHSTCN1 MC ATMN270B
UMACk 1*1G/160/BT/6L2.6/
CB_bg_0.3D_BAG_GEk_SC11
AOD150-0Bk CHINA Hong Kong LU.S570B.008 AOD150-0Bk AOXPHSTHK2 MC ATMN270B
UMACk 1*1G/160/BT/6L2.6/
CB_bg_0.3D_BAG_GEk_ZH31
AOD150-1Bk AAP Vietnam LU.S570B.022 AOD150-1Bk AOXPHSTVN1 MC ATMN280B
UMACk 1*1G/160/BT/3L/5R/
CB_bg_0.3D_BAG_GEk_EN12
Appendix A 164
Model RO Country Acer P/N Description CPU
AOD150-0Bk AAP Vietnam LU.S570B.021 AOD150-0Bk AOXPHSTVN1 MC ATMN270B
UMACk 1*1G/160/3L/5R/
CB_bg_0.3D_BAG_GEk_EN12
AOD150-1Bk AAP Thailand LU.S570B.029 AOD150-1Bk AOXPHSTTH1 MC ATMN280B
UMACk 1*1G/160/BT/3L/5R/
CB_bg_0.3D_BAG_GEk_TH22
AOD150-1Bk AAP Thailand LU.S570B.028 AOD150-1Bk AOXPHSTTH1 MC ATMN280B
UMACk 1*1G/160/3L/5R/
CB_bg_0.3D_BAG_GEk_TH22
AOD150-0Bk AAP Malaysia LU.S570B.151 AOD150-0Bk AOXPHSTMY1 MC ATMN270B
UMACk 1*1G/160/BT/6L/5R/
CB_bg_0.3D_BAG_GEk_EN12
AOD150-1Bk AAP Malaysia LU.S570B.023 AOD150-1Bk AOXPHSTMY1 MC ATMN280B
UMACk 1*1G/160/BT/6L/5R/
CB_bg_0.3D_BAG_GEk_EN12
AOD150-1Bk AAP Indonesia LU.S570B.155 AOD150-1Bk AOXPHSTID1 MC ATMN280B
UMACk 1*1G/160/BT/6L/5R/
CB_bg_0.3D_BAG_GEk_ID23
AOD150-0Bk AAP Philippines LU.S570B.014 AOD150-0Bk AOXPHSTPH1 MC ATMN270B
UMACk 1*1G/160/BT/3L/5R/
CB_bg_0.3D_BAG_GEk_EN12
AOD150-0Bk AAP Philippines LU.S570B.012 AOD150-0Bk AOXPHSTPH1 MC ATMN270B
UMACk 1*512/160/BT/3L/5R/
CB_bg_0.3D_BAG_GEk_EN12
AOD150-0Bk PA USA LU.S570B.156 AOD150-0Bk AOXPHSTUS1 MC ATMN270B
UMACk 1*1G/160/6L/5R/
CB_bg_0.3D_GEk_EN35
AOD150-1Bk AAP Japan LU.S570B.027 AOD150-1Bk AOXPHSJP1 MC ATMN280B
UMACk 1*1G/160/BT/3L/5R/
CB_bg_0.3D_BAG_GEk_JA11_Bk8
3
AOD150-1Bk AAP Japan LU.S570B.025 AOD150-1Bk AOXPHSPJP1 MC ATMN280B
UMACk 1*1G/160/BT/3L/5R/
CB_bg_0.3D_BAG_GEk_JA11_Bk8
3f
AOD150-0Bk AAP Japan LU.S570B.020 AOD150-0Bk AOXPHSPJP1 MC ATMN270B
UMACk 1*1G/160/BT/3L/5R/
CB_bg_0.3D_BAG_GEk_JA11_Bk7
3f
AOD150-1Bk AAP Singapore LU.S570B.152 AOD150-1Bk AOXPHSTSG1 MC ATMN280B
UMACk 1*1G/160/BT/6L/5R/
CB_bg_0.3D_BAG_GEk_EN11
AOD150-1Bk AAP Australia/ LU.S570B.150 AOD150-1Bk AOXPHSTAU1 MC ATMN280B
New UMACk 1*1G/160/BT/6L/5R/
Zealand CB_bg_0.3D_BAG_GEk_EN11
AOD150-0Bk PA Canada LU.S570B.149 AOD150-0Bk AOXPHSTCA2 MC ATMN270B
UMACk 1*1G/160/6L/5R/
CB_bg_0.3D_GEk_FR31
AOD150-0Bk PA USA LU.S570B.144 AOD150-0Bk AOXPHSTUS1 MC ATMN270B
UMACk 1*1G/160/6L/5R/
CB_bg_0.3D_GEk_EN34
AOD150-0Bk PA USA LU.S570B.145 AOD150-0Bk AOXPHSTUS1 MC ATMN270B
UMACk 1*1G/160/6L/5R/
CB_bg_0.3D_GEk_EN33
AOD150-0Bk PA Canada LU.S570B.147 AOD150-0Bk AOXPHSTCA2 MC ATMN270B
UMACk 1*1G/160/6L/5R/
CB_bg_0.3D_GEk_FR33
165 Appendix A
Model RO Country Acer P/N Description CPU
AOD150-0Bk PA Canada LU.S570B.148 AOD150-0Bk AOXPHSTCA2 MC ATMN270B
UMACk 1*1G/160/6L/5R/
CB_bg_0.3D_GEk_FR34
AOD150-1Bk EMEA Eastern LU.S570B.140 AOD150-1Bk AOXPHSTEU7 MC ATMN280B
Europe UMACk 1*1G/160/3L/5R/
CB_bg_0.3D_BAG_GEk_ENR2
AOD150-1Bk EMEA Russia LU.S570B.143 AOD150-1Bk AOXPHSTRU1 MC ATMN280B
UMACk 1*1G/160/3L/5R/
CB_bg_0.3D_BAG_GEk_RU12
AOD150-1Bk EMEA Austria LU.S570B.142 AOD150-1Bk AOXPHSTAT1 MC ATMN280B
UMACk 1*1G/160/3L/5R/
CB_bg_0.3D_BAG_GEk_DE11
AOD150-1Bk EMEA Eastern LU.S570B.139 AOD150-1Bk AOXPHSTEU5 MC ATMN280B
Europe UMACk 1*1G/160/3L/5R/
CB_bg_0.3D_BAG_GEk_RO12
AOD150-1Bk EMEA Eastern LU.S570B.138 AOD150-1Bk AOXPHSTEU4 MC ATMN280B
Europe UMACk 1*1G/160/3L/5R/
CB_bg_0.3D_BAG_GEk_FI13
AOD150-1Bk EMEA Sweden LU.S570B.141 AOD150-1Bk AOXPHSTSE1 MC ATMN280B
UMACk 1*1G/160/3L/5R/
CB_bg_0.3D_BAG_GEk_FI13
AOD150-1Bk EMEA Eastern LU.S570B.137 AOD150-1Bk AOXPHSTEU7 MC ATMN280B
Europe UMACk 1*1G/160/3L/5R/
CB_bg_0.3D_BAG_GEk_SL11
AOD150-1Bk EMEA Eastern LU.S570B.136 AOD150-1Bk AOXPHSTEU7 MC ATMN280B
Europe UMACk 1*1G/160/3L/5R/
CB_bg_0.3D_BAG_GEk_EN11
AOD150-1Bk EMEA Spain LU.S570B.127 AOD150-1Bk AOXPHSTES1 MC ATMN280B
UMACk 1*1G/160/3L/5R/
CB_bg_0.3D_BAG_GEk_ES22
AOD150-1Bk EMEA Hungary LU.S570B.129 AOD150-1Bk AOXPHSTHU1 MC ATMN280B
UMACk 1*1G/160/3L/5R/
CB_bg_0.3D_BAG_GEk_HU14
AOD150-1Bk EMEA Portugal LU.S570B.128 AOD150-1Bk AOXPHSTPT1 MC ATMN280B
UMACk 1*1G/160/3L/5R/
CB_bg_0.3D_BAG_GEk_PT12
AOD150-1Bk EMEA Eastern LU.S570B.134 AOD150-1Bk AOXPHSTEU5 MC ATMN280B
Europe UMACk 1*1G/160/3L/5R/
CB_bg_0.3D_BAG_GEk_PL14
AOD150-1Bk EMEA Finland LU.S570B.130 AOD150-1Bk AOXPHSTFI2 MC ATMN280B
UMACk 1*1G/160/3L/5R/
CB_bg_0.3D_BAG_GEk_FI11
AOD150-1Bk EMEA Finland LU.S570B.131 AOD150-1Bk AOXPHSTFI2 MC ATMN280B
UMACk 1*1G/160/3L/5R/
CB_bg_0.3D_BAG_GEk_FI31
AOD150-1Bk EMEA Finland LU.S570B.132 AOD150-1Bk AOXPHSTFI2 MC ATMN280B
UMACk 1*1G/160/3L/5R/
CB_bg_0.3D_BAG_GEk_FI41
AOD150-1Bk EMEA Finland LU.S570B.133 AOD150-1Bk AOXPHSTFI2 MC ATMN280B
UMACk 1*1G/160/3L/5R/
CB_bg_0.3D_BAG_GEk_SV41
AOD150-1Bk EMEA Eastern LU.S570B.135 AOD150-1Bk AOXPHSTEU3 MC ATMN280B
Europe UMACk 1*1G/160/3L/5R/
CB_bg_0.3D_BAG_GEk_RU24
AOD150-1Bk EMEA Middle East LU.S570B.120 AOD150-1Bk EM AOXPHSTME3 ATMN280B
MC UMACk 1*1G/160/3L/5R/
CB_bg_0.3D_BAG_GEk_FR22
Appendix A 166
Model RO Country Acer P/N Description CPU
AOD150-1Bk EMEA Italy LU.S570B.124 AOD150-1Bk AOXPHSTIT1 MC ATMN280B
UMACk 1*1G/160/3L/5R/
CB_bg_0.3D_BAG_GEk_IT12
AOD150-1Bk EMEA Israel LU.S570B.125 AOD150-1Bk AOXPHSTIL1 MC ATMN280B
UMACk 1*1G/160/3L/5R/
CB_bg_0.3D_BAG_GEk_HE13
AOD150-1Bk EMEA Middle East LU.S570B.119 AOD150-1Bk EM AOXPHSTME2 ATMN280B
MC UMACk 1*1G/160/3L/5R/
CB_bg_0.3D_BAG_GEk_EN12
AOD150-1Bk EMEA Middle East LU.S570B.121 AOD150-1Bk EM AOXPHSTME2 ATMN280B
MC UMACk 1*1G/160/3L/5R/
CB_bg_0.3D_BAG_GEk_AR22
AOD150-1Bk EMEA Middle East LU.S570B.118 AOD150-1Bk EM AOXPHSTME4 ATMN280B
MC UMACk 1*1G/160/3L/5R/
CB_bg_0.3D_BAG_GEk_EN12
AOD150-1Bk EMEA Greece LU.S570B.126 AOD150-1Bk AOXPHSTGR1 MC ATMN280B
UMACk 1*1G/160/3L/5R/
CB_bg_0.3D_BAG_GEk_EL32
AOD150-1Bk EMEA Middle East LU.S570B.122 AOD150-1Bk EM AOXPHSTME9 ATMN280B
MC UMACk 1*1G/160/3L/5R/
CB_bg_0.3D_BAG_GEk_FR22
AOD150-1Bk EMEA Middle East LU.S570B.123 AOD150-1Bk EM AOXPHSTME2 ATMN280B
MC UMACk 1*1G/160/3L/5R/
CB_bg_0.3D_BAG_GEk_AR12
AOD150-1Bk EMEA Middle East LU.S570B.117 AOD150-1Bk EM AOXPHSTME6 ATMN280B
MC UMACk 1*1G/160/3L/5R/
CB_bg_0.3D_BAG_GEk_EN12
AOD150-1Bk EMEA South Africa LU.S570B.111 AOD150-1Bk EM AOXPHSTZA1 ATMN280B
MC UMACk 1*1G/160/3L/5R/
CB_bg_0.3D_GEk_FR22
AOD150-1Bk EMEA Turkey LU.S570B.116 AOD150-1Bk AOXPHSTTR1 MC ATMN280B
UMACk 1*1G/160/3L/5R/
CB_bg_0.3D_BAG_GEk_TR33
AOD150-1Bk EMEA Denmark LU.S570B.110 AOD150-1Bk AOXPHSTDK1 MC ATMN280B
UMACk 1*1G/160/3L/5R/
CB_bg_0.3D_GEk_NO12
AOD150-1Bk EMEA Switzerland LU.S570B.114 AOD150-1Bk AOXPHSTCH1 MC ATMN280B
UMACk 1*1G/160/3L/5R/
CB_bg_0.3D_BAG_GEk_IT42
AOD150-1Bk EMEA Germany LU.S570B.108 AOD150-1Bk AOXPHSTDE1 MC ATMN280B
UMACk 1*1G/160/3L/5R/
CB_bg_0.3D_GEk_DE12
AOD150-1Bk EMEA South Africa LU.S570B.112 AOD150-1Bk EM AOXPHSTZA2 ATMN280B
MC UMACk 1*1G/160/3L/5R/
CB_bg_0.3D_GEk_EN12
AOD150-1Bk EMEA Poland LU.S570B.115 AOD150-1Bk AOXPHSTPL1 MC ATMN280B
UMACk 1*1G/160/3L/5R/
CB_bg_0.3D_BAG_GEk_PL11
AOD150-1Bk EMEA Belgium LU.S570B.107 AOD150-1Bk AOXPHSTBE1 MC ATMN280B
UMACk 1*1G/160/3L/5R/
CB_bg_0.3D_GEk_NL12
AOD150-1Bk EMEA Ukraine LU.S570B.113 AOD150-1Bk AOXPHSTUK1 MC ATMN280B
UMACk 1*1G/160/3L/5R/
CB_bg_0.3D_BAG_GEk_RU11
AOD150-1Bk EMEA France LU.S570B.109 AOD150-1Bk AOXPHSTFR1 MC ATMN280B
UMACk 1*1G/160/3L/5R/
CB_bg_0.3D_GEk_FR22
167 Appendix A
Model RO Country Acer P/N Description CPU
AOD150-1Bk EMEA Eastern LU.S570B.099 AOD150-1Bk AOXPHSTEU7 MC ATMN280B
Europe UMACk 1*1G/160/3L/5R/
CB_bg_0.3D_GEk_ENR2
AOD150-1Bk EMEA Austria LU.S570B.102 AOD150-1Bk AOXPHSTAT1 MC ATMN280B
UMACk 1*1G/160/3L/5R/
CB_bg_0.3D_GEk_DE11
AOD150-1Bk EMEA Luxembourg LU.S570B.105 AOD150-1Bk AOXPHSTLU3 MC ATMN280B
UMACk 1*1G/160/3L/5R/
CB_bg_0.3D_GEk_IT41
AOD150-1Bk EMEA Eastern LU.S570B.098 AOD150-1Bk AOXPHSTEU5 MC ATMN280B
Europe UMACk 1*1G/160/3L/5R/
CB_bg_0.3D_GEk_RO12
AOD150-1Bk EMEA Holland LU.S570B.106 AOD150-1Bk AOXPHSTNL1 MC ATMN280B
UMACk 1*1G/160/3L/5R/
CB_bg_0.3D_GEk_NL12
AOD150-1Bk EMEA Eastern LU.S570B.097 AOD150-1Bk AOXPHSTEU4 MC ATMN280B
Europe UMACk 1*1G/160/3L/5R/
CB_bg_0.3D_GEk_FI13
AOD150-1Bk EMEA Sweden LU.S570B.101 AOD150-1Bk AOXPHSTSE1 MC ATMN280B
UMACk 1*1G/160/3L/5R/
CB_bg_0.3D_GEk_FI13
AOD150-1Bk EMEA Russia LU.S570B.103 AOD150-1Bk AOXPHSTRU1 MC ATMN280B
UMACk 1*1G/160/3L/5R/
CB_bg_0.3D_GEk_RU12
AOD150-1Bk EMEA Norway LU.S570B.104 AOD150-1Bk AOXPHSTNO1 MC ATMN280B
UMACk 1*1G/160/3L/5R/
CB_bg_0.3D_GEk_NO12
AOD150-1Bk EMEA Eastern LU.S570B.096 AOD150-1Bk AOXPHSTEU7 MC ATMN280B
Europe UMACk 1*1G/160/3L/5R/
CB_bg_0.3D_GEk_SL11
AOD150-1Bk EMEA Eastern LU.S570B.095 AOD150-1Bk AOXPHSTEU7 MC ATMN280B
Europe UMACk 1*1G/160/3L/5R/
CB_bg_0.3D_GEk_EN11
AOD150-1Bk EMEA Portugal LU.S570B.087 AOD150-1Bk AOXPHSTPT1 MC ATMN280B
UMACk 1*1G/160/3L/5R/
CB_bg_0.3D_GEk_PT12
AOD150-1Bk EMEA Eastern LU.S570B.093 AOD150-1Bk AOXPHSTEU5 MC ATMN280B
Europe UMACk 1*1G/160/3L/5R/
CB_bg_0.3D_GEk_PL14
AOD150-1Bk EMEA Finland LU.S570B.089 AOD150-1Bk AOXPHSTFI2 MC ATMN280B
UMACk 1*1G/160/3L/5R/
CB_bg_0.3D_GEk_FI11
AOD150-1Bk EMEA Finland LU.S570B.090 AOD150-1Bk AOXPHSTFI2 MC ATMN280B
UMACk 1*1G/160/3L/5R/
CB_bg_0.3D_GEk_FI31
AOD150-1Bk EMEA Finland LU.S570B.091 AOD150-1Bk AOXPHSTFI2 MC ATMN280B
UMACk 1*1G/160/3L/5R/
CB_bg_0.3D_GEk_FI41
AOD150-1Bk EMEA Finland LU.S570B.092 AOD150-1Bk AOXPHSTFI2 MC ATMN280B
UMACk 1*1G/160/3L/5R/
CB_bg_0.3D_GEk_SV41
AOD150-1Bk EMEA Eastern LU.S570B.094 AOD150-1Bk AOXPHSTEU3 MC ATMN280B
Europe UMACk 1*1G/160/3L/5R/
CB_bg_0.3D_GEk_RU24
AOD150-1Bk EMEA Spain LU.S570B.086 AOD150-1Bk AOXPHSTES1 MC ATMN280B
UMACk 1*1G/160/3L/5R/
CB_bg_0.3D_GEk_ES22
Appendix A 168
Model RO Country Acer P/N Description CPU
AOD150-1Bk EMEA Hungary LU.S570B.088 AOD150-1Bk AOXPHSTHU1 MC ATMN280B
UMACk 1*1G/160/3L/5R/
CB_bg_0.3D_GEk_HU14
AOD150-1Bk EMEA Middle East LU.S570B.079 AOD150-1Bk EM AOXPHSTME3 ATMN280B
MC UMACk 1*1G/160/3L/5R/
CB_bg_0.3D_GEk_FR22
AOD150-1Bk EMEA Greece LU.S570B.085 AOD150-1Bk AOXPHSTGR1 MC ATMN280B
UMACk 1*1G/160/3L/5R/
CB_bg_0.3D_GEk_EL32
AOD150-1Bk EMEA Middle East LU.S570B.077 AOD150-1Bk EM AOXPHSTME4 ATMN280B
MC UMACk 1*1G/160/3L/5R/
CB_bg_0.3D_GEk_EN12
AOD150-1Bk EMEA Middle East LU.S570B.080 AOD150-1Bk EM AOXPHSTME2 ATMN280B
MC UMACk 1*1G/160/3L/5R/
CB_bg_0.3D_GEk_AR22
AOD150-1Bk EMEA Israel LU.S570B.084 AOD150-1Bk AOXPHSTIL1 MC ATMN280B
UMACk 1*1G/160/3L/5R/
CB_bg_0.3D_GEk_HE13
AOD150-1Bk EMEA Italy LU.S570B.083 AOD150-1Bk AOXPHSTIT1 MC ATMN280B
UMACk 1*1G/160/3L/5R/
CB_bg_0.3D_GEk_IT12
AOD150-1Bk EMEA Middle East LU.S570B.078 AOD150-1Bk EM AOXPHSTME2 ATMN280B
MC UMACk 1*1G/160/3L/5R/
CB_bg_0.3D_GEk_EN12
AOD150-1Bk EMEA Middle East LU.S570B.082 AOD150-1Bk EM AOXPHSTME2 ATMN280B
MC UMACk 1*1G/160/3L/5R/
CB_bg_0.3D_GEk_AR12
AOD150-1Bk EMEA Middle East LU.S570B.076 AOD150-1Bk EM AOXPHSTME6 ATMN280B
MC UMACk 1*1G/160/3L/5R/
CB_bg_0.3D_GEk_EN12
AOD150-1Bk EMEA Middle East LU.S570B.081 AOD150-1Bk EM AOXPHSTME9 ATMN280B
MC UMACk 1*1G/160/3L/5R/
CB_bg_0.3D_GEk_FR22
AOD150-1Bk EMEA Turkey LU.S570B.075 AOD150-1Bk AOXPHSTTR1 MC ATMN280B
UMACk 1*1G/160/3L/5R/
CB_bg_0.3D_GEk_TR33
AOD150-1Bk EMEA Ukraine LU.S570B.072 AOD150-1Bk AOXPHSTUK1 MC ATMN280B
UMACk 1*1G/160/3L/5R/
CB_bg_0.3D_GEk_RU11
AOD150-1Bk EMEA Switzerland LU.S570B.073 AOD150-1Bk AOXPHSTCH1 MC ATMN280B
UMACk 1*1G/160/3L/5R/
CB_bg_0.3D_GEk_IT42
AOD150-1Bk EMEA Poland LU.S570B.074 AOD150-1Bk AOXPHSTPL1 MC ATMN280B
UMACk 1*1G/160/3L/5R/
CB_bg_0.3D_GEk_PL11
AOD150-1Bk EMEA UK LU.S570B.071 AOD150-1Bk AOXPHSTGB1 MC ATMN280B
UMACk 1*1G/160/3L/5R/
CB_bg_0.3D_GEk_EN12
AOD150-1Bk EMEA South Africa LU.S570B.069 AOD150-1Bk EM AOXPHSTZA1 ATMN280B
MC UMACk 1*1G/160/BT/6L/5R/
CB_bg_0.3D_GEk_FR22
AOD150-1Bk EMEA Denmark LU.S570B.068 AOD150-1Bk AOXPHSTDK1 MC ATMN280B
UMACk 1*1G/160/BT/6L/5R/
CB_bg_0.3D_GEk_NO12
AOD150-1Bk EMEA South Africa LU.S570B.070 AOD150-1Bk EM AOXPHSTZA2 ATMN280B
MC UMACk 1*1G/160/BT/6L/5R/
CB_bg_0.3D_GEk_EN12
169 Appendix A
Model RO Country Acer P/N Description CPU
AOD150-1Bk EMEA Eastern LU.S570B.058 AOD150-1Bk AOXPHSTEU7 MC ATMN280B
Europe UMACk 1*1G/160/BT/6L/5R/
CB_bg_0.3D_GEk_ENR2
AOD150-1Bk EMEA Luxembourg LU.S570B.061 AOD150-1Bk AOXPHSTLU3 MC ATMN280B
UMACk 1*1G/160/BT/6L/5R/
CB_bg_0.3D_GEk_IT41
AOD150-1Bk EMEA Austria LU.S570B.060 AOD150-1Bk AOXPHSTAT1 MC ATMN280B
UMACk 1*1G/160/BT/6L/5R/
CB_bg_0.3D_GEk_DE11
AOD150-1Bk EMEA France LU.S570B.064 AOD150-1Bk AOXPHSTFR1 MC ATMN280B
UMACk 1*1G/160/BT/6L/5R/
CB_bg_0.3D_GEk_FR22
AOD150-1Bk EMEA Belgium LU.S570B.066 AOD150-1Bk AOXPHSTBE1 MC ATMN280B
UMACk 1*1G/160/BT/6L/5R/
CB_bg_0.3D_GEk_NL12
AOD150-1Bk EMEA Germany LU.S570B.065 AOD150-1Bk AOXPHSTDE1 MC ATMN280B
UMACk 1*1G/160/BT/6L/5R/
CB_bg_0.3D_GEk_DE12
AOD150-1Bk EMEA Sweden LU.S570B.059 AOD150-1Bk AOXPHSTSE1 MC ATMN280B
UMACk 1*1G/160/BT/6L/5R/
CB_bg_0.3D_GEk_FI13
AOD150-1Bk EMEA Russia LU.S570B.063 AOD150-1Bk AOXPHSTRU1 MC ATMN280B
UMACk 1*1G/160/BT/6L/5R/
CB_bg_0.3D_GEk_RU12
AOD150-1Bk EMEA Eastern LU.S570B.056 AOD150-1Bk AOXPHSTEU7 MC ATMN280B
Europe UMACk 1*1G/160/BT/6L/5R/
CB_bg_0.3D_GEk_SL11
AOD150-1Bk EMEA Eastern LU.S570B.052 AOD150-1Bk AOXPHSTEU5 MC ATMN280B
Europe UMACk 1*1G/160/BT/6L/5R/
CB_bg_0.3D_GEk_PL14
AOD150-1Bk EMEA Eastern LU.S570B.054 AOD150-1Bk AOXPHSTEU5 MC ATMN280B
Europe UMACk 1*1G/160/BT/6L/5R/
CB_bg_0.3D_GEk_RO12
AOD150-1Bk EMEA Eastern LU.S570B.055 AOD150-1Bk AOXPHSTEU4 MC ATMN280B
Europe UMACk 1*1G/160/BT/6L/5R/
CB_bg_0.3D_GEk_FI13
AOD150-1Bk EMEA Finland LU.S570B.053 AOD150-1Bk AOXPHSTFI2 MC ATMN280B
UMACk 1*1G/160/BT/6L/5R/
CB_bg_0.3D_GEk_SV41
AOD150-1Bk EMEA Finland LU.S570B.050 AOD150-1Bk AOXPHSTFI2 MC ATMN280B
UMACk 1*1G/160/BT/6L/5R/
CB_bg_0.3D_GEk_FI41
AOD150-1Bk EMEA Finland LU.S570B.048 AOD150-1Bk AOXPHSTFI2 MC ATMN280B
UMACk 1*1G/160/BT/6L/5R/
CB_bg_0.3D_GEk_FI11
AOD150-1Bk EMEA Finland LU.S570B.049 AOD150-1Bk AOXPHSTFI2 MC ATMN280B
UMACk 1*1G/160/BT/6L/5R/
CB_bg_0.3D_GEk_FI31
AOD150-1Bk EMEA Eastern LU.S570B.057 AOD150-1Bk AOXPHSTEU7 MC ATMN280B
Europe UMACk 1*1G/160/BT/6L/5R/
CB_bg_0.3D_GEk_EN11
AOD150-1Bk EMEA Eastern LU.S570B.051 AOD150-1Bk AOXPHSTEU3 MC ATMN280B
Europe UMACk 1*1G/160/BT/6L/5R/
CB_bg_0.3D_GEk_RU24
AOD150-1Bk EMEA Hungary LU.S570B.047 AOD150-1Bk AOXPHSTHU1 MC ATMN280B
UMACk 1*1G/160/BT/6L/5R/
CB_bg_0.3D_GEk_HU14
Appendix A 170
Model RO Country Acer P/N Description CPU
AOD150-1Bk EMEA Italy LU.S570B.042 AOD150-1Bk AOXPHSTIT1 MC ATMN280B
UMACk 1*1G/160/BT/6L/5R/
CB_bg_0.3D_GEk_IT12
AOD150-1Bk EMEA Israel LU.S570B.041 AOD150-1Bk AOXPHSTIL1 MC ATMN280B
UMACk 1*1G/160/BT/6L/5R/
CB_bg_0.3D_GEk_HE13
AOD150-1Bk EMEA Middle East LU.S570B.043 AOD150-1Bk EM AOXPHSTME2 ATMN280B
MC UMACk 1*1G/160/BT/6L/5R/
CB_bg_0.3D_GEk_AR12
AOD150-1Bk EMEA Portugal LU.S570B.046 AOD150-1Bk AOXPHSTPT1 MC ATMN280B
UMACk 1*1G/160/BT/6L/5R/
CB_bg_0.3D_GEk_PT12
AOD150-1Bk EMEA Greece LU.S570B.044 AOD150-1Bk AOXPHSTGR1 MC ATMN280B
UMACk 1*1G/160/BT/6L/5R/
CB_bg_0.3D_GEk_EL32
AOD150-1Bk EMEA Middle East LU.S570B.040 AOD150-1Bk EM AOXPHSTME9 ATMN280B
MC UMACk 1*1G/160/BT/6L/5R/
CB_bg_0.3D_GEk_FR22
AOD150-1Bk EMEA Spain LU.S570B.045 AOD150-1Bk AOXPHSTES1 MC ATMN280B
UMACk 1*1G/160/BT/6L/5R/
CB_bg_0.3D_GEk_ES22
AOD150-1Bk EMEA Middle East LU.S570B.038 AOD150-1Bk EM AOXPHSTME3 ATMN280B
MC UMACk 1*1G/160/BT/6L/5R/
CB_bg_0.3D_GEk_FR22
AOD150-1Bk EMEA Middle East LU.S570B.036 AOD150-1Bk EM AOXPHSTME4 ATMN280B
MC UMACk 1*1G/160/BT/6L/5R/
CB_bg_0.3D_GEk_EN12
AOD150-1Bk EMEA Middle East LU.S570B.037 AOD150-1Bk EM AOXPHSTME2 ATMN280B
MC UMACk 1*1G/160/BT/6L/5R/
CB_bg_0.3D_GEk_EN12
AOD150-1Bk EMEA Poland LU.S570B.033 AOD150-1Bk AOXPHSTPL1 MC ATMN280B
UMACk 1*1G/160/BT/6L/5R/
CB_bg_0.3D_GEk_PL11
AOD150-1Bk EMEA Middle East LU.S570B.035 AOD150-1Bk EM AOXPHSTME6 ATMN280B
MC UMACk 1*1G/160/BT/6L/5R/
CB_bg_0.3D_GEk_EN12
AOD150-1Bk EMEA Turkey LU.S570B.034 AOD150-1Bk AOXPHSTTR1 MC ATMN280B
UMACk 1*1G/160/BT/6L/5R/
CB_bg_0.3D_GEk_TR33
AOD150-1Bk EMEA Ukraine LU.S570B.031 AOD150-1Bk AOXPHSTUK1 MC ATMN280B
UMACk 1*1G/160/BT/6L/5R/
CB_bg_0.3D_GEk_RU11
AOD150-1Bk EMEA UK LU.S570B.030 AOD150-1Bk AOXPHSTGB1 MC ATMN280B
UMACk 1*1G/160/BT/6L/5R/
CB_bg_0.3D_GEk_EN12
AOD150-1Bk EMEA Switzerland LU.S570B.032 AOD150-1Bk AOXPHSTCH1 MC ATMN280B
UMACk 1*1G/160/BT/6L/5R/
CB_bg_0.3D_GEk_IT42
AOD150-0Bk PA Canada LU.S570B.002 AOD150-0Bk AOXPHSTCA2 MC ATMN270B
UMACk 1*1G/160/3L/
CB_bg_0.3D_GEk_FR31
AOD150-0Bk PA Canada LU.S570B.017 AOD150-0Bk AOXPHSTCA2 MC ATMN270B
UMACk 1*1G/160/3L/
CB_bg_0.3D_GEk_FR33
AOD150-0Bk TWN GCTWN LU.S570B.004 AOD150-0Bk AOXPHSTTW1 MC ATMN270B
UMACk 1*1G/160/BT/3L/
CB_bg_0.3D_BAG_GEk_TC11
171 Appendix A
Model RO Country Acer P/N Description CPU
AOD150-0Bk AAP Singapore LU.S570B.003 AOD150-0Bk AOXPHSTSG1 MC ATMN270B
UMACk 1*1G/160/BT/6L/
CB_bg_0.3D_BAG_GEk_EN11
AOD150-0Bk WW WW S2.S570B.001 AOD150-0Bk AOXPHSTWW1 MC ATMN270B
UMACk 1*1G/160/BT/3L/
CB_bg_0.3D_GEk_EN11
AOD150-0Bk PA USA LU.S570B.001 AOD150-0Bk AOXPHSTUS1 MC ATMN270B
UMACk 1*1G/160/3L/
CB_bg_0.3D_GEk_EN31
AOD150-0Bk PA USA LU.S570B.015 AOD150-0Bk AOXPHSTUS1 MC ATMN270B
UMACk 1*1G/160/3L/
CB_bg_0.3D_GEk_EN34
AOD150-0Bk PA USA LU.S570B.016 AOD150-0Bk AOXPHSTUS1 MC ATMN270B
UMACk 1*1G/160/3L/
CB_bg_0.3D_GEk_EN33
AOD150-0Bk CHINA Hong Kong LU.S570B.006 AOD150-0Bk AOXPHSTHK2 MC ATMN270B
UMACk 1*1G/160/3L/
CB_bg_0.3D_BAG_GEk_ZH31
AOD150-0Bk CHINA China LU.S570B.007 AOD150-0Bk AOXPHSTCN1 MC ATMN270B
UMACk 1*1G/160/3L/
CB_bg_0.3D_BAG_GEk_SC11
AOD150-0Bk PA Canada LU.S570B.018 AOD150-0Bk AOXPHSTCA2 MC ATMN270B
UMACk 1*1G/160/3L/
CB_bg_0.3D_GEk_FR34
AOD150-0Bk AAP Australia/ S2.S570B.004 AOD150-0Bk AOXPHSTAU1 MC ATMN270B
New UMACk 1*1G/160/BT/3L/5R/
Zealand CB_bg_0.3D_BAG_GEk_EN11
AOD150-1Bk AAP Australia/ S2.S570B.002 AOD150-1Bk AOXPHSTAU1 MC ATMN280B
New UMACk 1*1G/160/BT/3L/5R/
Zealand CB_bg_0.3D_BAG_GEk_EN11
AOD150-1Br EMEA Holland LU.S560B.049 AOD150-1Br AOXPHSTNL1 MC ATMN280B
UMACr 1*1G/160/BT/6L/5R/
CB_bg_0.3D_GEk_NL12
AOD150-1Br AAP Thailand LU.S560B.107 AOD150-1Br AOXPHSTTH1 MC ATMN280B
UMACr 1*1G/160/BT/3L/5R/
CB_bg_0.3D_BAG_GEk_TH22
AOD150-0Br PA USA LU.S560B.103 AOD150-0Br AOXPHSTUS1 MC ATMN270B
UMACr 1*1G/160/6L/5R/
CB_bg_0.3D_GEk_EN31
AOD150-0Br AAP Japan LU.S560B.014 AOD150-0Br AOXPHSJP1 MC ATMN270B
UMACr 1*1G/160/BT/3L/5R/
CB_bg_0.3D_BAG_GEk_JA11_Br7
3
AOD150-1Br EMEA Norway LU.S560B.047 AOD150-1Br AOXPHSTNO1 MC ATMN280B
UMACr 1*1G/160/BT/6L/5R/
CB_bg_0.3D_GEk_NO12
AOD150-0Br EMEA France LU.S560B.123 AOD150-0Br AOXPHSTFR1 MC ATMN270B
UMACr 1*1G/160/BT/3L/5R/
CB_bg_0.3D_GEk_FR22
AOD150-0Br EMEA France LU.S560B.122 AOD150-0Br AOXPHSTFR1 MC ATMN270B
UMACr 1*1G/160/BT/3L/5R/
CB_bg_0.3D_BAG_GEk_FR22
AOD150-1Br EMEA Denmark LU.S560B.121 AOD150-1Br AOXPHSTDK2 MC ATMN280B
UMACr 1*1G/160/3L/5R/
CB_bg_0.3D_GEk_ENS1
Appendix A 172
Model RO Country Acer P/N Description CPU
AOD150-1Br EMEA Denmark LU.S560B.120 AOD150-1Br AOXPHSTDK2 MC ATMN280B
UMACr 1*1G/160/BT/6L/5R/
CB_bg_0.3D_GEk_ENS1
AOD150-0Br PA ACLA- LU.S560B.118 AOD150-0Br EM AOXPHSTEA1 ATMN270B
Spanish MC UMACr 1*1G/160/3L/5R/
CB_bg_0.3D_BAG_GEk_ES21
AOD150-0Br PA ACLA- LU.S560B.117 AOD150-0Br EM AOXPHSTEA3 ATMN270B
Spanish MC UMACr 1*1G/160/3L/5R/
CB_bg_0.3D_BAG_GEk_ES21
AOD150-0Br PA ACLA- LU.S560B.115 AOD150-0Br EM AOXPHSTEA1 ATMN270B
Spanish MC UMACr 1*1G/160/6L2.6/5R/
CB_bg_0.3D_BAG_GEk_ES21
AOD150-0Br PA ACLA- LU.S560B.116 AOD150-0Br EM AOXPHSTXC2 ATMN270B
Portuguese MC UMACr 1*1G/160/6L2.6/5R/
CB_bg_0.3D_BAG_GEk_XC21
AOD150-0Br PA ACLA- LU.S560B.119 AOD150-0Br EM AOXPHSTXC2 ATMN270B
Portuguese MC UMACr 1*1G/160/3L/5R/
CB_bg_0.3D_BAG_GEk_XC21
AOD150-0Br PA ACLA- LU.S560B.114 AOD150-0Br EM AOXPHSTEA3 ATMN270B
Spanish MC UMACr 1*1G/160/6L2.6/5R/
CB_bg_0.3D_BAG_GEk_ES21
AOD150-0Br AAP Australia/ LU.S560B.113 AOD150-0Br AOXPHSTAU1 MC ATMN270B
New UMACr 1*1G/160/BT/3L/5R/
Zealand CB_bg_0.3D_BAG_GEk_EN11
AOD150-0Br CHINA China LU.S560B.002 AOD150-0Br AOXPHSTCN1 MC ATMN270B
UMACr 1*1G/160/BT/6L2.6/
CB_bg_0.3D_BAG_GEk_SC11
AOD150-0Br CHINA Hong Kong LU.S560B.001 AOD150-0Br AOXPHSTHK2 MC ATMN270B
UMACr 1*1G/160/BT/6L2.6/
CB_bg_0.3D_BAG_GEk_ZH31
AOD150-0Br AAP Japan LU.S560B.009 AOD150-0Br AOXPHSPJP1 MC ATMN270B
UMACr 1*1G/160/BT/6L2.6/
CB_bg_0.3D_BAG_GEk_JA11
AOD150-0Br AAP Japan LU.S560B.013 AOD150-0Br AOXPHSJP1 MC ATMN270B
UMACr 1*1G/160/BT/6L2.6/5R/
CB_bg_0.3D_BAG_GEk_JA11_Br7
6
AOD150-0Br AAP Japan LU.S560B.011 AOD150-0Br AOXPHSPJP1 MC ATMN270B
UMACr 1*1G/160/BT/6L2.6/5R/
CB_bg_0.3D_BAG_GEk_JA11_Br7
6f
AOD150-0Br TWN GCTWN LU.S560B.005 AOD150-0Br AOXPHSTTW1 MC ATMN270B
UMACr 1*1G/160/BT/6L2.6/
CB_bg_0.3D_BAG_GEk_TC11
AOD150-0Br AAP Singapore LU.S560B.010 AOD150-0Br AOXPHSTSG1 MC ATMN270B
UMACr 1*1G/160/BT/6L2.6/
CB_bg_0.3D_BAG_GEk_EN11
AOD150-0Br AAP Philippines LU.S560B.008 AOD150-0Br AOXPHSTPH1 MC ATMN270B
UMACr 1*1G/160/BT/6L2.6/5R/
CB_bg_0.3D_BAG_GEk_EN12
AOD150-0Br AAP Vietnam LU.S560B.015 AOD150-0Br AOXPHSTVN1 MC ATMN270B
UMACr 1*1G/160/6L2.6/5R/
CB_bg_0.3D_BAG_GEk_EN12
AOD150-0Br AAP Indonesia LU.S560B.109 AOD150-0Br AOXPHSTID1 MC ATMN270B
UMACr 1*1G/160/BT/3L/5R/
CB_bg_0.3D_BAG_GEk_ID23
173 Appendix A
Model RO Country Acer P/N Description CPU
AOD150-1Br AAP Indonesia LU.S560B.112 AOD150-1Br AOXPHSTID1 MC ATMN280B
UMACr 1*1G/160/BT/6L/5R/
CB_bg_0.3D_BAG_GEk_ID23
AOD150-0Br AAP Philippines LU.S560B.007 AOD150-0Br AOXPHSTPH1 MC ATMN270B
UMACr 1*1G/160/BT/3L/5R/
CB_bg_0.3D_BAG_GEk_EN12
AOD150-0Br AAP Australia/ LU.S560B.111 AOD150-0Br AOXPHSTAU1 MC ATMN270B
New UMACr 1*1G/160/BT/6L/5R/
Zealand CB_bg_0.3D_BAG_GEk_EN11
AOD150-0Br AAP Japan LU.S560B.110 AOD150-0Br AOXPHSJP1 MC ATMN270B
UMACr 1*1G/160/BT/6L/5R/
CB_bg_0.3D_BAG_GEk_JA11
AOD150-0Br AAP Japan LU.S560B.012 AOD150-0Br AOXPHSPJP1 MC ATMN270B
UMACr 1*1G/160/BT/3L/5R/
CB_bg_0.3D_BAG_GEk_JA11_Br7
3f
AOD150-1Br AAP Singapore LU.S560B.108 AOD150-1Br AOXPHSTSG1 MC ATMN280B
UMACr 1*1G/160/BT/6L/5R/
CB_bg_0.3D_BAG_GEk_EN11
AOD150-0Br PA USA LU.S560B.106 AOD150-0Br AOXPHSTUS1 MC ATMN270B
UMACr 1*1G/160/3L/5R/
CB_bg_0.3D_GEk_EN31
AOD150-0Br PA Canada LU.S560B.105 AOD150-0Br AOXPHSTCA2 MC ATMN270B
UMACr 1*1G/160/6L/5R/
CB_bg_0.3D_GEk_FR31
AOD150-0Br PA Canada LU.S560B.104 AOD150-0Br AOXPHSTCA2 MC ATMN270B
UMACr 1*1G/160/6L/5R/
CB_bg_0.3D_GEk_FR34
AOD150-0Br PA USA LU.S560B.101 AOD150-0Br AOXPHSTUS1 MC ATMN270B
UMACr 1*1G/160/6L/5R/
CB_bg_0.3D_GEk_EN33
AOD150-0Br PA USA LU.S560B.099 AOD150-0Br AOXPHSTUS1 MC ATMN270B
UMACr 1*1G/160/6L/5R/
CB_bg_0.3D_GEk_EN35
AOD150-0Br PA Canada LU.S560B.098 AOD150-0Br AOXPHSTCA2 MC ATMN270B
UMACr 1*1G/160/3L/5R/
CB_bg_0.3D_GEk_FR31
AOD150-0Br PA Canada LU.S560B.102 AOD150-0Br AOXPHSTCA2 MC ATMN270B
UMACr 1*1G/160/6L/5R/
CB_bg_0.3D_GEk_FR33
AOD150-1Br EMEA Denmark LU.S560B.095 AOD150-1Br AOXPHSTDK1 MC ATMN280B
UMACr 1*1G/160/3L/5R/
CB_bg_0.3D_GEk_NO12
AOD150-1Br EMEA Germany LU.S560B.093 AOD150-1Br AOXPHSTDE1 MC ATMN280B
UMACr 1*1G/160/3L/5R/
CB_bg_0.3D_GEk_DE12
AOD150-1Br EMEA South Africa LU.S560B.097 AOD150-1Br EM AOXPHSTZA2 ATMN280B
MC UMACr 1*1G/160/3L/5R/
CB_bg_0.3D_GEk_EN12
AOD150-1Br EMEA France LU.S560B.094 AOD150-1Br AOXPHSTFR1 MC ATMN280B
UMACr 1*1G/160/3L/5R/
CB_bg_0.3D_GEk_FR22
AOD150-1Br EMEA South Africa LU.S560B.096 AOD150-1Br EM AOXPHSTZA1 ATMN280B
MC UMACr 1*1G/160/3L/5R/
CB_bg_0.3D_GEk_FR22
Appendix A 174
Model RO Country Acer P/N Description CPU
AOD150-1Br EMEA Holland LU.S560B.091 AOD150-1Br AOXPHSTNL1 MC ATMN280B
UMACr 1*1G/160/3L/5R/
CB_bg_0.3D_GEk_NL12
AOD150-1Br EMEA Luxembourg LU.S560B.090 AOD150-1Br AOXPHSTLU3 MC ATMN280B
UMACr 1*1G/160/3L/5R/
CB_bg_0.3D_GEk_IT41
AOD150-1Br EMEA Norway LU.S560B.089 AOD150-1Br AOXPHSTNO1 MC ATMN280B
UMACr 1*1G/160/3L/5R/
CB_bg_0.3D_GEk_NO12
AOD150-1Br EMEA Belgium LU.S560B.092 AOD150-1Br AOXPHSTBE1 MC ATMN280B
UMACr 1*1G/160/3L/5R/
CB_bg_0.3D_GEk_NL12
AOD150-1Br EMEA Eastern LU.S560B.084 AOD150-1Br AOXPHSTEU5 MC ATMN280B
Europe UMACr 1*1G/160/3L/5R/
CB_bg_0.3D_GEk_RO12
AOD150-1Br EMEA Eastern LU.S560B.083 AOD150-1Br AOXPHSTEU4 MC ATMN280B
Europe UMACr 1*1G/160/3L/5R/
CB_bg_0.3D_GEk_FI13
AOD150-1Br EMEA Austria LU.S560B.087 AOD150-1Br AOXPHSTAT1 MC ATMN280B
UMACr 1*1G/160/3L/5R/
CB_bg_0.3D_GEk_DE11
AOD150-1Br EMEA Russia LU.S560B.088 AOD150-1Br AOXPHSTRU1 MC ATMN280B
UMACr 1*1G/160/3L/5R/
CB_bg_0.3D_GEk_RU12
AOD150-1Br EMEA Eastern LU.S560B.085 AOD150-1Br AOXPHSTEU7 MC ATMN280B
Europe UMACr 1*1G/160/3L/5R/
CB_bg_0.3D_GEk_ENR2
AOD150-1Br EMEA Sweden LU.S560B.086 AOD150-1Br AOXPHSTSE1 MC ATMN280B
UMACr 1*1G/160/3L/5R/
CB_bg_0.3D_GEk_FI13
AOD150-1Br EMEA Portugal LU.S560B.073 AOD150-1Br AOXPHSTPT1 MC ATMN280B
UMACr 1*1G/160/3L/5R/
CB_bg_0.3D_GEk_PT12
AOD150-1Br EMEA Hungary LU.S560B.074 AOD150-1Br AOXPHSTHU1 MC ATMN280B
UMACr 1*1G/160/3L/5R/
CB_bg_0.3D_GEk_HU14
AOD150-1Br EMEA Eastern LU.S560B.080 AOD150-1Br AOXPHSTEU3 MC ATMN280B
Europe UMACr 1*1G/160/3L/5R/
CB_bg_0.3D_GEk_RU24
AOD150-1Br EMEA Eastern LU.S560B.081 AOD150-1Br AOXPHSTEU7 MC ATMN280B
Europe UMACr 1*1G/160/3L/5R/
CB_bg_0.3D_GEk_EN11
AOD150-1Br EMEA Eastern LU.S560B.082 AOD150-1Br AOXPHSTEU7 MC ATMN280B
Europe UMACr 1*1G/160/3L/5R/
CB_bg_0.3D_GEk_SL11
AOD150-1Br EMEA Finland LU.S560B.075 AOD150-1Br AOXPHSTFI2 MC ATMN280B
UMACr 1*1G/160/3L/5R/
CB_bg_0.3D_GEk_FI11
AOD150-1Br EMEA Finland LU.S560B.076 AOD150-1Br AOXPHSTFI2 MC ATMN280B
UMACr 1*1G/160/3L/5R/
CB_bg_0.3D_GEk_FI31
AOD150-1Br EMEA Finland LU.S560B.077 AOD150-1Br AOXPHSTFI2 MC ATMN280B
UMACr 1*1G/160/3L/5R/
CB_bg_0.3D_GEk_FI41
AOD150-1Br EMEA Finland LU.S560B.078 AOD150-1Br AOXPHSTFI2 MC ATMN280B
UMACr 1*1G/160/3L/5R/
CB_bg_0.3D_GEk_SV41
175 Appendix A
Model RO Country Acer P/N Description CPU
AOD150-1Br EMEA Eastern LU.S560B.079 AOD150-1Br AOXPHSTEU5 MC ATMN280B
Europe UMACr 1*1G/160/3L/5R/
CB_bg_0.3D_GEk_PL14
AOD150-1Br EMEA Israel LU.S560B.070 AOD150-1Br AOXPHSTIL1 MC ATMN280B
UMACr 1*1G/160/3L/5R/
CB_bg_0.3D_GEk_HE13
AOD150-1Br EMEA Middle East LU.S560B.063 AOD150-1Br EM AOXPHSTME4 ATMN280B
MC UMACr 1*1G/160/3L/5R/
CB_bg_0.3D_GEk_EN12
AOD150-1Br EMEA Italy LU.S560B.069 AOD150-1Br AOXPHSTIT1 MC ATMN280B
UMACr 1*1G/160/3L/5R/
CB_bg_0.3D_GEk_IT12
AOD150-1Br EMEA Middle East LU.S560B.067 AOD150-1Br EM AOXPHSTME9 ATMN280B
MC UMACr 1*1G/160/3L/5R/
CB_bg_0.3D_GEk_FR22
AOD150-1Br EMEA Middle East LU.S560B.068 AOD150-1Br EM AOXPHSTME2 ATMN280B
MC UMACr 1*1G/160/3L/5R/
CB_bg_0.3D_GEk_AR12
AOD150-1Br EMEA Middle East LU.S560B.066 AOD150-1Br EM AOXPHSTME2 ATMN280B
MC UMACr 1*1G/160/3L/5R/
CB_bg_0.3D_GEk_AR22
AOD150-1Br EMEA Middle East LU.S560B.065 AOD150-1Br EM AOXPHSTME3 ATMN280B
MC UMACr 1*1G/160/3L/5R/
CB_bg_0.3D_GEk_FR22
AOD150-1Br EMEA Greece LU.S560B.071 AOD150-1Br AOXPHSTGR1 MC ATMN280B
UMACr 1*1G/160/3L/5R/
CB_bg_0.3D_GEk_EL32
AOD150-1Br EMEA Spain LU.S560B.072 AOD150-1Br AOXPHSTES1 MC ATMN280B
UMACr 1*1G/160/3L/5R/
CB_bg_0.3D_GEk_ES22
AOD150-1Br EMEA Middle East LU.S560B.064 AOD150-1Br EM AOXPHSTME2 ATMN280B
MC UMACr 1*1G/160/3L/5R/
CB_bg_0.3D_GEk_EN12
AOD150-1Br EMEA Middle East LU.S560B.062 AOD150-1Br EM AOXPHSTME6 ATMN280B
MC UMACr 1*1G/160/3L/5R/
CB_bg_0.3D_GEk_EN12
AOD150-1Br EMEA Poland LU.S560B.060 AOD150-1Br AOXPHSTPL1 MC ATMN280B
UMACr 1*1G/160/3L/5R/
CB_bg_0.3D_GEk_PL11
AOD150-1Br EMEA Turkey LU.S560B.061 AOD150-1Br AOXPHSTTR1 MC ATMN280B
UMACr 1*1G/160/3L/5R/
CB_bg_0.3D_GEk_TR33
AOD150-1Br EMEA UK LU.S560B.057 AOD150-1Br AOXPHSTGB1 MC ATMN280B
UMACr 1*1G/160/3L/5R/
CB_bg_0.3D_GEk_EN12
AOD150-1Br EMEA Ukraine LU.S560B.058 AOD150-1Br AOXPHSTUK1 MC ATMN280B
UMACr 1*1G/160/3L/5R/
CB_bg_0.3D_GEk_RU11
AOD150-1Br EMEA Switzerland LU.S560B.059 AOD150-1Br AOXPHSTCH1 MC ATMN280B
UMACr 1*1G/160/3L/5R/
CB_bg_0.3D_GEk_IT42
AOD150-1Br EMEA Eastern LU.S560B.056 AOD150-1Br AOXPHSTEU5 MC ATMN280B
Europe UMACr 1*1G/160/BT/6L/5R/
CB_bg_0.3D_GEk_PL14
AOD150-1Br EMEA South Africa LU.S560B.055 AOD150-1Br EM AOXPHSTZA2 ATMN280B
MC UMACr 1*1G/160/BT/6L/5R/
CB_bg_0.3D_GEk_EN12
Appendix A 176
Model RO Country Acer P/N Description CPU
AOD150-1Br EMEA South Africa LU.S560B.054 AOD150-1Br EM AOXPHSTZA1 ATMN280B
MC UMACr 1*1G/160/BT/6L/5R/
CB_bg_0.3D_GEk_FR22
AOD150-1Br EMEA Denmark LU.S560B.053 AOD150-1Br AOXPHSTDK1 MC ATMN280B
UMACr 1*1G/160/BT/6L/5R/
CB_bg_0.3D_GEk_NO12
AOD150-1Br EMEA Russia LU.S560B.046 AOD150-1Br AOXPHSTRU1 MC ATMN280B
UMACr 1*1G/160/BT/6L/5R/
CB_bg_0.3D_GEk_RU12
AOD150-1Br EMEA Austria LU.S560B.045 AOD150-1Br AOXPHSTAT1 MC ATMN280B
UMACr 1*1G/160/BT/6L/5R/
CB_bg_0.3D_GEk_DE11
AOD150-1Br EMEA France LU.S560B.052 AOD150-1Br AOXPHSTFR1 MC ATMN280B
UMACr 1*1G/160/BT/6L/5R/
CB_bg_0.3D_GEk_FR22
AOD150-1Br EMEA Belgium LU.S560B.050 AOD150-1Br AOXPHSTBE1 MC ATMN280B
UMACr 1*1G/160/BT/6L/5R/
CB_bg_0.3D_GEk_NL12
AOD150-1Br EMEA Luxembourg LU.S560B.048 AOD150-1Br AOXPHSTLU3 MC ATMN280B
UMACr 1*1G/160/BT/6L/5R/
CB_bg_0.3D_GEk_IT41
AOD150-1Br EMEA Germany LU.S560B.051 AOD150-1Br AOXPHSTDE1 MC ATMN280B
UMACr 1*1G/160/BT/6L/5R/
CB_bg_0.3D_GEk_DE12
AOD150-1Br EMEA Eastern LU.S560B.042 AOD150-1Br AOXPHSTEU5 MC ATMN280B
Europe UMACr 1*1G/160/BT/6L/5R/
CB_bg_0.3D_GEk_RO12
AOD150-1Br EMEA Eastern LU.S560B.040 AOD150-1Br AOXPHSTEU7 MC ATMN280B
Europe UMACr 1*1G/160/BT/6L/5R/
CB_bg_0.3D_GEk_SL11
AOD150-1Br EMEA Eastern LU.S560B.038 AOD150-1Br AOXPHSTEU3 MC ATMN280B
Europe UMACr 1*1G/160/BT/6L/5R/
CB_bg_0.3D_GEk_RU24
AOD150-1Br EMEA Eastern LU.S560B.039 AOD150-1Br AOXPHSTEU7 MC ATMN280B
Europe UMACr 1*1G/160/BT/6L/5R/
CB_bg_0.3D_GEk_EN11
AOD150-1Br EMEA Eastern LU.S560B.043 AOD150-1Br AOXPHSTEU7 MC ATMN280B
Europe UMACr 1*1G/160/BT/6L/5R/
CB_bg_0.3D_GEk_ENR2
AOD150-1Br EMEA Eastern LU.S560B.041 AOD150-1Br AOXPHSTEU4 MC ATMN280B
Europe UMACr 1*1G/160/BT/6L/5R/
CB_bg_0.3D_GEk_FI13
AOD150-1Br EMEA Sweden LU.S560B.044 AOD150-1Br AOXPHSTSE1 MC ATMN280B
UMACr 1*1G/160/BT/6L/5R/
CB_bg_0.3D_GEk_FI13
AOD150-1Br EMEA Finland LU.S560B.035 AOD150-1Br AOXPHSTFI2 MC ATMN280B
UMACr 1*1G/160/BT/6L/5R/
CB_bg_0.3D_GEk_FI31
AOD150-1Br EMEA Finland LU.S560B.036 AOD150-1Br AOXPHSTFI2 MC ATMN280B
UMACr 1*1G/160/BT/6L/5R/
CB_bg_0.3D_GEk_FI41
AOD150-1Br EMEA Finland LU.S560B.037 AOD150-1Br AOXPHSTFI2 MC ATMN280B
UMACr 1*1G/160/BT/6L/5R/
CB_bg_0.3D_GEk_SV41
AOD150-1Br EMEA Portugal LU.S560B.033 AOD150-1Br AOXPHSTPT1 MC ATMN280B
UMACr 1*1G/160/BT/6L/5R/
CB_bg_0.3D_GEk_PT12
177 Appendix A
Model RO Country Acer P/N Description CPU
AOD150-1Br EMEA Middle East LU.S560B.025 AOD150-1Br EM AOXPHSTME4 ATMN280B
MC UMACr 1*1G/160/BT/6L/5R/
CB_bg_0.3D_GEk_EN12
AOD150-1Br EMEA Italy LU.S560B.030 AOD150-1Br AOXPHSTIT1 MC ATMN280B
UMACr 1*1G/160/BT/6L/5R/
CB_bg_0.3D_GEk_IT12
AOD150-1Br EMEA Middle East LU.S560B.026 AOD150-1Br EM AOXPHSTME9 ATMN280B
MC UMACr 1*1G/160/BT/6L/5R/
CB_bg_0.3D_GEk_FR22
AOD150-1Br EMEA Greece LU.S560B.028 AOD150-1Br AOXPHSTGR1 MC ATMN280B
UMACr 1*1G/160/BT/6L/5R/
CB_bg_0.3D_GEk_EL32
AOD150-1Br EMEA Spain LU.S560B.034 AOD150-1Br AOXPHSTES1 MC ATMN280B
UMACr 1*1G/160/BT/6L/5R/
CB_bg_0.3D_GEk_ES22
AOD150-1Br EMEA Middle East LU.S560B.027 AOD150-1Br EM AOXPHSTME2 ATMN280B
MC UMACr 1*1G/160/BT/6L/5R/
CB_bg_0.3D_GEk_AR12
AOD150-1Br EMEA Finland LU.S560B.031 AOD150-1Br AOXPHSTFI2 MC ATMN280B
UMACr 1*1G/160/BT/6L/5R/
CB_bg_0.3D_GEk_FI11
AOD150-1Br EMEA Israel LU.S560B.029 AOD150-1Br AOXPHSTIL1 MC ATMN280B
UMACr 1*1G/160/BT/6L/5R/
CB_bg_0.3D_GEk_HE13
AOD150-1Br EMEA Hungary LU.S560B.032 AOD150-1Br AOXPHSTHU1 MC ATMN280B
UMACr 1*1G/160/BT/6L/5R/
CB_bg_0.3D_GEk_HU14
AOD150-1Br EMEA Middle East LU.S560B.019 AOD150-1Br EM AOXPHSTME6 ATMN280B
MC UMACr 1*1G/160/BT/6L/5R/
CB_bg_0.3D_GEk_EN12
AOD150-1Br EMEA Switzerland LU.S560B.018 AOD150-1Br AOXPHSTCH1 MC ATMN280B
UMACr 1*1G/160/BT/6L/5R/
CB_bg_0.3D_GEk_IT42
AOD150-1Br EMEA Middle East LU.S560B.023 AOD150-1Br EM AOXPHSTME3 ATMN280B
MC UMACr 1*1G/160/BT/6L/5R/
CB_bg_0.3D_GEk_FR22
AOD150-1Br EMEA Ukraine LU.S560B.017 AOD150-1Br AOXPHSTUK1 MC ATMN280B
UMACr 1*1G/160/BT/6L/5R/
CB_bg_0.3D_GEk_RU11
AOD150-1Br EMEA Turkey LU.S560B.020 AOD150-1Br AOXPHSTTR1 MC ATMN280B
UMACr 1*1G/160/BT/6L/5R/
CB_bg_0.3D_GEk_TR33
AOD150-1Br EMEA UK LU.S560B.016 AOD150-1Br AOXPHSTGB1 MC ATMN280B
UMACr 1*1G/160/BT/6L/5R/
CB_bg_0.3D_GEk_EN12
AOD150-1Br EMEA Middle East LU.S560B.022 AOD150-1Br EM AOXPHSTME2 ATMN280B
MC UMACr 1*1G/160/BT/6L/5R/
CB_bg_0.3D_GEk_AR22
AOD150-1Br EMEA Middle East LU.S560B.024 AOD150-1Br EM AOXPHSTME2 ATMN280B
MC UMACr 1*1G/160/BT/6L/5R/
CB_bg_0.3D_GEk_EN12
AOD150-1Br EMEA Poland LU.S560B.021 AOD150-1Br AOXPHSTPL1 MC ATMN280B
UMACr 1*1G/160/BT/6L/5R/
CB_bg_0.3D_GEk_PL11
AOD150-0Br CHINA Hong Kong LU.S560B.004 AOD150-0Br AOXPHSTHK2 MC ATMN270B
UMACr 1*1G/160/3L/
CB_bg_0.3D_BAG_GEk_ZH31
Appendix A 178
Model RO Country Acer P/N Description CPU
AOD150-0Br TWN GCTWN LU.S560B.006 AOD150-0Br AOXPHSTTW1 MC ATMN270B
UMACr 1*1G/160/BT/3L/
CB_bg_0.3D_BAG_GEk_TC11
AOD150-0Br CHINA China LU.S560B.003 AOD150-0Br AOXPHSTCN1 MC ATMN270B
UMACr 1*1G/160/3L/
CB_bg_0.3D_BAG_GEk_SC11
AOD150-1Bw EMEA Belgium LU.S550B.055 AOD150-1Bw AOXPHSTBE1 MC ATMN280B
UMACw 1*1G/160/BT/6L/5R/
CB_bg_0.3D_GEw_NL12
AOD150-0Bw CHINA China LU.S550B.133 AOD150-0Bw AOXPHSTCN1 MC ATMN270B
UMACw 1*1G/160/BT/3L/5R/
CB_bg_0.3D_BAG_GEw_SC11
AOD150-1Bw EMEA Holland LU.S550B.056 AOD150-1Bw AOXPHSTNL1 MC ATMN280B
UMACw 1*1G/160/BT/6L/5R/
CB_bg_0.3D_GEw_NL12
AOD150-1Bw EMEA Finland LU.S550B.084 AOD150-1Bw AOXPHSTFI2 MC ATMN280B
UMACw 1*1G/160/3L/5R/
CB_bg_0.3D_GEw_FI11
AOD150-1Bw EMEA Italy LU.S550B.034 AOD150-1Bw AOXPHSTIT1 MC ATMN280B
UMACw 1*1G/160/BT/6L/5R/
CB_bg_0.3D_GEw_IT12
AOD150-1Bw EMEA Luxembourg LU.S550B.057 AOD150-1Bw AOXPHSTLU3 MC ATMN280B
UMACw 1*1G/160/BT/6L/5R/
CB_bg_0.3D_GEw_IT41
AOD150-0Bw PA USA LU.S550B.111 AOD150-0Bw AOXPHSTUS1 MC ATMN270B
UMACw 1*1G/160/6L/5R/
CB_bg_0.3D_GEw_EN31
AOD150-0Bw EMEA France LU.S550B.132 AOD150-0Bw AOXPHSTFR1 MC ATMN270B
UMACw 1*1G/160/BT/3L/5R/
CB_bg_0.3D_GEw_FR22
AOD150-0Bw PA ACLA- LU.S550B.126 AOD150-0Bw EM AOXPHSTEA1 ATMN270B
Spanish MC UMACw 1*1G/160/3L/5R/
CB_bg_0.3D_BAG_GEw_ES21
AOD150-1Bw EMEA Russia LU.S550B.053 AOD150-1Bw AOXPHSTRU1 MC ATMN280B
UMACw 1*1G/160/BT/6L/5R/
CB_bg_0.3D_GEw_RU12
AOD150-0Bw CHINA China LU.S550B.002 AOD150-0Bw AOXPHSTCN1 MC ATMN270B
UMACw 1*1G/160/3L/
CB_bg_0.3D_BAG_GEw_SC11
AOD150-1Bw EMEA Norway LU.S550B.054 AOD150-1Bw AOXPHSTNO1 MC ATMN280B
UMACw 1*1G/160/BT/6L/5R/
CB_bg_0.3D_GEw_NO12
AOD150-0Bw AAP Australia/ LU.S550B.117 AOD150-0Bw AOXPHSTAU1 MC ATMN270B
New UMACw 1*1G/160/BT/6L/5R/
Zealand CB_bg_0.3D_BAG_GEw_EN11
AOD150-1Bw EMEA Germany LU.S550B.061 AOD150-1Bw AOXPHSTDE1 MC ATMN280B
UMACw 1*1G/160/BT/6L/5R/
CB_bg_0.3D_GEw_DE12
AOD150-1Bw EMEA Spain LU.S550B.035 AOD150-1Bw AOXPHSTES1 MC ATMN280B
UMACw 1*1G/160/BT/6L/5R/
CB_bg_0.3D_GEw_ES22
AOD150-1Bw EMEA Spain LU.S550B.081 AOD150-1Bw AOXPHSTES1 MC ATMN280B
UMACw 1*1G/160/3L/5R/
CB_bg_0.3D_GEw_ES22
AOD150-0Bw AAP Singapore LU.S550B.127 AOD150-0Bw AOXPHSTSG1 MC ATMN270B
UMACw 1*1G/160/BT/6L/5R/
CB_bg_0.3D_BAG_GEw_EN11
179 Appendix A
Model RO Country Acer P/N Description CPU
AOD150-0Bw AAP Australia/ LU.S550B.120 AOD150-0Bw AOXPHSTAU1 MC ATMN270B
New UMACw 1*1G/160/BT/3L/5R/
Zealand CB_bg_0.3D_BAG_GEw_EN11
AOD150-0Bw EMEA France LU.S550B.131 AOD150-0Bw AOXPHSTFR1 MC ATMN270B
UMACw 1*1G/160/3L/5R/
CB_bg_0.3D_BAG_GEw_FR22
AOD150-1Bw EMEA Denmark LU.S550B.129 AOD150-1Bw AOXPHSTDK2 MC ATMN280B
UMACw 1*1G/160/BT/6L/5R/
CB_bg_0.3D_GEw_ENS1
AOD150-1Bw EMEA Denmark LU.S550B.130 AOD150-1Bw AOXPHSTDK2 MC ATMN280B
UMACw 1*1G/160/3L/5R/
CB_bg_0.3D_GEw_ENS1
AOD150-0Bw AAP Indonesia LU.S550B.128 AOD150-0Bw AOXPHSTID1 MC ATMN270B
UMACw 1*1G/160/BT/6L/5R/
CB_bg_0.3D_BAG_GEw_ID23
AOD150-0Bw WW WW S2.S550B.003 AOD150-0Bw AOXPHSTWW1 MC ATMN270B
UMACw 1*1G/160/BT/6L2.6/5R/
CB_bg_0.3D_GEw_EN11
AOD150-1Bw EMEA Hungary LU.S550B.040 AOD150-1Bw AOXPHSTHU1 MC ATMN280B
UMACw 1*1G/160/BT/6L/5R/
CB_bg_0.3D_GEw_HU14
AOD150-1Bw AAP Philippines LU.S550B.118 AOD150-1Bw AOXPHSTPH1 MC ATMN280B
UMACw 1*1G/160/BT/6L2.6/5R/
CB_bg_0.3D_BAG_GEw_EN12
AOD150-1Bw AAP Indonesia LU.S550B.119 AOD150-1Bw AOXPHSTID1 MC ATMN280B
UMACw 1*1G/160/BT/6L/5R/
CB_bg_0.3D_BAG_GEw_ID23
AOD150-0Bw PA ACLA- LU.S550B.125 AOD150-0Bw EM AOXPHSTXC2 ATMN270B
Portuguese MC UMACw 1*1G/160/3L/5R/
CB_bg_0.3D_BAG_GEw_XC21
AOD150-0Bw PA ACLA- LU.S550B.124 AOD150-0Bw EM AOXPHSTEA3 ATMN270B
Spanish MC UMACw 1*1G/160/3L/5R/
CB_bg_0.3D_BAG_GEw_ES21
AOD150-0Bw PA ACLA- LU.S550B.121 AOD150-0Bw EM AOXPHSTEA3 ATMN270B
Spanish MC UMACw 1*1G/160/6L2.6/5R/
CB_bg_0.3D_BAG_GEw_ES21
AOD150-0Bw PA ACLA- LU.S550B.123 AOD150-0Bw EM AOXPHSTEA1 ATMN270B
Spanish MC UMACw 1*1G/160/6L2.6/5R/
CB_bg_0.3D_BAG_GEw_ES21
AOD150-0Bw PA ACLA- LU.S550B.122 AOD150-0Bw EM AOXPHSTXC2 ATMN270B
Portuguese MC UMACw 1*1G/160/6L2.6/5R/
CB_bg_0.3D_BAG_GEw_XC21
AOD150-0Bw AAP Malaysia LU.S550B.009 AOD150-0Bw AOXPHSTMY1 MC ATMN270B
UMACw 1*1G/160/BT/6L/5R/
CB_bg_0.3D_BAG_GEw_EN12
AOD150-1Bw AAP Indonesia LU.S550B.114 AOD150-1Bw AOXPHSTID1 MC ATMN280B
UMACw 1*1G/160/BT/6L2.6/5R/
CB_bg_0.3D_BAG_GEw_ID23
AOD150-0Bw TWN GCTWN LU.S550B.005 AOD150-0Bw AOXPHSTTW1 MC ATMN270B
UMACw 1*1G/160/BT/6L2.6/
CB_bg_0.3D_BAG_GEw_TC11
AOD150-1Bw AAP Japan LU.S550B.015 AOD150-1Bw AOXPHSJP1 MC ATMN280B
UMACw 1*1G/160/BT/6L2.6/5R/
CB_bg_0.3D_BAG_GEw_JA11_Bw
86
Appendix A 180
Model RO Country Acer P/N Description CPU
AOD150-0Bw AAP Japan LU.S550B.011 AOD150-0Bw AOXPHSPJP1 MC ATMN270B
UMACw 1*1G/160/BT/6L2.6/5R/
CB_bg_0.3D_BAG_GEw_JA11_Bw
76f
AOD150-0Bw AAP Japan LU.S550B.013 AOD150-0Bw AOXPHSJP1 MC ATMN270B
UMACw 1*1G/160/BT/6L2.6/5R/
CB_bg_0.3D_BAG_GEw_JA11_Bw
76
AOD150-1Bw AAP Japan LU.S550B.016 AOD150-1Bw AOXPHSPJP1 MC ATMN280B
UMACw 1*1G/160/BT/6L2.6/5R/
CB_bg_0.3D_BAG_GEw_JA11_Bw
86f
AOD150-0Bw CHINA China LU.S550B.003 AOD150-0Bw AOXPHSTCN1 MC ATMN270B
UMACw 1*1G/160/BT/6L2.6/
CB_bg_0.3D_BAG_GEw_SC11
AOD150-0Bw CHINA Hong Kong LU.S550B.004 AOD150-0Bw AOXPHSTHK2 MC ATMN270B
UMACw 1*1G/160/BT/6L2.6/
CB_bg_0.3D_BAG_GEw_ZH31
AOD150-0Bw AAP Vietnam LU.S550B.014 AOD150-0Bw AOXPHSTVN1 MC ATMN270B
UMACw 1*1G/160/3L/5R/
CB_bg_0.3D_BAG_GEw_EN12
AOD150-1Bw AAP Thailand LU.S550B.113 AOD150-1Bw AOXPHSTTH1 MC ATMN280B
UMACw 1*1G/160/3L/5R/
CB_bg_0.3D_BAG_GEw_TH22
AOD150-1Bw AAP Thailand LU.S550B.021 AOD150-1Bw AOXPHSTTH1 MC ATMN280B
UMACw 1*1G/160/BT/3L/5R/
CB_bg_0.3D_BAG_GEw_TH22
AOD150-0Bw AAP Philippines LU.S550B.116 AOD150-0Bw AOXPHSTPH1 MC ATMN270B
UMACw 1*1G/160/BT/6L/5R/
CB_bg_0.3D_BAG_GEw_EN12
AOD150-0Bw CHINA Hong Kong LU.S550B.115 AOD150-0Bw AOXPHSTHK2 MC ATMN270B
UMACw 1*1G/160/BT/3L/5R/
CB_bg_0.3D_BAG_GEw_ZH31
AOD150-1Bw AAP Japan LU.S550B.018 AOD150-1Bw AOXPHSJP1 MC ATMN280B
UMACw 1*1G/160/BT/3L/5R/
CB_bg_0.3D_BAG_GEw_JA11_Bw
83
AOD150-1Bw AAP Japan LU.S550B.017 AOD150-1Bw AOXPHSPJP1 MC ATMN280B
UMACw 1*1G/160/BT/3L/5R/
CB_bg_0.3D_BAG_GEw_JA11_Bw
83f
AOD150-0Bw AAP Japan LU.S550B.012 AOD150-0Bw AOXPHSPJP1 MC ATMN270B
UMACw 1*1G/160/BT/3L/5R/
CB_bg_0.3D_BAG_GEw_JA11_Bw
76f
AOD150-0Bw AAP Japan LU.S550B.010 AOD150-0Bw AOXPHSJP1 MC ATMN270B
UMACw 1*1G/160/BT/3L/5R/
CB_bg_0.3D_BAG_GEw_JA11_Bw
73
AOD150-0Bw PA Canada LU.S550B.112 AOD150-0Bw AOXPHSTCA2 MC ATMN270B
UMACw 1*1G/160/6L/5R/
CB_bg_0.3D_GEw_FR31
AOD150-0Bw PA USA LU.S550B.108 AOD150-0Bw AOXPHSTUS1 MC ATMN270B
UMACw 1*1G/160/6L/5R/
CB_bg_0.3D_GEw_EN33
AOD150-0Bw PA USA LU.S550B.107 AOD150-0Bw AOXPHSTUS1 MC ATMN270B
UMACw 1*1G/160/6L/5R/
CB_bg_0.3D_GEw_EN35
181 Appendix A
Model RO Country Acer P/N Description CPU
AOD150-0Bw PA Canada LU.S550B.110 AOD150-0Bw AOXPHSTCA2 MC ATMN270B
UMACw 1*1G/160/6L/5R/
CB_bg_0.3D_GEw_FR33
AOD150-0Bw PA Canada LU.S550B.109 AOD150-0Bw AOXPHSTCA2 MC ATMN270B
UMACw 1*1G/160/6L/5R/
CB_bg_0.3D_GEw_FR34
AOD150-1Bw AAP Singapore LU.S550B.106 AOD150-1Bw AOXPHSTSG1 MC ATMN280B
UMACw 1*1G/160/BT/6L/5R/
CB_bg_0.3D_BAG_GEw_EN11
AOD150-1Bw AAP Japan LU.S550B.105 AOD150-1Bw AOXPHSPJP1 MC ATMN280B
UMACw 1*1G/160/BT/6L/5R/
CB_bg_0.3D_BAG_GEw_JA11
AOD150-1Bw EMEA South Africa LU.S550B.104 AOD150-1Bw EM AOXPHSTZA2 ATMN280B
MC UMACw 1*1G/160/3L/5R/
CB_bg_0.3D_GEw_EN12
AOD150-1Bw EMEA South Africa LU.S550B.103 AOD150-1Bw EM AOXPHSTZA1 ATMN280B
MC UMACw 1*1G/160/3L/5R/
CB_bg_0.3D_GEw_FR22
AOD150-1Bw EMEA France LU.S550B.101 AOD150-1Bw AOXPHSTFR1 MC ATMN280B
UMACw 1*1G/160/3L/5R/
CB_bg_0.3D_GEw_FR22
AOD150-1Bw EMEA Denmark LU.S550B.102 AOD150-1Bw AOXPHSTDK1 MC ATMN280B
UMACw 1*1G/160/3L/5R/
CB_bg_0.3D_GEw_NO12
AOD150-1Bw EMEA Norway LU.S550B.093 AOD150-1Bw AOXPHSTNO1 MC ATMN280B
UMACw 1*1G/160/3L/5R/
CB_bg_0.3D_GEw_NO12
AOD150-1Bw EMEA Austria LU.S550B.095 AOD150-1Bw AOXPHSTAT1 MC ATMN280B
UMACw 1*1G/160/3L/5R/
CB_bg_0.3D_GEw_DE11
AOD150-1Bw EMEA Germany LU.S550B.096 AOD150-1Bw AOXPHSTDE1 MC ATMN280B
UMACw 1*1G/160/3L/5R/
CB_bg_0.3D_GEw_DE12
AOD150-1Bw EMEA Luxembourg LU.S550B.099 AOD150-1Bw AOXPHSTLU3 MC ATMN280B
UMACw 1*1G/160/3L/5R/
CB_bg_0.3D_GEw_IT41
AOD150-1Bw EMEA Sweden LU.S550B.092 AOD150-1Bw AOXPHSTSE1 MC ATMN280B
UMACw 1*1G/160/3L/5R/
CB_bg_0.3D_GEw_FI13
AOD150-1Bw EMEA Eastern LU.S550B.090 AOD150-1Bw AOXPHSTEU5 MC ATMN280B
Europe UMACw 1*1G/160/3L/5R/
CB_bg_0.3D_GEw_RO12
AOD150-1Bw EMEA Holland LU.S550B.098 AOD150-1Bw AOXPHSTNL1 MC ATMN280B
UMACw 1*1G/160/3L/5R/
CB_bg_0.3D_GEw_NL12
AOD150-1Bw EMEA Russia LU.S550B.094 AOD150-1Bw AOXPHSTRU1 MC ATMN280B
UMACw 1*1G/160/3L/5R/
CB_bg_0.3D_GEw_RU12
AOD150-1Bw EMEA Belgium LU.S550B.097 AOD150-1Bw AOXPHSTBE1 MC ATMN280B
UMACw 1*1G/160/3L/5R/
CB_bg_0.3D_GEw_NL12
AOD150-1Bw EMEA Eastern LU.S550B.091 AOD150-1Bw AOXPHSTEU7 MC ATMN280B
Europe UMACw 1*1G/160/3L/5R/
CB_bg_0.3D_GEw_ENR2
AOD150-1Bw EMEA Eastern LU.S550B.088 AOD150-1Bw AOXPHSTEU7 MC ATMN280B
Europe UMACw 1*1G/160/3L/5R/
CB_bg_0.3D_GEw_SL11
Appendix A 182
Model RO Country Acer P/N Description CPU
AOD150-1Bw EMEA Eastern LU.S550B.089 AOD150-1Bw AOXPHSTEU4 MC ATMN280B
Europe UMACw 1*1G/160/3L/5R/
CB_bg_0.3D_GEw_FI13
AOD150-1Bw EMEA Greece LU.S550B.080 AOD150-1Bw AOXPHSTGR1 MC ATMN280B
UMACw 1*1G/160/3L/5R/
CB_bg_0.3D_GEw_EL32
AOD150-1Bw EMEA Hungary LU.S550B.085 AOD150-1Bw AOXPHSTHU1 MC ATMN280B
UMACw 1*1G/160/3L/5R/
CB_bg_0.3D_GEw_HU14
AOD150-1Bw EMEA Finland LU.S550B.086 AOD150-1Bw AOXPHSTFI2 MC ATMN280B
UMACw 1*1G/160/3L/5R/
CB_bg_0.3D_GEw_SV41
AOD150-1Bw EMEA Finland LU.S550B.087 AOD150-1Bw AOXPHSTFI2 MC ATMN280B
UMACw 1*1G/160/3L/5R/
CB_bg_0.3D_GEw_FI41
AOD150-1Bw EMEA Portugal LU.S550B.082 AOD150-1Bw AOXPHSTPT1 MC ATMN280B
UMACw 1*1G/160/3L/5R/
CB_bg_0.3D_GEw_PT12
AOD150-1Bw EMEA Finland LU.S550B.083 AOD150-1Bw AOXPHSTFI2 MC ATMN280B
UMACw 1*1G/160/3L/5R/
CB_bg_0.3D_GEw_FI31
AOD150-1Bw EMEA Turkey LU.S550B.070 AOD150-1Bw AOXPHSTTR1 MC ATMN280B
UMACw 1*1G/160/3L/5R/
CB_bg_0.3D_GEw_TR33
AOD150-1Bw EMEA Israel LU.S550B.076 AOD150-1Bw AOXPHSTIL1 MC ATMN280B
UMACw 1*1G/160/3L/5R/
CB_bg_0.3D_GEw_HE13
AOD150-1Bw EMEA Middle East LU.S550B.072 AOD150-1Bw EM AOXPHSTME4 ATMN280B
MC UMACw 1*1G/160/3L/5R/
CB_bg_0.3D_GEw_EN12
AOD150-1Bw EMEA Middle East LU.S550B.074 AOD150-1Bw EM AOXPHSTME3 ATMN280B
MC UMACw 1*1G/160/3L/5R/
CB_bg_0.3D_GEw_FR22
AOD150-1Bw EMEA Italy LU.S550B.077 AOD150-1Bw AOXPHSTIT1 MC ATMN280B
UMACw 1*1G/160/3L/5R/
CB_bg_0.3D_GEw_IT12
AOD150-1Bw EMEA Middle East LU.S550B.079 AOD150-1Bw EM AOXPHSTME9 ATMN280B
MC UMACw 1*1G/160/3L/5R/
CB_bg_0.3D_GEw_FR22
AOD150-1Bw EMEA Middle East LU.S550B.071 AOD150-1Bw EM AOXPHSTME6 ATMN280B
MC UMACw 1*1G/160/3L/5R/
CB_bg_0.3D_GEw_EN12
AOD150-1Bw EMEA Middle East LU.S550B.073 AOD150-1Bw EM AOXPHSTME2 ATMN280B
MC UMACw 1*1G/160/3L/5R/
CB_bg_0.3D_GEw_AR22
AOD150-1Bw EMEA Middle East LU.S550B.075 AOD150-1Bw EM AOXPHSTME2 ATMN280B
MC UMACw 1*1G/160/3L/5R/
CB_bg_0.3D_GEw_EN12
AOD150-1Bw EMEA Middle East LU.S550B.078 AOD150-1Bw EM AOXPHSTME2 ATMN280B
MC UMACw 1*1G/160/3L/5R/
CB_bg_0.3D_GEw_AR12
AOD150-1Bw EMEA Eastern LU.S550B.065 AOD150-1Bw AOXPHSTEU7 MC ATMN280B
Europe UMACw 1*1G/160/3L/5R/
CB_bg_0.3D_GEw_EN11
AOD150-1Bw EMEA Poland LU.S550B.066 AOD150-1Bw AOXPHSTPL1 MC ATMN280B
UMACw 1*1G/160/3L/5R/
CB_bg_0.3D_GEw_PL11
183 Appendix A
Model RO Country Acer P/N Description CPU
AOD150-1Bw EMEA UK LU.S550B.069 AOD150-1Bw AOXPHSTGB1 MC ATMN280B
UMACw 1*1G/160/3L/5R/
CB_bg_0.3D_GEw_EN12
AOD150-1Bw EMEA Switzerland LU.S550B.067 AOD150-1Bw AOXPHSTCH1 MC ATMN280B
UMACw 1*1G/160/3L/5R/
CB_bg_0.3D_GEw_IT42
AOD150-1Bw EMEA Eastern LU.S550B.063 AOD150-1Bw AOXPHSTEU5 MC ATMN280B
Europe UMACw 1*1G/160/3L/5R/
CB_bg_0.3D_GEw_PL14
AOD150-1Bw EMEA Eastern LU.S550B.064 AOD150-1Bw AOXPHSTEU3 MC ATMN280B
Europe UMACw 1*1G/160/3L/5R/
CB_bg_0.3D_GEw_RU24
AOD150-1Bw EMEA Ukraine LU.S550B.068 AOD150-1Bw AOXPHSTUK1 MC ATMN280B
UMACw 1*1G/160/3L/5R/
CB_bg_0.3D_GEw_RU11
AOD150-1Bw EMEA South Africa LU.S550B.062 AOD150-1Bw EM AOXPHSTZA2 ATMN280B
MC UMACw 1*1G/160/BT/6L/5R/
CB_bg_0.3D_GEw_EN12
AOD150-1Bw EMEA Denmark LU.S550B.059 AOD150-1Bw AOXPHSTDK1 MC ATMN280B
UMACw 1*1G/160/BT/6L/5R/
CB_bg_0.3D_GEw_NO12
AOD150-1Bw EMEA Austria LU.S550B.052 AOD150-1Bw AOXPHSTAT1 MC ATMN280B
UMACw 1*1G/160/BT/6L/5R/
CB_bg_0.3D_GEw_DE11
AOD150-1Bw EMEA South Africa LU.S550B.058 AOD150-1Bw EM AOXPHSTZA1 ATMN280B
MC UMACw 1*1G/160/BT/6L/5R/
CB_bg_0.3D_GEw_FR22
AOD150-1Bw EMEA France LU.S550B.060 AOD150-1Bw AOXPHSTFR1 MC ATMN280B
UMACw 1*1G/160/BT/6L/5R/
CB_bg_0.3D_GEw_FR22
AOD150-1Bw EMEA Eastern LU.S550B.049 AOD150-1Bw AOXPHSTEU7 MC ATMN280B
Europe UMACw 1*1G/160/BT/6L/5R/
CB_bg_0.3D_GEw_ENR2
AOD150-1Bw EMEA Eastern LU.S550B.045 AOD150-1Bw AOXPHSTEU7 MC ATMN280B
Europe UMACw 1*1G/160/BT/6L/5R/
CB_bg_0.3D_GEw_SL11
AOD150-1Bw EMEA Eastern LU.S550B.046 AOD150-1Bw AOXPHSTEU7 MC ATMN280B
Europe UMACw 1*1G/160/BT/6L/5R/
CB_bg_0.3D_GEw_EN11
AOD150-1Bw EMEA Finland LU.S550B.042 AOD150-1Bw AOXPHSTFI2 MC ATMN280B
UMACw 1*1G/160/BT/6L/5R/
CB_bg_0.3D_GEw_FI41
AOD150-1Bw EMEA Finland LU.S550B.043 AOD150-1Bw AOXPHSTFI2 MC ATMN280B
UMACw 1*1G/160/BT/6L/5R/
CB_bg_0.3D_GEw_SV41
AOD150-1Bw EMEA Eastern LU.S550B.051 AOD150-1Bw AOXPHSTEU4 MC ATMN280B
Europe UMACw 1*1G/160/BT/6L/5R/
CB_bg_0.3D_GEw_FI13
AOD150-1Bw EMEA Sweden LU.S550B.048 AOD150-1Bw AOXPHSTSE1 MC ATMN280B
UMACw 1*1G/160/BT/6L/5R/
CB_bg_0.3D_GEw_FI13
AOD150-1Bw EMEA Eastern LU.S550B.044 AOD150-1Bw AOXPHSTEU5 MC ATMN280B
Europe UMACw 1*1G/160/BT/6L/5R/
CB_bg_0.3D_GEw_PL14
AOD150-1Bw EMEA Eastern LU.S550B.050 AOD150-1Bw AOXPHSTEU5 MC ATMN280B
Europe UMACw 1*1G/160/BT/6L/5R/
CB_bg_0.3D_GEw_RO12
Appendix A 184
Model RO Country Acer P/N Description CPU
AOD150-1Bw EMEA Eastern LU.S550B.047 AOD150-1Bw AOXPHSTEU3 MC ATMN280B
Europe UMACw 1*1G/160/BT/6L/5R/
CB_bg_0.3D_GEw_RU24
AOD150-1Bw EMEA Greece LU.S550B.036 AOD150-1Bw AOXPHSTGR1 MC ATMN280B
UMACw 1*1G/160/BT/6L/5R/
CB_bg_0.3D_GEw_EL32
AOD150-1Bw EMEA Israel LU.S550B.037 AOD150-1Bw AOXPHSTIL1 MC ATMN280B
UMACw 1*1G/160/BT/6L/5R/
CB_bg_0.3D_GEw_HE13
AOD150-1Bw EMEA Finland LU.S550B.038 AOD150-1Bw AOXPHSTFI2 MC ATMN280B
UMACw 1*1G/160/BT/6L/5R/
CB_bg_0.3D_GEw_FI31
AOD150-1Bw EMEA Finland LU.S550B.039 AOD150-1Bw AOXPHSTFI2 MC ATMN280B
UMACw 1*1G/160/BT/6L/5R/
CB_bg_0.3D_GEw_FI11
AOD150-1Bw EMEA Portugal LU.S550B.041 AOD150-1Bw AOXPHSTPT1 MC ATMN280B
UMACw 1*1G/160/BT/6L/5R/
CB_bg_0.3D_GEw_PT12
AOD150-1Bw EMEA Middle East LU.S550B.032 AOD150-1Bw EM AOXPHSTME9 ATMN280B
MC UMACw 1*1G/160/BT/6L/5R/
CB_bg_0.3D_GEw_FR22
AOD150-1Bw EMEA Middle East LU.S550B.033 AOD150-1Bw EM AOXPHSTME2 ATMN280B
MC UMACw 1*1G/160/BT/6L/5R/
CB_bg_0.3D_GEw_AR12
AOD150-1Bw EMEA Turkey LU.S550B.026 AOD150-1Bw AOXPHSTTR1 MC ATMN280B
UMACw 1*1G/160/BT/6L/5R/
CB_bg_0.3D_GEw_TR33
AOD150-1Bw EMEA Ukraine LU.S550B.023 AOD150-1Bw AOXPHSTUK1 MC ATMN280B
UMACw 1*1G/160/BT/6L/5R/
CB_bg_0.3D_GEw_RU11
AOD150-1Bw EMEA Middle East LU.S550B.029 AOD150-1Bw EM AOXPHSTME3 ATMN280B
MC UMACw 1*1G/160/BT/6L/5R/
CB_bg_0.3D_GEw_FR22
AOD150-1Bw EMEA Switzerland LU.S550B.024 AOD150-1Bw AOXPHSTCH1 MC ATMN280B
UMACw 1*1G/160/BT/6L/5R/
CB_bg_0.3D_GEw_IT42
AOD150-1Bw EMEA Poland LU.S550B.027 AOD150-1Bw AOXPHSTPL1 MC ATMN280B
UMACw 1*1G/160/BT/6L/5R/
CB_bg_0.3D_GEw_PL11
AOD150-1Bw EMEA Middle East LU.S550B.025 AOD150-1Bw EM AOXPHSTME6 ATMN280B
MC UMACw 1*1G/160/BT/6L/5R/
CB_bg_0.3D_GEw_EN12
AOD150-1Bw EMEA Middle East LU.S550B.028 AOD150-1Bw EM AOXPHSTME2 ATMN280B
MC UMACw 1*1G/160/BT/6L/5R/
CB_bg_0.3D_GEw_AR22
AOD150-1Bw EMEA Middle East LU.S550B.030 AOD150-1Bw EM AOXPHSTME2 ATMN280B
MC UMACw 1*1G/160/BT/6L/5R/
CB_bg_0.3D_GEw_EN12
AOD150-1Bw EMEA Middle East LU.S550B.031 AOD150-1Bw EM AOXPHSTME4 ATMN280B
MC UMACw 1*1G/160/BT/6L/5R/
CB_bg_0.3D_GEw_EN12
AOD150-1Bw EMEA UK LU.S550B.022 AOD150-1Bw AOXPHSTGB1 MC ATMN280B
UMACw 1*1G/160/BT/6L/5R/
CB_bg_0.3D_GEw_EN12
AOD150-0Bw PA Canada LU.S550B.007 AOD150-0Bw AOXPHSTCA2 MC ATMN270B
UMACw 1*1G/160/3L/
CB_bg_0.3D_GEw_FR31
185 Appendix A
Model RO Country Acer P/N Description CPU
AOD150-0Bw CHINA Hong Kong LU.S550B.001 AOD150-0Bw AOXPHSTHK2 MC ATMN270B
UMACw 1*1G/160/3L/
CB_bg_0.3D_BAG_GEw_ZH31
AOD150-0Bw PA USA LU.S550B.008 AOD150-0Bw AOXPHSTUS1 MC ATMN270B
UMACw 1*1G/160/3L/
CB_bg_0.3D_GEw_EN31
AOD150-0Bw WW WW S2.S550B.002 AOD150-0Bw AOXPHSTWW1 MC ATMN270B
UMACw 1*1G/160/BT/3L/
CB_bg_0.3D_GEw_EN11for Taiwan
AOD150-0Bw TWN GCTWN LU.S550B.006 AOD150-0Bw AOXPHSTTW1 MC ATMN270B
UMACw 1*1G/160/BT/3L/
CB_bg_0.3D_BAG_GEw_TC11
AOD150-0Bw WW WW S2.S550B.001 AOD150-0Bw AOXPHSTWW1 MC ATMN270B
UMACw 1*1G/160/BT/3L/
CB_bg_0.3D_GEw_EN11
AOD150-0Bw AAP Japan LU.S550B.020 AOD150-0Bw AOXPHSPJP1 MC ATMN270B
UMACw 1*1G/160/BT/3L/5R/
CB_bg_0.3D_BAG_GEw_JA11_Bw
73f
AOD150-1BGb AAP Singapore LU.S630B.014 AOD150-1BGb AOXPHSTSG1 MC ATMN280B
UMAGCb 1*1G/160/BT/6L/5R/
CB_bg_0.3D_3G_BAG_GEb_EN11
AOD150-0BGb AAP Singapore LU.S630B.013 AOD150-0BGb AOXPHSTSG1 MC ATMN270B
UMAGCb 1*1G/160/BT/6L/5R/
CB_bg_0.3D_3G_BAG_GEb_EN11
AOD150-0BGb PA USA LU.S630B.011 AOD150-0BGb AOXPHSTUS1 MC ATMN270B
UMAGCb 1*1G/160/3L/5R/
CB_bg_0.3D_3G_BAG_GEb_EN31
AOD150-0BGb PA ACLA- LU.S630B.010 AOD150-0BGb EM AOXPHSTXC2 ATMN270B
Portuguese MC UMAGCb 1*1G/160/3L/5R/
CB_bg_0.3D_3G_BAG_GEb_XC21
AOD150-0BGb PA ACLA- LU.S630B.008 AOD150-0BGb EM AOXPHSTEA3 ATMN270B
Spanish MC UMAGCb 1*1G/160/3L/5R/
CB_bg_0.3D_3G_BAG_GEb_ES21
AOD150-0BGb PA Canada LU.S630B.007 AOD150-0BGb AOXPHSTCA2 MC ATMN270B
UMAGCb 1*1G/160/6L2.6/5R/
CB_bg_0.3D_3G_BAG_GEb_FR31
AOD150-0BGb PA Canada LU.S630B.012 AOD150-0BGb AOXPHSTCA2 MC ATMN270B
UMAGCb 1*1G/160/3L/5R/
CB_bg_0.3D_3G_BAG_GEb_FR31
AOD150-0BGb PA USA LU.S630B.006 AOD150-0BGb AOXPHSTUS1 MC ATMN270B
UMAGCb 1*1G/160/6L2.6/5R/
CB_bg_0.3D_3G_BAG_GEb_EN31
AOD150-0BGb PA ACLA- LU.S630B.005 AOD150-0BGb EM AOXPHSTXC2 ATMN270B
Portuguese MC UMAGCb 1*1G/160/6L2.6/5R/
CB_bg_0.3D_3G_BAG_GEb_XC21
AOD150-0BGb PA ACLA- LU.S630B.009 AOD150-0BGb EM AOXPHSTEA1 ATMN270B
Spanish MC UMAGCb 1*1G/160/3L/5R/
CB_bg_0.3D_3G_BAG_GEb_ES21
AOD150-0BGb PA ACLA- LU.S630B.004 AOD150-0BGb EM AOXPHSTEA1 ATMN270B
Spanish MC UMAGCb 1*1G/160/6L2.6/5R/
CB_bg_0.3D_3G_BAG_GEb_ES21
AOD150-0BGb PA ACLA- LU.S630B.003 AOD150-0BGb EM AOXPHSTEA3 ATMN270B
Spanish MC UMAGCb 1*1G/160/6L2.6/5R/
CB_bg_0.3D_3G_BAG_GEb_ES21
Appendix A 186
Model RO Country Acer P/N Description CPU
AOD150-1BGb AAP Thailand LU.S630B.001 AOD150-1BGb AOXPHSTTH1 MC ATMN280B
UMAGCb 1*1G/160/BT/6L2.6/5R/
CB_bg_0.3D_3G_BAG_GEb_TH22
AOD150-1BGb AAP Indonesia LU.S630B.002 AOD150-1BGb AOXPHSTID1 MC ATMN280B
UMAGCb 1*1G/160/BT/6L2.6/5R/
CB_bg_0.3D_3G_BAG_GEb_ID23
AOD150-0BGk AAP Singapore LU.S610B.007 AOD150-0BGk AOXPHSTSG1 MC ATMN270B
UMAGCk 1*1G/160/BT/6L2.6/5R/
CB_bg_0.3D_3G_BAG_GEk_EN11
AOD150-1BGk AAP Singapore LU.S610B.006 AOD150-1BGk AOXPHSTSG1 MC ATMN280B
UMAGCk 1*1G/160/BT/6L2.6/5R/
CB_bg_0.3D_3G_BAG_GEk_EN11
AOD150-1BGk EMEA France LU.S610B.005 AOD150-1BGk AOXPHSTFR1 MC ATMN280B
UMAGCk 1*1G/160/BT/6L/5R/
CB_bg_0.3D_3G_BAG_GEk_FR22
AOD150-1BGk AAP Thailand LU.S610B.003 AOD150-1BGk AOXPHSTTH1 MC ATMN280B
UMAGCk 1*1G/160/BT/6L2.6/5R/
CB_bg_0.3D_3G_BAG_GEk_TH22
AOD150-1BGk AAP Indonesia LU.S610B.004 AOD150-1BGk AOXPHSTID1 MC ATMN280B
UMAGCk 1*1G/160/BT/6L2.6/5R/
CB_bg_0.3D_3G_BAG_GEk_ID23_
UNDP-1
AOD150-1BGr AAP Singapore LU.S590B.007 AOD150-1BGr AOXPHSTSG1 MC ATMN280B
UMAGCr 1*1G/160/BT/6L/5R/
CB_bg_0.3D_3G_BAG_GEk_EN11
AOD150-0BGr AAP Singapore LU.S590B.006 AOD150-0BGr AOXPHSTSG1 MC ATMN270B
UMAGCr 1*1G/160/BT/6L/5R/
CB_bg_0.3D_3G_BAG_GEk_EN11
AOD150-1BGr EMEA France LU.S590B.005 AOD150-1BGr AOXPHSTFR1 MC ATMN280B
UMAGCr 1*1G/160/BT/6L/5R/
CB_bg_0.3D_3G_BAG_GEk_FR22
AOD150-1BGr AAP Thailand LU.S590B.003 AOD150-1BGr AOXPHSTTH1 MC ATMN280B
UMAGCr 1*1G/160/BT/6L2.6/5R/
CB_bg_0.3D_3G_BAG_GEk_TH22
AOD150-1BGr AAP Indonesia LU.S590B.004 AOD150-1BGr AOXPHSTID1 MC ATMN280B
UMAGCr 1*1G/160/BT/6L2.6/5R/
CB_bg_0.3D_3G_BAG_GEk_ID23
AOD150-0BGw WW WW S2.S580B.006 AOD150-0BGw AOXPHSTWW1 ATMN270B
MC UMAGCw 1*1G/160/6L2.6/5R/
CB_bg_0.3D_3G_GEw_EN11GTM3
80E
AOD150-0BGw WW WW S2.S580B.005 AOD150-0BGw AOXPHSTWW1 ATMN270B
MC UMAGCw 1*1G/160/6L2.6/5R/
CB_bg_0.3D_3G_GEw_EN11
AOD150-1BGw AAP Singapore LU.S580B.009 AOD150-1BGw AOXPHSTSG1 MC ATMN280B
UMAGCw 1*1G/160/BT/6L/5R/
CB_bg_0.3D_3G_BAG_GEw_EN11
AOD150-0BGw AAP Singapore LU.S580B.008 AOD150-0BGw AOXPHSTSG1 MC ATMN270B
UMAGCw 1*1G/160/BT/6L/5R/
CB_bg_0.3D_3G_BAG_GEw_EN11
AOD150-1BGw AAP Indonesia LU.S580B.005 AOD150-1BGw AOXPHSTID1 MC ATMN280B
UMAGCw 1*1G/160/BT/6L/5R/
CB_bg_0.3D_3G_BAG_GEw_ID23
AOD150-1BGw EMEA France LU.S580B.007 AOD150-1BGw AOXPHSTFR1 MC ATMN280B
UMAGCw 1*1G/160/BT/6L/5R/
CB_bg_0.3D_3G_BAG_GEw_FR22
187 Appendix A
Model RO Country Acer P/N Description CPU
AOD150-0BGw AAP Indonesia LU.S580B.006 AOD150-0BGw AOXPHSTID1 MC ATMN270B
UMAGCw 1*1G/160/BT/6L/5R/
CB_bg_0.3D_3G_BAG_GEw_ID23
AOD150-1BGw AAP Indonesia LU.S580B.004 AOD150-1BGw AOXPHSTID1 MC ATMN280B
UMAGCw 1*1G/160/BT/6L2.6/5R/
CB_bg_0.3D_3G_BAG_GEw_ID23
AOD150-0BGw WW WW S2.S580B.002 AOD150-0BGw AOXPHSTWW1 ATMN270B
MC UMAGCw 1*1G/160/BT/6L2.6/
CB_bg_0.3D_3G_GEw_EN11for
Taiwan
AOD150-0BGw WW WW S2.S580B.001 AOD150-0BGw AOXPHSTWW1 ATMN270B
MC UMAGCw 1*1G/160/BT/6L2.6/
CB_bg_0.3D_3G_GEw_EN11
AOD150-1BGw AAP Thailand LU.S580B.003 AOD150-1BGw AOXPHSTTH1 MC ATMN280B
UMAGCw 1*1G/160/BT/6L2.6/5R/
CB_bg_0.3D_3G_BAG_GEw_TH22
AOD150-0BGw WW WW S2.S580B.003 AOD150-0BGw AOXPHSTWW1 ATMN270B
MC UMAGCw 1*1G/160/BT/6L/
CB_bg_0.3D_3G_GEw_EN11for
Gobi
AOD150-0BGw WW WW S2.S580B.004 AOD150-0BGw AOXPHSTWW1 ATMN270B
MC UMAGCw 1*1G/160/6L/
CB_bg_0.3D_3G_GEw_EN11for
Gobi Taiwan
Model LCD Memory 1 HDD 1(GB) Card Reader Wireless LAN BT
AOD150-0Bb NLED10.1WSV SO1GBII6 N160GB5.4KS 5 in 1-Build in 3rd WiFi BG N
GAG
AOD150-0Bb NLED10.1WSV SO1GBII6 N160GB5.4KS 5 in 1-Build in 3rd WiFi BG N
GAG
AOD150-1Bb NLED10.1WSV SO1GBII6 N160GB5.4KS 5 in 1-Build in 3rd WiFi BG BT 2.0
GAG
AOD150-0Bb NLED10.1WSV SO1GBII6 N160GB5.4KS 5 in 1-Build in 3rd WiFi BG BT 2.0
GAG
AOD150-1Bb NLED10.1WSV SO1GBII6 N160GB5.4KS 5 in 1-Build in 3rd WiFi BG BT 2.0
GAG
AOD150-0Bb NLED10.1WSV SO1GBII6 N160GB5.4KS 5 in 1-Build in 3rd WiFi BG N
GAG
AOD150-0Bb NLED10.1WSV SO1GBII6 N160GB5.4KS 5 in 1-Build in 3rd WiFi BG N
GAG
AOD150-0Bb NLED10.1WSV SO1GBII6 N160GB5.4KS 5 in 1-Build in 3rd WiFi BG N
GAG
AOD150-0Bb NLED10.1WSV SO1GBII6 N160GB5.4KS 5 in 1-Build in 3rd WiFi BG N
GAG
AOD150-0Bb NLED10.1WSV SO1GBII6 N160GB5.4KS 5 in 1-Build in 3rd WiFi BG N
GAG
AOD150-1Bb NLED10.1WSV SO1GBII6 N160GB5.4KS 5 in 1-Build in 3rd WiFi BG N
GAG
AOD150-1Bb NLED10.1WSV SO1GBII6 N160GB5.4KS 5 in 1-Build in 3rd WiFi BG N
GAG
AOD150-1Bb NLED10.1WSV SO1GBII6 N160GB5.4KS 5 in 1-Build in 3rd WiFi BG N
GAG
AOD150-1Bb NLED10.1WSV SO1GBII6 N160GB5.4KS 5 in 1-Build in 3rd WiFi BG N
GAG
AOD150-1Bb NLED10.1WSV SO1GBII6 N160GB5.4KS 5 in 1-Build in 3rd WiFi BG N
GAG
Appendix A 188
Model LCD Memory 1 HDD 1(GB) Card Reader Wireless LAN BT
AOD150-1Bb NLED10.1WSV SO1GBII6 N160GB5.4KS 5 in 1-Build in 3rd WiFi BG N
GAG
AOD150-1Bb NLED10.1WSV SO1GBII6 N160GB5.4KS 5 in 1-Build in 3rd WiFi BG N
GAG
AOD150-1Bb NLED10.1WSV SO1GBII6 N160GB5.4KS 5 in 1-Build in 3rd WiFi BG N
GAG
AOD150-1Bb NLED10.1WSV SO1GBII6 N160GB5.4KS 5 in 1-Build in 3rd WiFi BG N
GAG
AOD150-1Bb NLED10.1WSV SO1GBII6 N160GB5.4KS 5 in 1-Build in 3rd WiFi BG N
GAG
AOD150-1Bb NLED10.1WSV SO1GBII6 N160GB5.4KS 5 in 1-Build in 3rd WiFi BG N
GAG
AOD150-1Bb NLED10.1WSV SO1GBII6 N160GB5.4KS 5 in 1-Build in 3rd WiFi BG N
GAG
AOD150-1Bb NLED10.1WSV SO1GBII6 N160GB5.4KS 5 in 1-Build in 3rd WiFi BG N
GAG
AOD150-1Bb NLED10.1WSV SO1GBII6 N160GB5.4KS 5 in 1-Build in 3rd WiFi BG N
GAG
AOD150-1Bb NLED10.1WSV SO1GBII6 N160GB5.4KS 5 in 1-Build in 3rd WiFi BG N
GAG
AOD150-1Bb NLED10.1WSV SO1GBII6 N160GB5.4KS 5 in 1-Build in 3rd WiFi BG N
GAG
AOD150-1Bb NLED10.1WSV SO1GBII6 N160GB5.4KS 5 in 1-Build in 3rd WiFi BG N
GAG
AOD150-1Bb NLED10.1WSV SO1GBII6 N160GB5.4KS 5 in 1-Build in 3rd WiFi BG N
GAG
AOD150-1Bb NLED10.1WSV SO1GBII6 N160GB5.4KS 5 in 1-Build in 3rd WiFi BG N
GAG
AOD150-1Bb NLED10.1WSV SO1GBII6 N160GB5.4KS 5 in 1-Build in 3rd WiFi BG N
GAG
AOD150-1Bb NLED10.1WSV SO1GBII6 N160GB5.4KS 5 in 1-Build in 3rd WiFi BG N
GAG
AOD150-1Bb NLED10.1WSV SO1GBII6 N160GB5.4KS 5 in 1-Build in 3rd WiFi BG N
GAG
AOD150-1Bb NLED10.1WSV SO1GBII6 N160GB5.4KS 5 in 1-Build in 3rd WiFi BG N
GAG
AOD150-1Bb NLED10.1WSV SO1GBII6 N160GB5.4KS 5 in 1-Build in 3rd WiFi BG N
GAG
AOD150-1Bb NLED10.1WSV SO1GBII6 N160GB5.4KS 5 in 1-Build in 3rd WiFi BG N
GAG
AOD150-1Bb NLED10.1WSV SO1GBII6 N160GB5.4KS 5 in 1-Build in 3rd WiFi BG N
GAG
AOD150-1Bb NLED10.1WSV SO1GBII6 N160GB5.4KS 5 in 1-Build in 3rd WiFi BG N
GAG
AOD150-1Bb NLED10.1WSV SO1GBII6 N160GB5.4KS 5 in 1-Build in 3rd WiFi BG N
GAG
AOD150-1Bb NLED10.1WSV SO1GBII6 N160GB5.4KS 5 in 1-Build in 3rd WiFi BG N
GAG
AOD150-1Bb NLED10.1WSV SO1GBII6 N160GB5.4KS 5 in 1-Build in 3rd WiFi BG N
GAG
AOD150-1Bb NLED10.1WSV SO1GBII6 N160GB5.4KS 5 in 1-Build in 3rd WiFi BG N
GAG
AOD150-1Bb NLED10.1WSV SO1GBII6 N160GB5.4KS 5 in 1-Build in 3rd WiFi BG N
GAG
189 Appendix A
Model LCD Memory 1 HDD 1(GB) Card Reader Wireless LAN BT
AOD150-1Bb NLED10.1WSV SO1GBII6 N160GB5.4KS 5 in 1-Build in 3rd WiFi BG N
GAG
AOD150-1Bb NLED10.1WSV SO1GBII6 N160GB5.4KS 5 in 1-Build in 3rd WiFi BG N
GAG
AOD150-1Bb NLED10.1WSV SO1GBII6 N160GB5.4KS 5 in 1-Build in 3rd WiFi BG N
GAG
AOD150-1Bb NLED10.1WSV SO1GBII6 N160GB5.4KS 5 in 1-Build in 3rd WiFi BG N
GAG
AOD150-1Bb NLED10.1WSV SO1GBII6 N160GB5.4KS 5 in 1-Build in 3rd WiFi BG N
GAG
AOD150-1Bb NLED10.1WSV SO1GBII6 N160GB5.4KS 5 in 1-Build in 3rd WiFi BG N
GAG
AOD150-1Bb NLED10.1WSV SO1GBII6 N160GB5.4KS 5 in 1-Build in 3rd WiFi BG N
GAG
AOD150-1Bb NLED10.1WSV SO1GBII6 N160GB5.4KS 5 in 1-Build in 3rd WiFi BG N
GAG
AOD150-1Bb NLED10.1WSV SO1GBII6 N160GB5.4KS 5 in 1-Build in 3rd WiFi BG N
GAG
AOD150-1Bb NLED10.1WSV SO1GBII6 N160GB5.4KS 5 in 1-Build in 3rd WiFi BG N
GAG
AOD150-1Bb NLED10.1WSV SO1GBII6 N160GB5.4KS 5 in 1-Build in 3rd WiFi BG N
GAG
AOD150-1Bb NLED10.1WSV SO1GBII6 N160GB5.4KS 5 in 1-Build in 3rd WiFi BG N
GAG
AOD150-1Bb NLED10.1WSV SO1GBII6 N160GB5.4KS 5 in 1-Build in 3rd WiFi BG N
GAG
AOD150-1Bb NLED10.1WSV SO1GBII6 N160GB5.4KS 5 in 1-Build in 3rd WiFi BG BT 2.0
GAG
AOD150-0Bb NLED10.1WSV SO1GBII6 N160GB5.4KS 5 in 1-Build in 3rd WiFi BG BT 2.0
GAG
AOD150-1Bb NLED10.1WSV SO1GBII6 N160GB5.4KS 5 in 1-Build in 3rd WiFi BG BT 2.0
GAG
AOD150-0Bb NLED10.1WSV SO1GBII6 N160GB5.4KS 5 in 1-Build in 3rd WiFi BG BT 2.0
GAG
AOD150-0Bb NLED10.1WSV SO1GBII6 N160GB5.4KS 5 in 1-Build in 3rd WiFi BG BT 2.0
GAG
AOD150-1Bb NLED10.1WSV SO1GBII6 N160GB5.4KS 5 in 1-Build in 3rd WiFi BG BT 2.0
GAG
AOD150-0Bb NLED10.1WSV SO1GBII6 N160GB5.4KS 5 in 1-Build in 3rd WiFi BG BT 2.0
GAG
AOD150-0Bb NLED10.1WSV SO1GBII6 N160GB5.4KS 5 in 1-Build in 3rd WiFi BG N
GAG
AOD150-0Bb NLED10.1WSV SO1GBII6 N160GB5.4KS 5 in 1-Build in 3rd WiFi BG BT 2.0
GAG
AOD150-1Bb NLED10.1WSV SO1GBII6 N160GB5.4KS 5 in 1-Build in 3rd WiFi BG BT 2.0
GAG
AOD150-0Bb NLED10.1WSV SO1GBII6 N160GB5.4KS 5 in 1-Build in 3rd WiFi BG BT 2.0
GAG
AOD150-1Bb NLED10.1WSV SO1GBII6 N160GB5.4KS 5 in 1-Build in 3rd WiFi BG BT 2.0
GAG
AOD150-1Bb NLED10.1WSV SO1GBII6 N160GB5.4KS 5 in 1-Build in 3rd WiFi BG BT 2.0
GAG
AOD150-0Bb NLED10.1WSV SO1GBII6 N160GB5.4KS 5 in 1-Build in 3rd WiFi BG BT 2.0
GAG
Appendix A 190